{"section":"tutorials","requestedLocale":"en","requestedSlug":"vtex-pick-and-pack-settings","locale":"en","slug":"vtex-pick-and-pack-settings","path":"docs/en/tutorials/shipping/vtex-pick-and-pack/vtex-pick-and-pack-settings.md","branch":"main","content":"> ℹ️ This feature is in closed beta, so only selected customers can access it now. If you want to implement it in the future, please complete our [form](https://vtex.com/us-en/contact/) apontaby entering the product name in the `Comments` field.\n\n**Settings** is a VTEX Admin page that allows you to select the VTEX Pick and Pack settings for your store. The settings are distributed in the following tabs:\n\n- [Orders](#orders)\n - [Filters](#filters)\n- [Worksheets](#worksheets)\n - [General](#general)\n - [Label](#label)\n - [Picking](#picking)\n- [Packing](#packing)\n - [General](#general-1)\n - [Packaging types](#packaging-types)\n- [Items](#items)\n - [General](#general-2)\n - [Categories](#categories)\n - [Catalog](#catalog)\n- [Automation](#automation)\n - [Worksheets](#worksheets-1)\n - [Orders](#orders-1)\n - [Shipping services](#shipping-services)\n- [Users](#users)\n- [Integration](#integration)\n - [Webhook](#webhook)\n - [API key](#api-key)\n\n## Orders\n\nIn this section, you can configure settings for orders processed by VTEX Pick and Pack.\n\n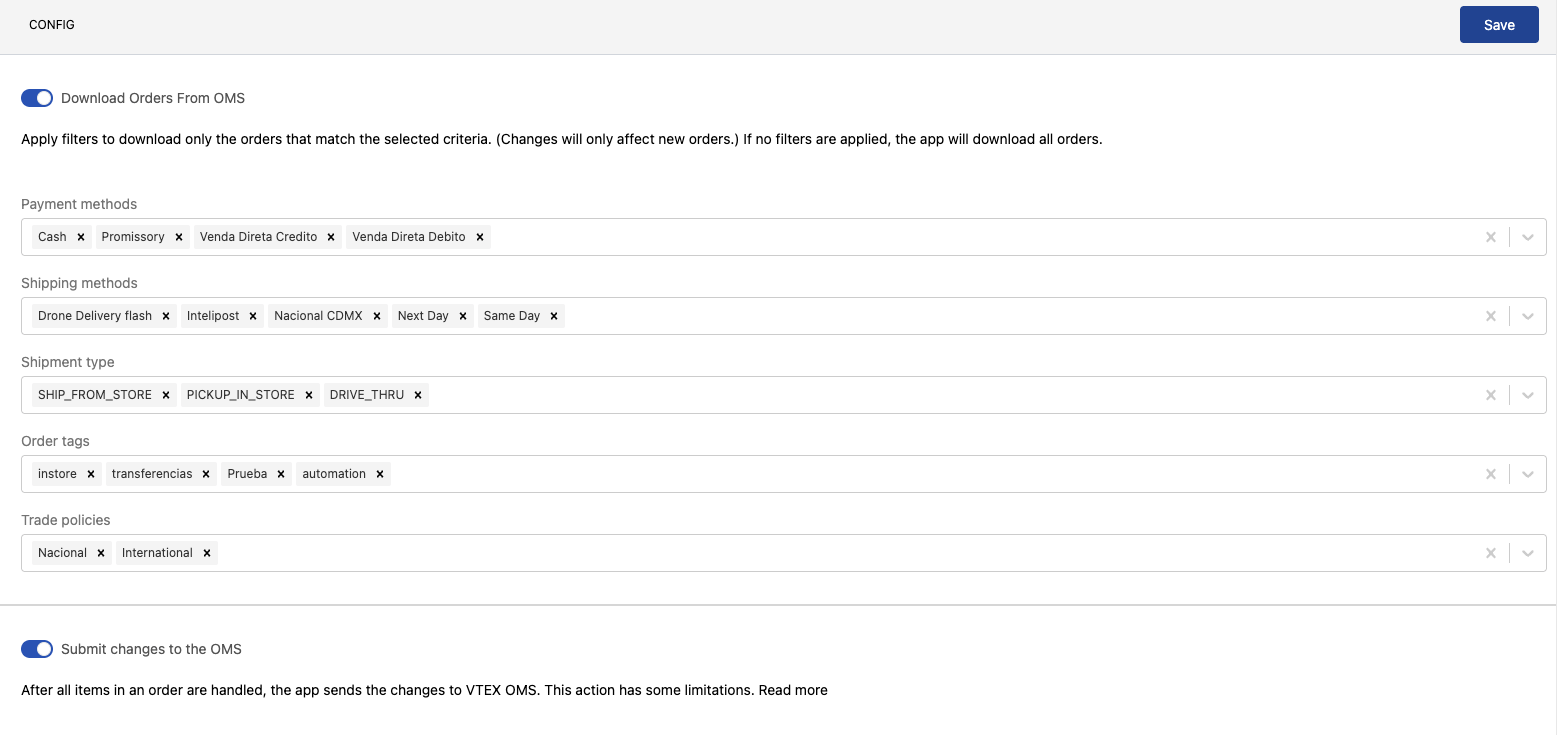\n\n- **Download orders from OMS**: Allows exporting orders from the VTEX Orders module.\n\n>ℹ️ The filters below only apply to new orders placed after the export. If no filters are set, all orders will be downloaded.\n\n### Filters\n\nThe following filters determine which orders will be downloaded:\n\n- **Payment methods**: Payment methods used in the orders being exported.\n- **Shipping method**: Shipping methods used in the orders being exported.\n- **Shipment type**: Shipping types used in the orders being exported (`SHIP_FROM_STORE`, `PICKUP_IN_STORE`, or `DRIVE_THRU`).\n- **Order tags**: Restricts the download to orders that have certain tags.\n- **Sales channels**: [Sales channels](https://help.vtex.com/en/tutorial/como-funciona-uma-politica-comercial--6Xef8PZiFm40kg2STrMkMV) applied to the orders being exported.\n- **Submit changes to OMS**: Allows submitting the changes (replacements, rejections, or modifications) made to the handled orders to the [VTEX Orders module](https://help.vtex.com/en/tutorial/gerenciamento-de-pedidos-visao-geral--tutorials_201). Orders must have their worksheet completed and no items pending picking or packing in the OMS to be valid in this filter.\n\nClick `Save` to save the changes in the section.\n\n## Worksheets\n\nIn this section, you can configure the settings that will be applied to store [worksheets](https://help.vtex.com/en/tutorial/vtex-pick-and-pack-ordens-de-servico--7bUwvmTY6eOqxzhyMIIzvz). A worksheet consists of a single order or a set of orders that will be processed by the Pick and Pack flow simultaneously.\n\n### General\n\n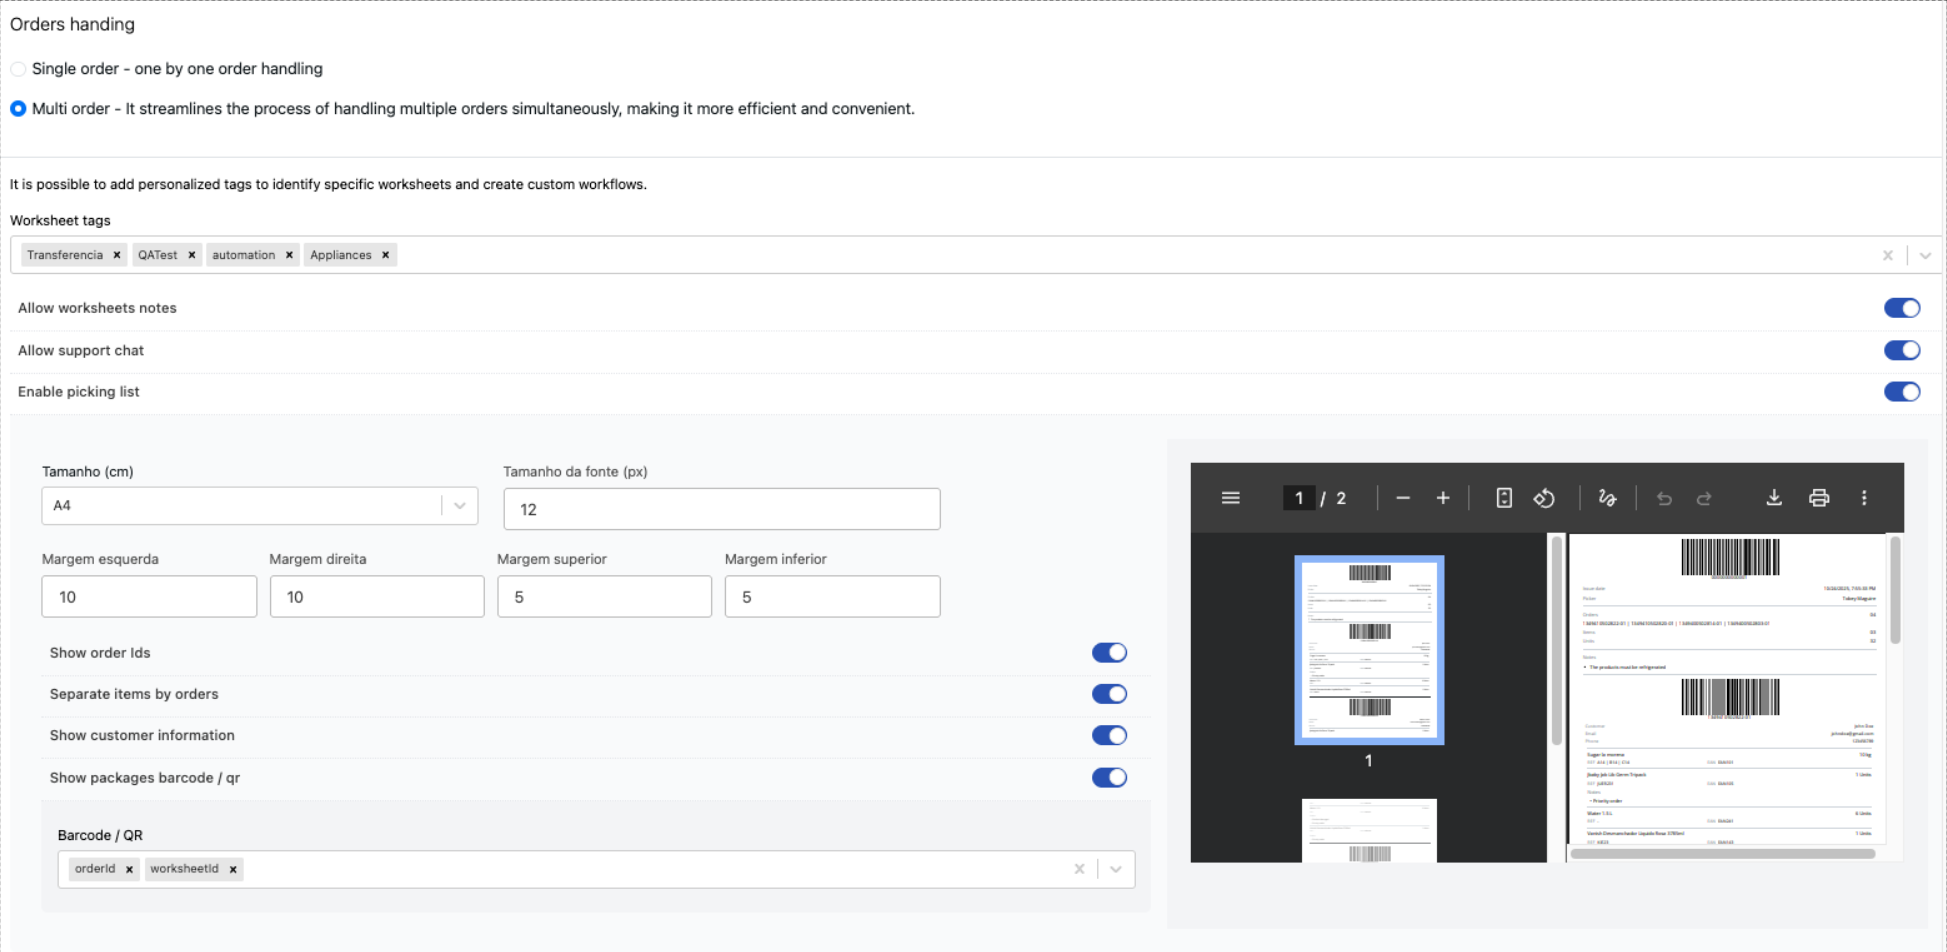\n\n- **Single order**: Limits each worksheet to a single order.\n- **Multi order**: Allows a worksheet to group more than one order.\n- **Worksheet tags**: Custom tags that help identify worksheets. Tags can be viewed on the [pending worksheets](https://help.vtex.com/en/tutorial/vtex-pick-and-pack-mobile--3i1K01CQlDBFYYp42WFOet#ordens-de-servico-pendentes) screen in the Pick and Pack mobile app.\n- **Allow worksheet notes**: Enables the picker [to add notes to the worksheet](https://help.vtex.com/en/tutorial/vtex-pick-and-pack-mobile--3i1K01CQlDBFYYp42WFOet#ordens-de-servico-pendentes).\n- **Allow support chat**: Enables a chat between the picker and the merchant through the VTEX Admin.\n- **Enable picking list**: List that contains the necessary worksheet information for the picker to pick items. This information can be printed in label format.\n\n### Label\n\nYou can define the information that will be displayed on the picking list, printed, and added to the order package.\n\n- **Size (in)**: Print format for the label.\n- **Font size (px)**: Font size in pixels that will be used for printing the label.\n- **Margin left**: Size of left label margin in millimeters.\n- **Margin right**: Size of the right label margin in millimeters.\n- **Margin top**: Size of top label margin in millimeters.\n- **Margin bottom**: Size of bottom label margin in millimeters.\n- **Show order IDs**: Displays order IDs on the label.\n- **Separate items by orders**: Allows generating one label per order.\n- **Show customer information**: Displays customer information on the label.\n- **Show package barcode / QR**: Displays the barcode or QR code on the label.\n- **Barcode / QR**: If the **Show package barcode / QR** option is enabled, this allows choosing whether the barcode with the order number, the worksheet number, or both will appear on the label.\n\nClick `Save` to save the changes in the section.\n\n### Picking\n\n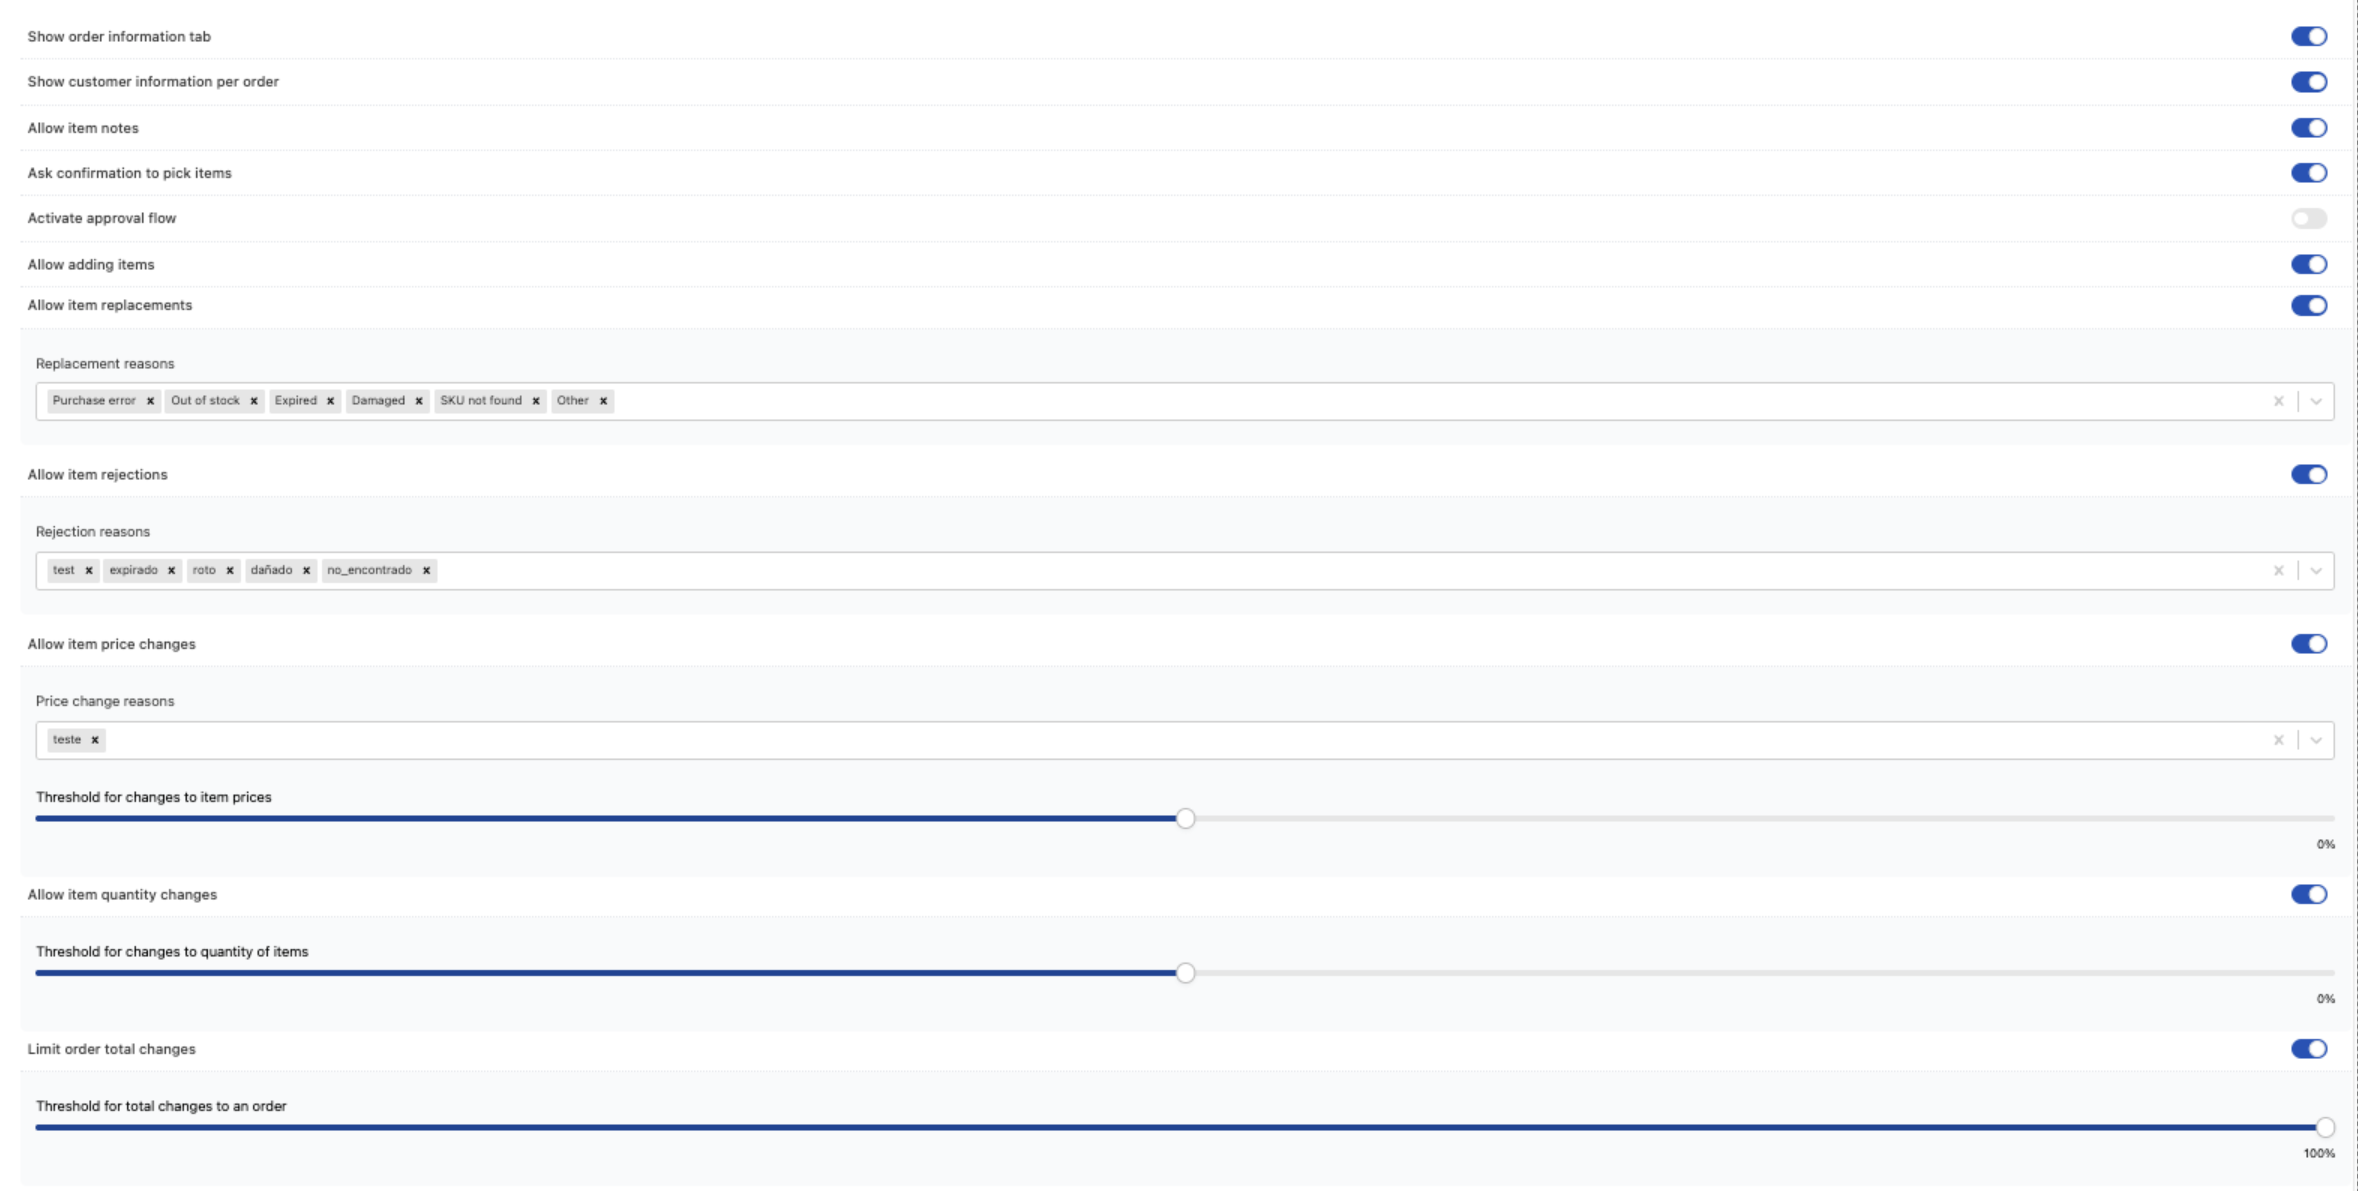\n\n- **Show order information tab**: Displays the order information tab to the picker in the worksheet, both in the [VTEX Admin](https://help.vtex.com/en/tutorial/vtex-pick-and-pack-ordens-de-servico--7bUwvmTY6eOqxzhyMIIzvz) or in the [Pick and Pack mobile app](https://help.vtex.com/en/tutorial/vtex-pick-and-pack-mobile--3i1K01CQlDBFYYp42WFOet#ordens-de-servico-pendentes).\n- **Show customer information per order**: Displays the customer information tab to the picker.\n- **Allow item notes**: Allows the picker to [add notes to order items during picking](https://help.vtex.com/en/tutorial/vtex-pick-and-pack-mobile--3i1K01CQlDBFYYp42WFOet#ordens-de-servico-pendentes).\n- **Ask confirmation to pick items**: Enables extra validation in the Pick and Pack app that requires the picker to confirm an item when picking it.\n- **Activate approval flow**: Requires admin approval for picking items.\n- **Allow adding items**: Allows the picker to [add new items during picking](https://help.vtex.com/en/tutorial/vtex-pick-and-pack-mobile--3i1K01CQlDBFYYp42WFOet#adicionar-novos-produtos-a-um-pedido).\n- **Allow item replacements**: Allows the picker to [replace items during picking](https://help.vtex.com/en/tutorial/vtex-pick-and-pack-mobile--3i1K01CQlDBFYYp42WFOet#substituir-itens).\n- **Replacement reasons**: Reasons for [item replacement](https://help.vtex.com/en/tutorial/vtex-pick-and-pack-mobile--3i1K01CQlDBFYYp42WFOet#substituir-itens) that the picker will be able to select in the [Pick and Pack mobile app](https://help.vtex.com/en/tutorial/vtex-pick-and-pack-mobile--3i1K01CQlDBFYYp42WFOet). The replacement reasons you add aren't translated when the picker selects another language in the Pick and Pack mobile app.\n- **Allow item rejections**: Allows the picker to [reject items during picking](https://help.vtex.com/en/tutorial/vtex-pick-and-pack-mobile--3i1K01CQlDBFYYp42WFOet#recusar-itens).\n- **Rejection reasons**: Reasons for [rejecting items](https://help.vtex.com/en/tutorial/vtex-pick-and-pack-mobile--3i1K01CQlDBFYYp42WFOet#recusar-itens) that the picker will be able to select in the [Pick and Pack mobile app](https://help.vtex.com/en/tutorial/vtex-pick-and-pack-mobile--3i1K01CQlDBFYYp42WFOet). The rejection reasons you add aren't translated when the picker selects another language in the Pick and Pack mobile app.\n- **Allow item price changes**: Allows the picker to change the price of items during picking.\n- **Price change reasons**: Price change reasons that the picker will be able to select in the [Pick and Pack mobile app](https://help.vtex.com/en/tutorial/vtex-pick-and-pack-mobile--3i1K01CQlDBFYYp42WFOet). The price change reasons you add aren't translated when the picker selects another language in the Pick and Pack mobile app.\n- **Threshold for changes to item price**: Limit for changes to item price in an order. **100%** is the maximum amount that can be added to the original price when making a change (calculated over the original item price). `-100%` is the minimum.\n- **Allow item quantity changes**: Allows the picker to [change the quantity of items during picking](https://help.vtex.com/en/tutorial/vtex-pick-and-pack-mobile--3i1K01CQlDBFYYp42WFOet#alterar-a-quantidade-de-um-produto).\n- **Threshold for changes to item quantity**: Quantity change limits for items in an order. **100%** is the maximum value that can be added to the original quantity when making a change (calculated over the original item quantity). `-100%` is the minimum.\n- **Limit order total changes**: Limits the changes that a picker can make to the order total. **100%** is the maximum amount that can be added to the final order total when making a change (calculated from the original order value). `-100%` is the minimum.\n- **Threshold for total changes to an order**: Maximum number of changes (replacements, rejections, and new items) that can be made to an order.\n\nClick `Save` to save the changes in the section.\n\n## Packing\n\nIn this section, you'll find the packing settings for order items.\n\n### General\n\n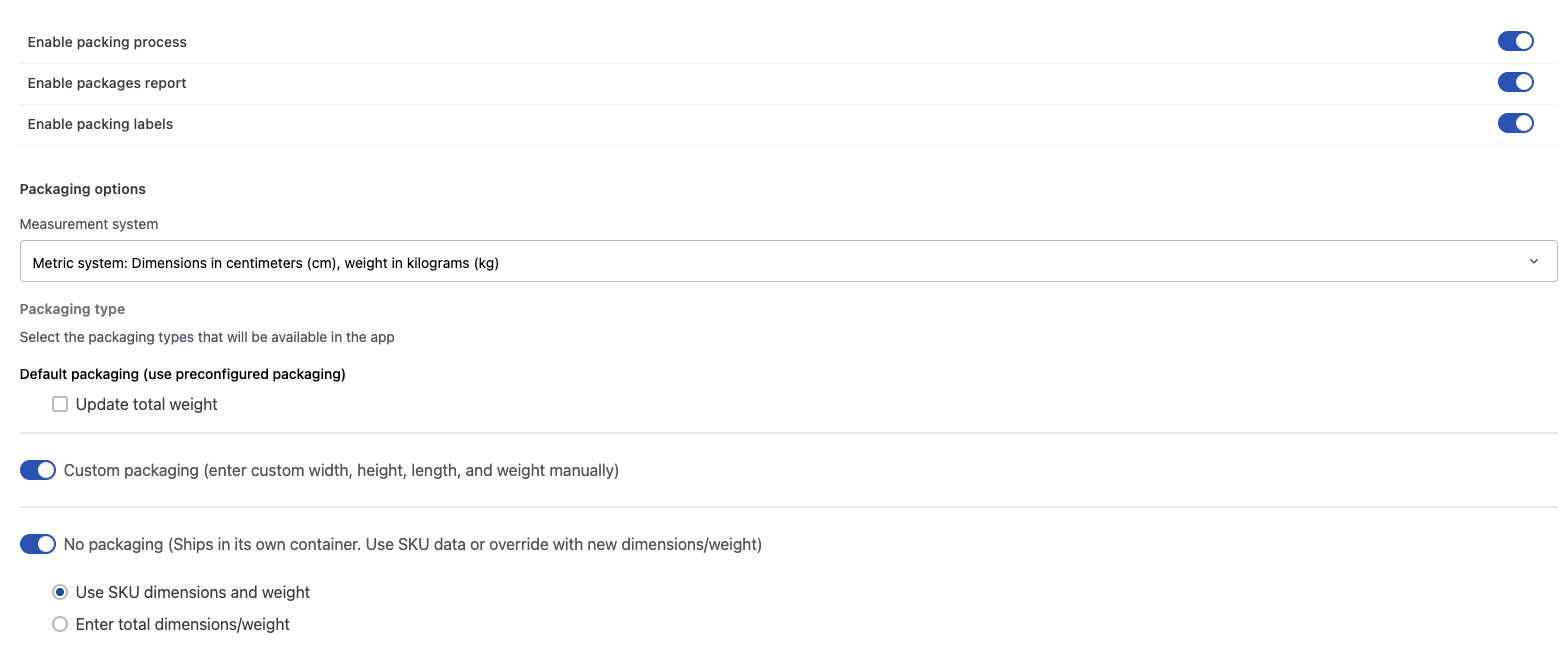\n\n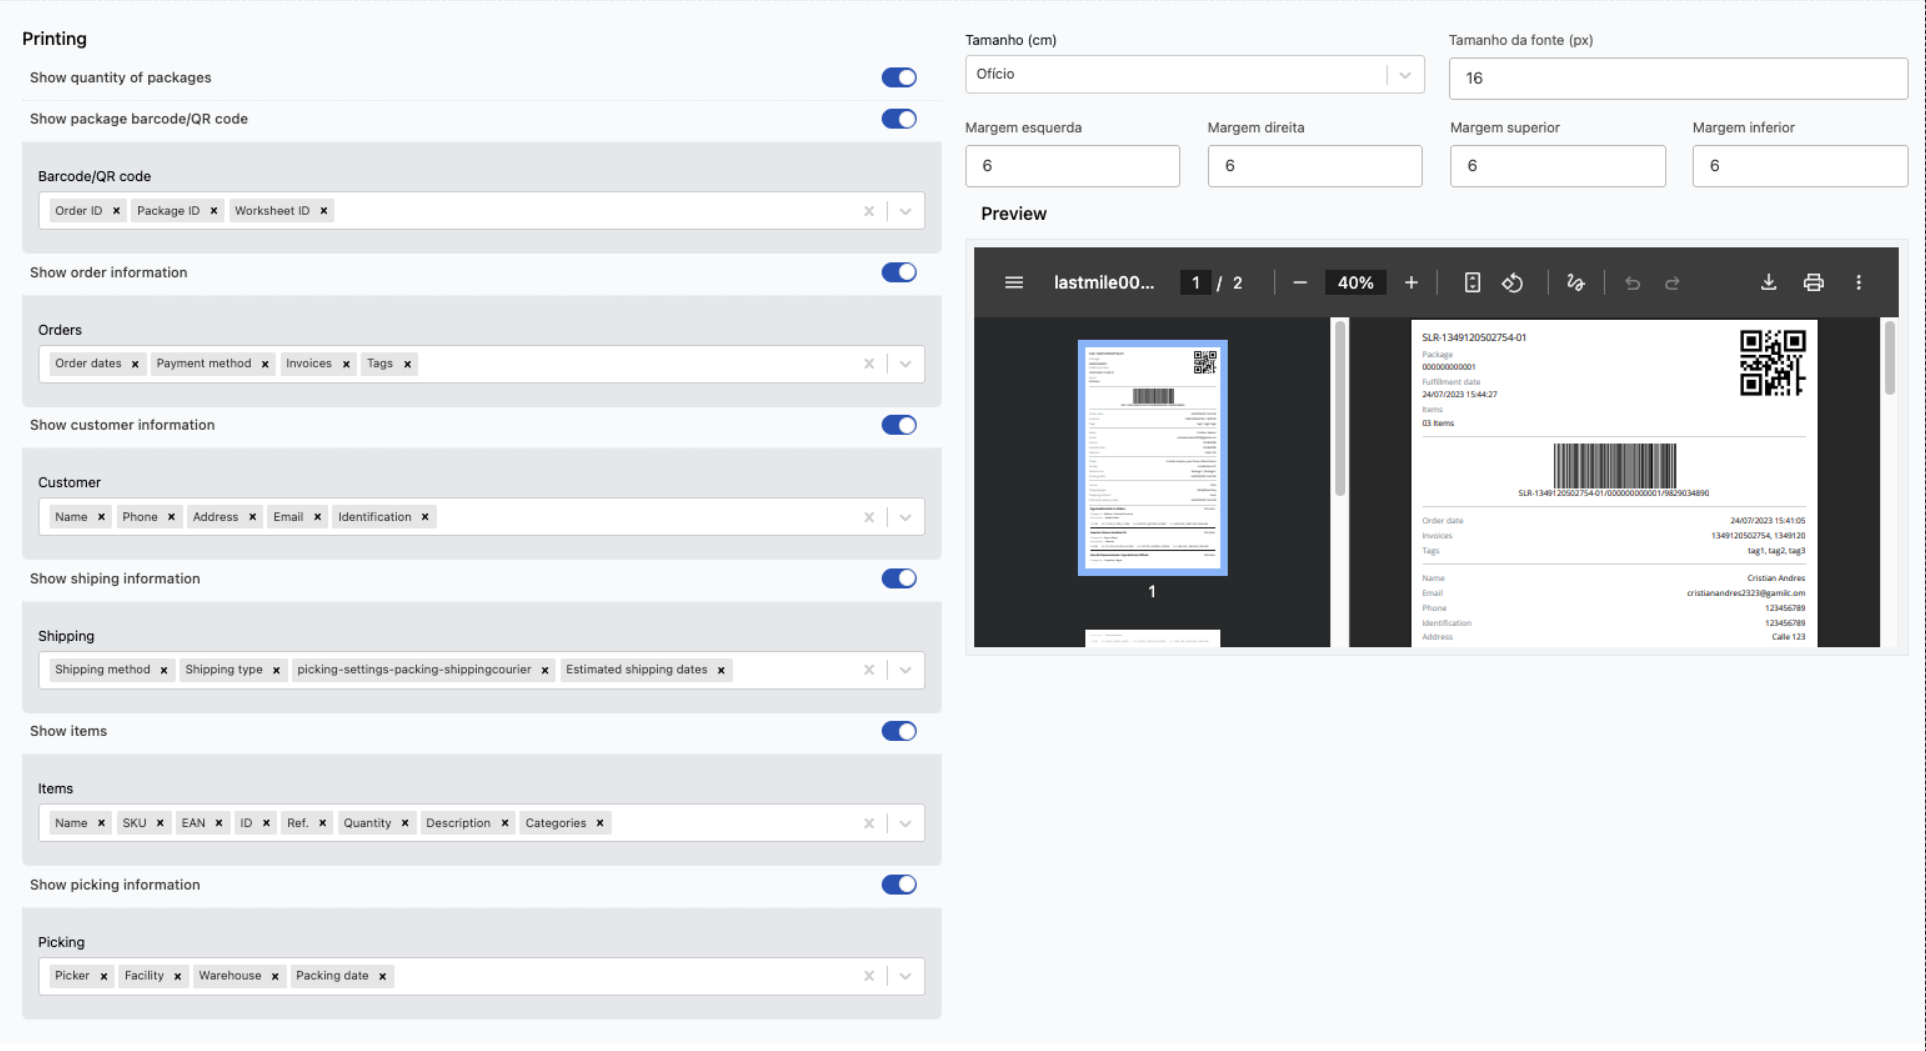\n\n- **Enable packing process**: Enables the [packing flow](https://help.vtex.com/en/tutorial/vtex-pick-and-pack-mobile--3i1K01CQlDBFYYp42WFOet#empacotamento) performed for the picker.\n- **Enable packages report**: Enables displaying a report about the packages. This option is currently disabled.\n- **Enable packing labels**: Enables generating labels for packing orders and shows the label settings on the page.\n- **Packaging options**: Settings for the packaging that will be used during packing. The following options are available:\n - **Measurement system**: Allows selecting between metric or imperial system for package dimensions and weight.\n - **Update total weight**: Displays a modal in the Pick and Pack app for the picker to enter the total package weight. If disabled, the modal is not shown and the packing process is started.\n- **Custom packaging**: Displays a form for the picker to enter the dimensions and weight of custom packaging in the Pick and Pack app.\n- **No packaging**: Allows using the packaging of the items to ship the order.\n - **Use SKU dimensions and weight**: Uses the SKU dimensions and weight as the dimensions and weight of the packaging. If the SKU doesn't have this information, the custom packaging dimensions and weight form will be displayed.\n - **Enter total dimensions/weight**: Allows entering the item dimensions and weight.\n- **Show quantity of packages**: Displays the number of packages on the printed label.\n- **Show package barcode/QR code**: Displays a barcode or QR code generated from the information of the **Barcode/QR code** field.\n- **Show order information**: Displays order details on the printed label. In the **Orders** field, select the information you want to display.\n- **Show customer information**: Displays customer details on the printed label. In the **Customer** field, select the information you want to display.\n- **Show shipping information**: Displays shipping details on the printed label. In the **Shipping** field, select the details you want to display.\n- **Show items**: Displays order item details on the printed label. In the **Items** field, select the details you want to display.\n- **Show picking information**: Displays item picking details on the printed label. In the **Picking** field, select the information you want to display.\n- **Size (in)**: Format for printing the invoice in inches.\n- **Font size (px)**: Font size that will be used on the printed label in pixels.\n- **Margin left**: Size of the printed label left margin in millimeters.\n- **Margin right**: Size of the right margin of the printed label in millimeters.\n- **Margin top**: Size of the top margin of the printed label in millimeters.\n- **Margin bottom**: Size of the bottom margin of the printed label in millimeters.\n\nClick `Save` to save the changes in the section.\n\n### Packaging types\n\n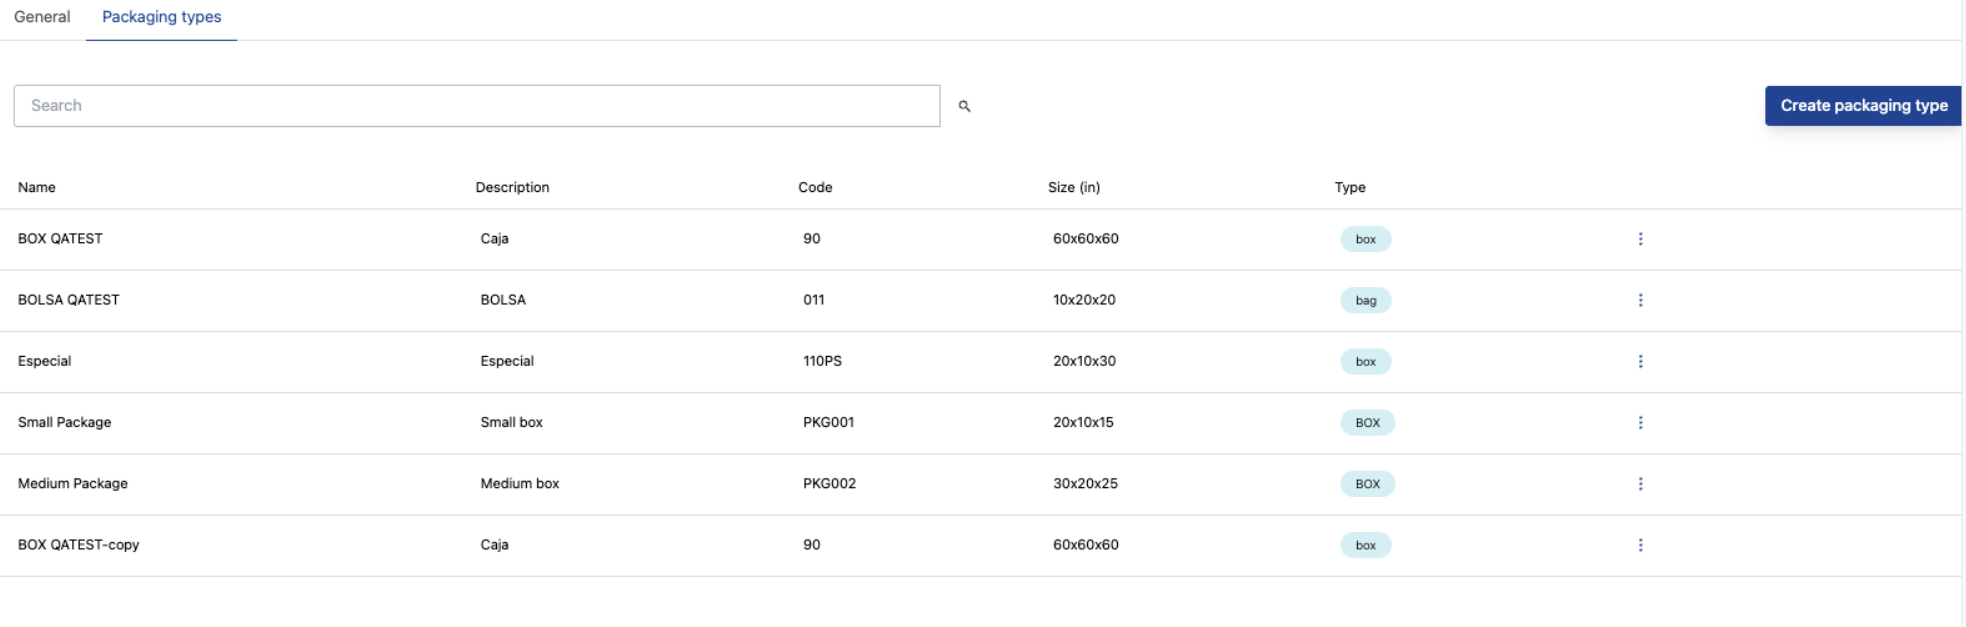\n\nThis page is organized as follows:\n\n| Column | Description |\n| ------------ | ------------------------------------------------ |\n| **Name** | Name of the packaging. |\n| **Description** | Description with details about the packaging. |\n| **Code** | Unique packaging code. |\n| **Size (in)**| Packaging size in inches. |\n| **Type** | Type of packaging: `Box`, `Bag`, `Envelopes`, `Tape`, or `Paper`. |\n\nTo create a new packaging type, follow the steps below:\n\n1. In VTEX Admin, go to **Shipping > Pick and Pack > Settings**, or search for **Settings** in the search bar.\n2. Click the **Packing** section and then the **Packaging types** tab.\n3. Click the `Create packaging type` button.\n4. Complete the following fields:\n - **Name**: Name of the packaging type.\n - **Type**: Type of packaging, which can be `Box`, `Bag`, `Envelopes`, `Tape`, or `Paper`.\n - **Description**: Description with details about the packaging.\n - **Code**: Unique code for the packaging.\n - **Length**: Package length in centimeters.\n - **Height**: Package height in centimeters.\n - **Width**: Package width in centimeters.\n - **Max weight**: Maximum weight of the packaging.\n5. Click `Save`.\n\nTo edit a packaging type, follow the steps below:\n\n1. In VTEX Admin, go to **Shipping > Pick and Pack > Settings**, or search for **Settings** in the search bar.\n2. Click the **Packing** section and then the **Packaging types** tab.\n3. Click for the packaging type you want to edit.\n4. Click `Edit`.\n5. Edit the information of the packaging type.\n6. Click `Save`.\n\nTo duplicate a packaging type, follow the steps below:\n\n1. In VTEX Admin, go to **Shipping > Pick and Pack > Settings**, or search for **Settings** in the search bar.\n2. Click the **Packing** section and then the **Packaging types** tab.\n3. Click for the packaging type you want to duplicate.\n4. Click `Duplicate`.\n5. Click `Confirm`.\n\n**To delete a packaging type, follow the steps below:**\n\n1. In VTEX Admin, go to **Shipping > Pick and Pack > Settings**, or search for **Settings** in the search bar.\n2. Click the **Packing** section and then the **Packaging types** tab.\n3. Click for the packaging type you want to delete.\n4. Click `Delete`.\n5. Click `Confirm`.\n\n## Items\n\nIn this section, you'll find the item settings displayed in the VTEX Pick and Pack mobile app.\n\n### General\n\nIn this section, you can define the item details that will be shown in the mobile app and add other information to help the picker locate items.\n\n\n\n- **Item card information in picking app**: Information about the products that will be displayed on the item card in the [Pick and Pack mobile app](https://help.vtex.com/en/tutorial/vtex-pick-and-pack-mobile--3i1K01CQlDBFYYp42WFOet).\n- **Enable item transfer**: Allows fulfilling an item from a location different from the facility that was originally specified.\n- **Enable item location**: Assigns a unique code to each SKU to facilitate locating items in the store or warehouse. For more information about this setting, check [Pick and Pack Order changes API](https://developers.vtex.com/docs/api-reference/pick-and-pack-order-changes-).\n- **Codes**: Item location code. For more information about this setting, check [Pick and Pack Order changes API](https://developers.vtex.com/docs/api-reference/pick-and-pack-order-changes-).\n- **Example**: Field that lets you preview how the location code will be generated. For more information about this setting, check [Pick and Pack Order changes API](https://developers.vtex.com/docs/api-reference/pick-and-pack-order-changes-).\n- **Separator**: Symbol that will separate each section of information in the location code. For more information about this setting, check [Pick and Pack Order changes API](https://developers.vtex.com/docs/api-reference/pick-and-pack-order-changes-).\n- **Assign product brands to**: Defines the space (**BIN**, zone, section, or aisle) that brands will be in. For more information about this setting, check [Pick and Pack Order changes API](https://developers.vtex.com/docs/api-reference/pick-and-pack-order-changes-).\n- **Assign product categories to**: Defines the space (**BIN**, zone, section, or aisle) that categories will be in. For more information about this setting, check [Pick and Pack Order changes API](https://developers.vtex.com/docs/api-reference/pick-and-pack-order-changes-).\n- **Enable dynamic barcodes**: When enabled ``, allows generating EANs based on:\n\n | **Price**|**Weight**|\n | --- | --- |\n | Format: `Digit-Item-Price-CheckDigit`
If the price is $12.90, the digits are converted as `01290`.
Example: `20-01234-01290-1` | Format: `Digit-Item-Weight-CheckDigit`
If the weight is 200 g, the digits are converted ass `00200`.
Example: `20-01234-00200-1` |\n\n- **Dynamic barcode types**: Defines whether the dynamic barcodes will be based on price, weight, or item quantity. After selecting the barcode type, complete the fields with the numeric values of the code.\n\n### Categories\n\nIn this section, you will define the product category hierarchy that will be displayed in the mobile app. The configured list is used to sort items when picking using the Pick and Pack mobile app.\n\n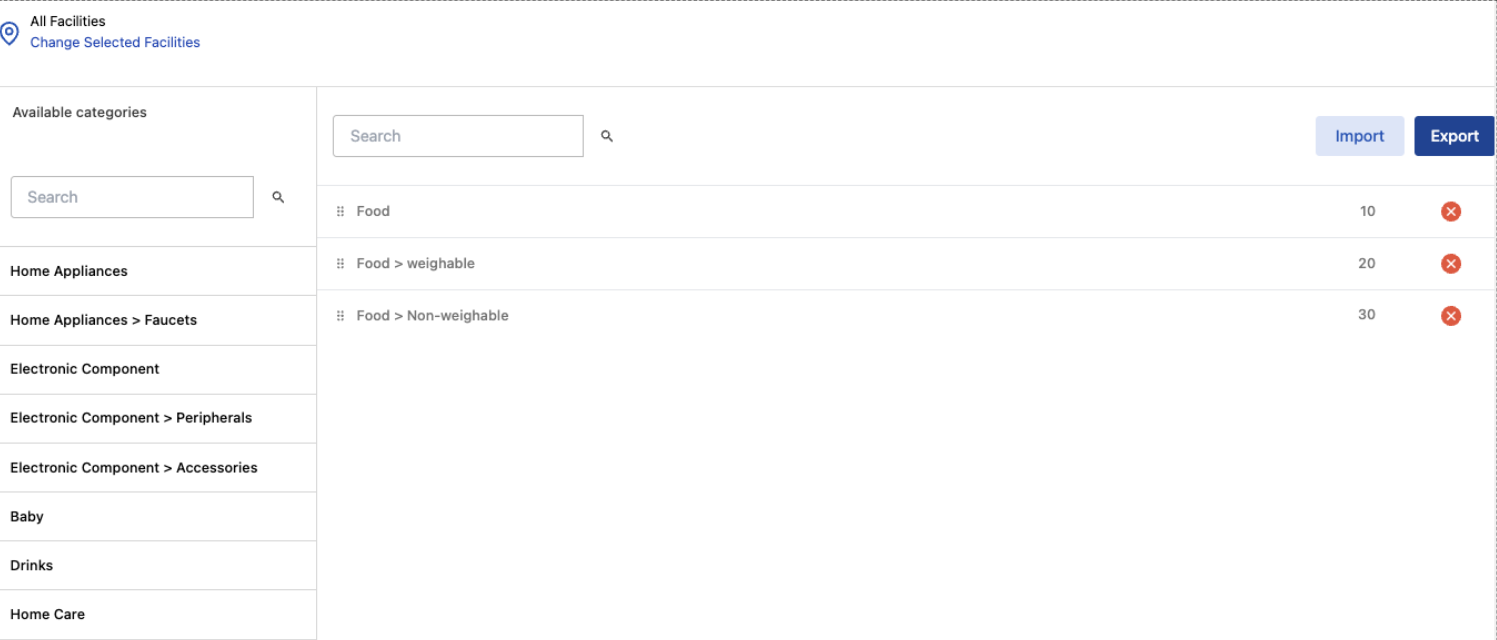\n\n- **All facilities**: Defines the facilities that will have the categories available. If there are differences between the selected facilities, a warning is displayed indicating that the new setting will replace existing settings.\n- **Available categories**: Full category tree from the catalog. When you select facilities, categories that were previously saved are loaded.\n\nTo define the available categories for a facility, follow the steps below:\n\n1. Click `Change selected facilities` and select the facilities you want to edit.\n2. In the list, click the categories you want to include in the facilities. You can search using the category name up to three levels in the tree.\n3. Click and drag a category to sort the list as desired.\n4. Click `Save`.\n \nTo remove a selected category, click .\n\nTo export the information of the categories that will be displayed in the [Pick and Pack mobile app](https://help.vtex.com/en/tutorial/vtex-pick-and-pack-mobile--3i1K01CQlDBFYYp42WFOet), follow these steps:\n\n1. In VTEX Admin, go to **Shipping > Pick and Pack > Settings**, or search for **Settings** in the search bar.\n2. Click the **Categories** section.\n3. Click the categories you want to export.\n4. After selecting them, click `Export`. A CSV file will be downloaded that contains the following information:\n\n```csv\ncategory_id,name,priority\n6,Food,10\n```\n\n- `category_id`: Category ID.\n- `name`: Category name.\n- `priority`: Priority in the category sort order displayed in the mobile app.\n\nTo import information for the selected categories that will be displayed in the [Pick and Pack mobile app](https://help.vtex.com/en/tutorial/vtex-pick-and-pack-mobile--3i1K01CQlDBFYYp42WFOet), follow the steps below:\n\n1. In VTEX Admin, go to **Shipping > Pick and Pack > Settings**, or search for **Settings** in the search bar.\n2. Click the **Categories** section.\n3. Click `Import`.\n4. Select the CSV file from your computer. The CSV file must have the columns `category_id`, `name`, and `priority`.\n5. Make sure the information is correct.\n6. Click `Replace`.\n\n### Catalog\n\nIn this section, you can **bulk update** and **index the catalog** that will be available in the Pick and Pack mobile app.\n\n>ℹ️ During the initial Pick and Pack setup, you need to **bulk update** the catalog and **index** it.\n\nThe page is organized as follows:\n\n| Column | Description|\n| ------------- | --------- |\n| **Item** | Product name. |\n| **ID** | Product ID.|\n| **SKU** | SKU ID.|\n| **EAN** | EAN number.|\n| **Categories**| Categories the product belongs to.|\n| **Dimensions**| Product dimensions.|\n| **Weight** | Product weight.|\n| **Weighable** | Indicates if the product varies in weight, like fruit, or has a fixed weight.|\n| **Temperature** | Product storage temperature. This information is only displayed in the VTEX Admin. |\n| **Active** | Indicates whether the product is active in the mobile app catalog. |\n\nTo edit items in bulk, follow the steps below:\n\n1. In VTEX Admin, go to **Shipping > Pick and Pack > Settings**, or search for **Settings** in the search bar.\n2. Under **Items**, click the **Catalog** section.\n3. Click `Bulk update`.\n4. Click `Download template`.\n5. Complete the template with the item information.\n6. Click `Choose file` and select the edited template that has the new information.\n7. Click `Continue`.\n8. Check for errors in the CSV. If there are any, correct them and re-upload the file.\n9. Click `Continue`.\n\nTo edit an item, follow the steps below:\n\n1. In VTEX Admin, go to **Shipping > Pick and Pack > Settings**, or search for **Settings** in the search bar.\n2. Under **Items**, click the **Catalog** section.\n3. Click the item you want to edit.\n4. Edit the item information:\n\n 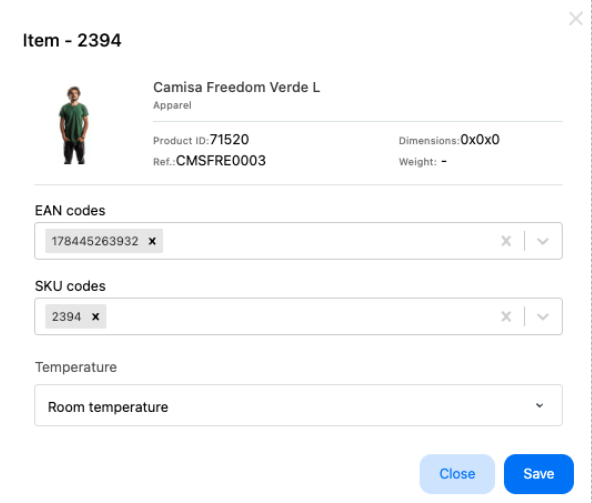\n\n - **EAN codes**\n - **SKU codes**\n - **Temperature**\n\n5. Click `Save`.\n\nTo index the updates to the items, follow the steps below:\n\n1. In VTEX Admin, go to **Shipping > Pick and Pack > Settings**, or search for **Settings** in the search bar.\n2. Under **Items**, click the **Catalog** section.\n3. Click `Index catalog`.\n4. Click `Continue`.\n5. Click `OK` to finish.\n\n## Automation\n\nIn this section, you'll find the automation settings for VTEX Pick and Pack processes. Automations are a rule-based mechanism triggered by events in which conditions are defined and the system automatically performs actions when they are met. These rules can be applied to orders, worksheets, and shipping services.\n\n### Worksheets\n\nIn this section, you can configure worksheet automations.\n\n\n\nTo create a new automation, follow the steps below:\n\n1. In VTEX Admin, go to **Shipping > Pick and Pack > Settings**, or search for **Settings** in the search bar.\n2. Under **Automation**, click the **Worksheets** section.\n3. Click `New`.\n4. Complete the fields below:\n - **Active**: Activates the worksheet automation.\n - **Automation name**: Descriptive name for the automation.\n - **When this happens**: Condition that triggers the automation.\n - **Do this**: Action applied by the automation.\n - Click `+ Add another action` to implement additional actions.\n5. Click `Create` to finish.\n\nTo update or delete an automation, follow the steps below:\n\n1. In VTEX Admin, go to **Shipping > Pick and Pack > Settings**, or search for **Settings** in the search bar.\n2. Under the **Automation** section, click **Worksheets**.\n3. Click the automation you want to edit.\n4. Click `Update` to save the changes or click `Delete` to delete the automation.\n\n### Orders\n\nIn this section, you can configure order automations.\n\n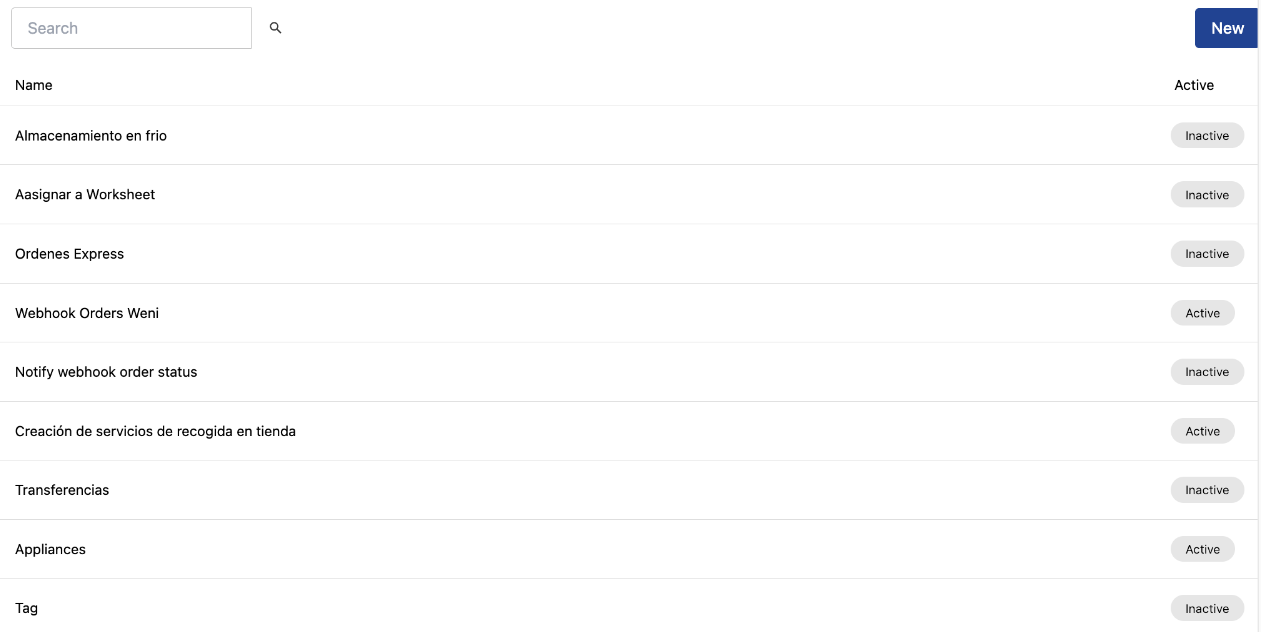\n\nTo create a new automation, follow the steps below:\n\n1. In VTEX Admin, go to **Shipping > Pick and Pack > Settings**, or search for **Settings** in the search bar.\n2. In the **Automation** section, click **Orders**.\n3. Click `New`.\n4. Complete the fields below:\n - **Active**: Activates the order automation.\n - **Automation name**: Descriptive name for the automation.\n - **When this happens**: Condition that triggers the automation.\n - **Do this**: Action applied by the automation.\n - Click `+ Add another action` to implement additional actions.\n5. Click `Create` to finish.\n\nTo update or delete an automation, follow the steps below:\n\n1. In VTEX Admin, go to **Shipping > Pick and Pack > Settings**, or search for **Settings** in the search bar.\n2. In **Automation**, click the **Orders** section.\n3. Click the automation you want to edit.\n4. Click `Update` to save the changes or click `Delete` to delete the automation.\n\n### Shipping services\n\nIn this section, you can configure shipping automations.\n\n\n\nTo create a new automation, follow the steps below:\n\n1. In VTEX Admin, go to **Shipping > Pick and Pack > Settings**, or search for **Settings** in the search bar.\n2. In **Automation**, click the **Shipping services** section.\n3. Click `New`.\n4. Complete the fields below:\n - **Active**: Activates the shipping automation.\n - **Automation name**: Descriptive name for the automation.\n - **When this happens**: Condition that triggers the automation.\n - **Do this**: Action applied by the automation.\n - Click `+ Add another action` to implement additional actions.\n5. Click `Create` to finish.\n\nTo update or delete an automation, follow the steps below:\n\n1. In VTEX Admin, go to **Shipping > Pick and Pack > Settings**, or search for **Settings** in the search bar.\n2. In **Automation**, click the **Shipping services** section.\n3. Click the automation you want to edit.\n4. Click `Update` to save the changes or click `Delete` to delete the automation.\n\n## Users\n\nIn this section, you can manage the pickers in your VTEX Pick and Pack operation. Users with **Picker** permissions can only access the VTEX Pick and Pack app.\n\n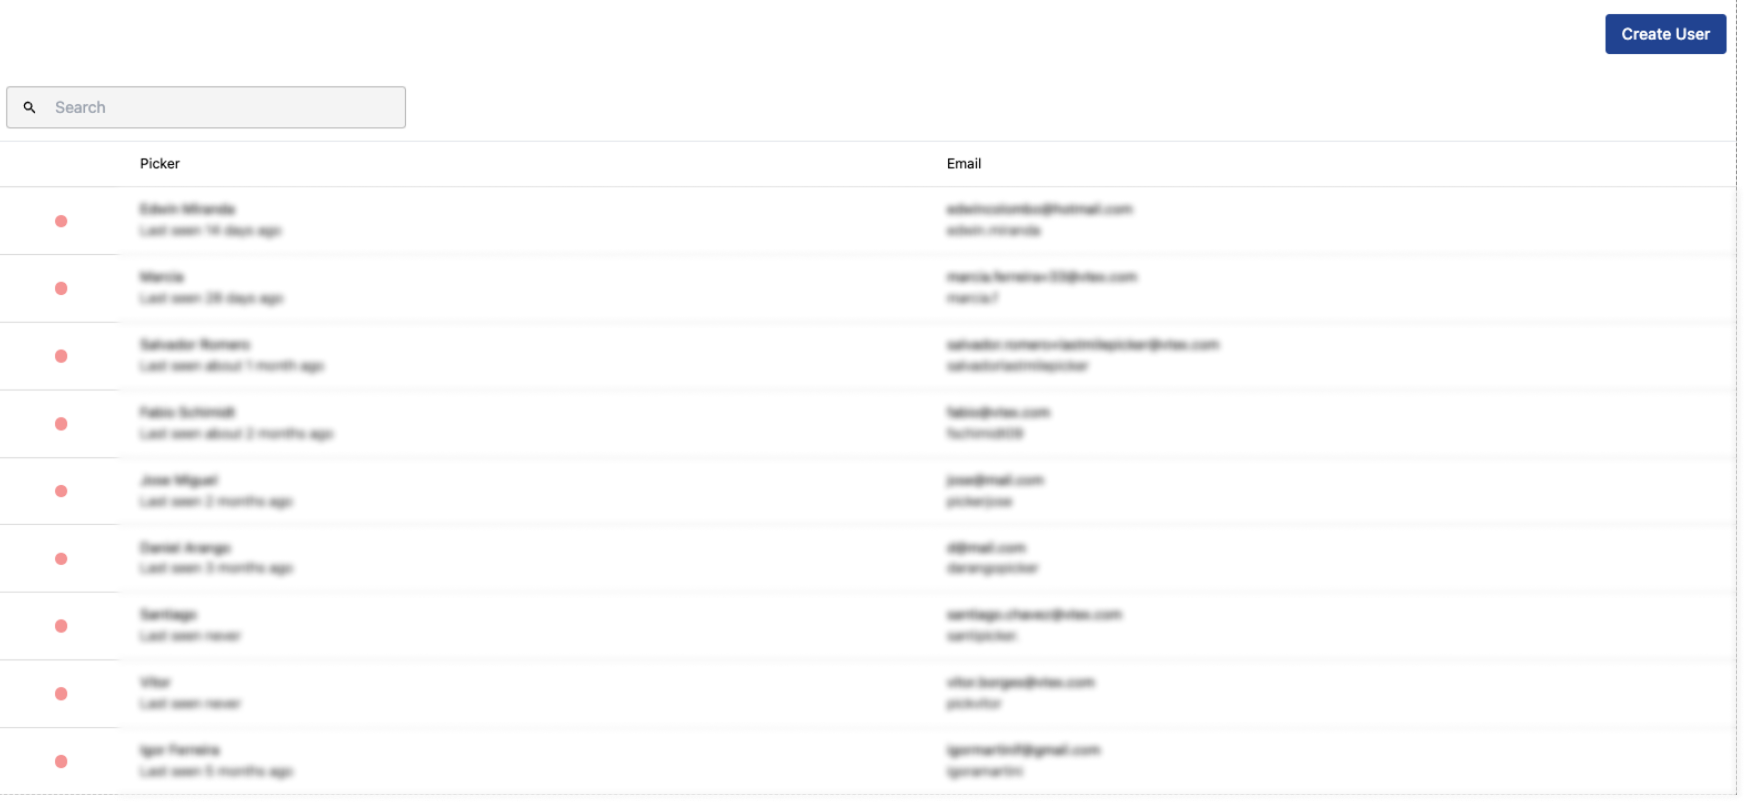\n\nTo create a new user, follow the steps below:\n\n1. In VTEX Admin, go to **Shipping > Pick and Pack > Settings**, or search for **Settings** in the search bar.\n2. In the **Users** section, click **Pickers**.\n3. Click `Create user`.\n4. Complete the form fields:\n - **Username**: Username of the picker.\n - **Name**: Picker name.\n - **Email**: Login email of the picker.\n - **Password**: Login password of the picker.\n - Select the facility where the picker is located.\n5. Click `Create user`.\n\nTo edit or delete a user, follow the steps below:\n\n1. In VTEX Admin, go to **Shipping > Pick and Pack > Settings**, or search for **Settings** in the search bar.\n2. In the **Users** section, click **Pickers**.\n3. Click the picker you want to edit or delete.\n4. Edit the information you want to change.\n5. Click `Update` to save the changes or `Delete` to delete the user.\n\n## Integration\n\nIn this section, you can set up integrations with the Pick and Pack mobile app.\n\n### Webhook\n\nIn this section, you can set up webhooks for the mobile app. Webhooks work as an automatic notification that Pick and Pack sends to a URL every time there's a change in the flow, such as invoicing an order or a worksheet status update.\n\nThe system gathers event information, such as order ID, current and previous status, date, and other details, and sends everything to the configured address. You can also limit notifications by facility. In that case, the webhook is only triggered for events related to the selected units.\n\n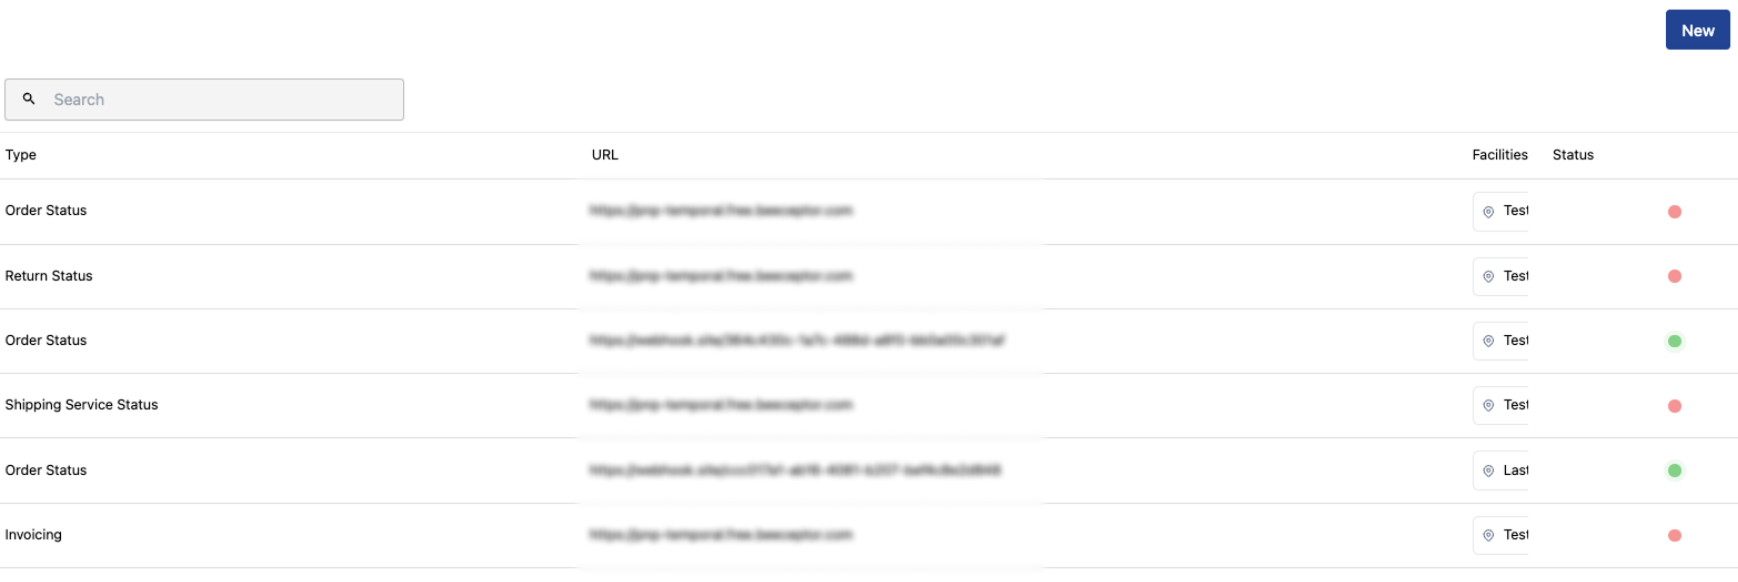\n\nTo create a new webhook, follow the steps below:\n\n1. In VTEX Admin, go to **Shipping > Pick and Pack > Settings**, or search for **Settings** in the search bar.\n2. In **Integration**, click the **Webhook** section.\n3. Click `New`.\n4. Complete the form fields:\n - **Active**: Activates the webhook.\n - **Type**: Webhook method. The event types that can trigger notifications are:\n\n - `INVOICING`: The order is invoiced.\n - `ORDER_STATUS`: The order status changes.\n - `WORKSHEET_STATUS`: The worksheet status changes.\n - `RETURN_STATUS`: The return status changes.\n \n - **URL**: Webhook URL.\n - **Headers**: Webhook headers.\n - **Params**: Webhook parameters.\n - **Where will this apply (facilities)**: Facilities the webhook will apply to.\n5. Click `Create`.\n\nTo edit or delete a webhook, follow the steps below:\n\n1. In VTEX Admin, go to **Shipping > Pick and Pack > Settings**, or search for **Settings** in the search bar.\n2. In **Integration**, click the **Webhook** section.\n3. Click the webhook you want to edit.\n4. Edit the webhook information.\n5. Click `Update` to save the changes or `Delete` to delete the webhook.\n\n### API key\n\nIn this section, you can generate an API key to use the JWT authentication endpoints for the Pick and Pack API and the Pick and Pack Last Mile Protocol API.\n\n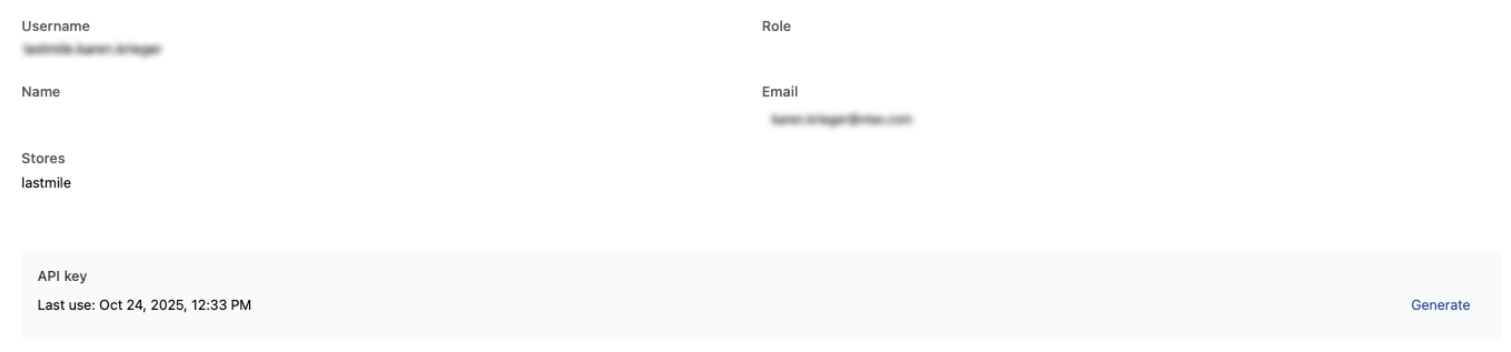\n\nTo generate a new API key, click `Generate`."}