{"section":"tutorials","requestedLocale":"en","requestedSlug":"progressive-discount","locale":"en","slug":"progressive-discount","path":"docs/en/tutorials/promotions-and-taxes/promotions/progressive-discount.md","branch":"main","content":"Progressive Discount is a feature that allows you to create promotions with increasing discount percentages as the customer adds more products to the cart. This strategy is perfect for boosting larger purchases and rewarding the customer with benefits based on the number of items purchased.\n\n\n\nTo configure the **Progressive Discount** promotion, you need to complete the following steps:\n\n- [Create a Progressive Discount promotion](#create-a-progressive-discount-promotion)\n- [Set the conditions for the Progressive Discount promotion](#set-the-conditions-for-the-progressive-discount-promotion)\n- [Set conditions for applying the promotion](#set-conditions-for-applying-the-promotion)\n- [Set usage restrictions](#set-usage-restrictions)\n- [Configure combination and competition](#configure-combination-and-competition)\n- [Display the promotion on the product page](#display-the-promotion-on-the-product-page)\n\n## Creating a Progressive Discount promotion\n1. In the VTEX Admin, go to **Promotions > Promotions**, or type **Promotions** in the search bar at the top of the page.\n2. Click `Create Promotion`.\n3. Select the **Progressive Discount** option.\n4. Complete the fields. You can find details of how to complete them in the table below.\n5. Click `Save`.\n\nSegue a tabela convertida para o formato Markdown, substituindo as células vazias por \"IMAGEMAQUI\":\n\n| Field | Description | Example |\n|--------------------------------|------------------------------------------------------------------------------------------------------------------------------------------------------------------------------------------------------------------------------------------------------------------------------------------------|-------------------------------------------|\n| **Name** | Enter a clear and objective name that reflects the purpose of the promotion, making it easy for customers to identify it (up to 150 characters). | Summer Clearance. |\n| **Status** | Define whether the promotion will be Active or Inactive. Configure as to apply the promotion based on the configured dates and times. Set as to pause it, even if it is within the defined period. |   |\n| **Description** | The internal promotion description should be used to record information for internal communication (up to 10,000 characters). This field is used to specify the purpose of the promotion, such as a specific campaign or clearance. | Promotion for clearing summer collection items. |\n| **Start date and time** | Select the date and time the promotion will start, ensuring that it is activated when you want it to. Make sure date and time align with campaign planning to maximize effectiveness. |  |\n| **End date and time** | Define the expiration date of the promotion by setting the date and time it will be automatically deactivated. |  |\n| **Use recurrence settings** | Select this option to schedule the promotion to repeat automatically on specific days and times. Set the desired ranges to ensure recurrence as scheduled. | 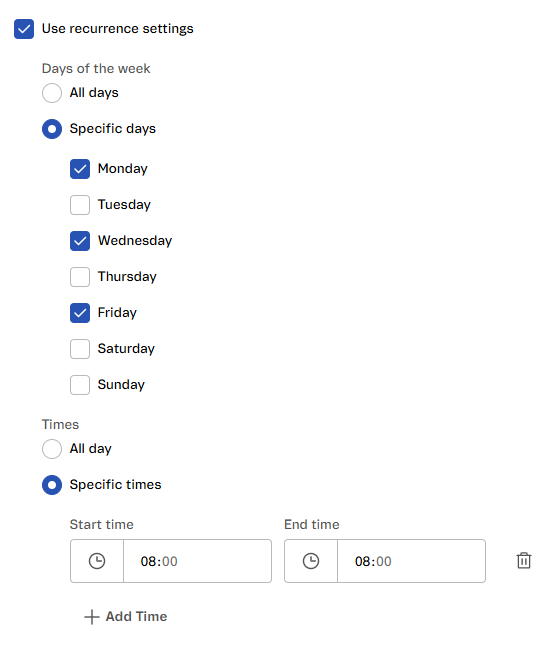 |\n\n### Sellers\nIn the right-hand corner of the page, in the **Sellers,** section, define the sellers that the promotion should apply to.\n\n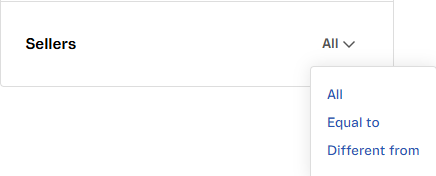\n\nSelect one of the following options for applying the promotion:\n\n- **All:** The promotion will be applied to all sellers. Use this option if you want all products from all sellers to be part of the campaign.\n- **Same as:** The promotion will only be applied to specific sellers. After selecting this option, complete the field that will display the names of the desired sellers.\n- **Different from:** Define the sellers that will not be affected by this promotion. After selecting \"Different from\", you can choose the sellers you don't want to include in the campaign. All other sellers will be included.\n- **Participants**: with this configuration, the promotion works in opt-in mode, meaning seller participation is managed through the [Seller opt-in or opt-out](https://developers.vtex.com/docs/api-reference/promotions-and-taxes-api#post-/api/rnb/pvt/calculatorconfiguration/-promotionId-/seller-opt). In this API, you can define which sellers should be included in or removed from the promotion.\n\nFor more information, see [Seller Opt-in for Promotions](https://developers.vtex.com/docs/guides/seller-opt-in-promotions).\n\n### Sales channels\nIn the right-hand corner of the page, in the section **Sales channels**, select the sales channels valid for the discount. You can give discounts for sales channels when [your store acts as a marketplace](/en/faq/o-que-e-um-marketplace) (**My store**) or as a seller (**Third-party stores - Fulfillment**).\n\nYou can choose from the following options:\n\n- **All:** Select this option to apply the promotion to all sales channels without any restrictions. All products, regardless of the associated sales channel, will be included in the promotion.\n- **Equal to**: This option allows you to determine the policies that will apply to the products eligible for the discount.\n- **Different from:** This option removes specific policies, ensuring the discount is not applied to products that use those business rules.\n\n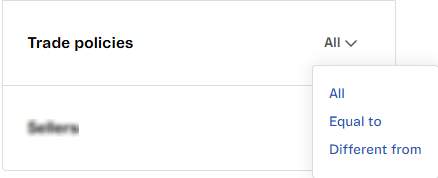\n\n## Set the conditions for the Progressive Discount promotion\nDetermine the conditions and discount percentages to be applied. See the available conditions below:\n\n- **SKUs:** Select the SKUs that the progressive discount will apply to. This option restricts the promotion to products associated with the selected SKUs.\n- **Collections:** Select the product [collections](/en/docs/tutorials/creating-a-product-collection) that the progressive discount will apply to. This option allows you to apply the promotion to a group of predefined products.\n- **Must be the same item:** This option restricts the discount to products that are the same. For example, if you add different SKUs from the same collection, the promotion won't be applied. The rule only checks the quantity of the single SKU in the cart.\n- **Discount:** Set the discount percentage applied when the minimum quantity of items defined is reached. You can create up to 10 progressive discount ranges.\n- **Add range:** Configure additional progressive discount levels. For example, you can define a 5% discount with a quantity of 10, and an increase to 10% when the quantity reaches 20. The maximum number of configurable ranges is 10.\n\n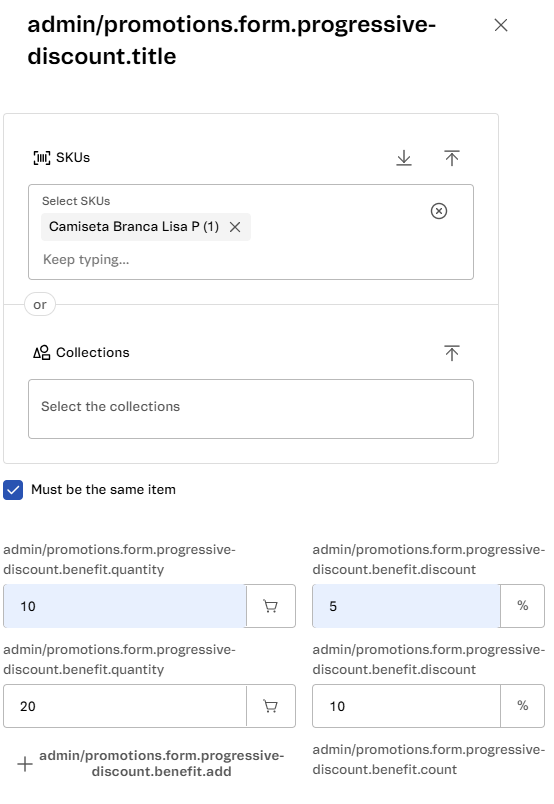\n\n## Setting conditions for applying the promotion\nConditions allow the promotion to activate under specific circumstances based on the selected criteria. To add a condition, follow the instructions below:\n\n- **Card BIN:** Apply this promotion when using cards from specific networks, banks, or categories identified by their BIN codes. Import a list of BINs saved in a TXT or CSV file, with each BIN on a separate row.\n- **Customer cluster:** select an already created [customer cluster](/en/tutorial/como-criar-um-cluster-de-clientes) in Master Data, following the field=value or field contains value format. Select one of the following options:\n - **All of the following:** Apply the promotion only if all cluster criteria are met.\n - **At least one of the following:** Apply the promotion if at least one of the cluster criteria is met.\n- **Shipping location:** Apply the promotion based on the shipping address associated with the order. Conditions can be configured using the following criteria:\n - **Countries:** Specify the countries in which the promotion will be valid. You can select up to 50 countries from the list. The promotion will only apply to orders with shipping linked to the configured countries.\n - **Shipping postal code:** Configure postal code ranges to limit the application of the promotion to specific regions.\n - **Choose Include or Exclude:** Define whether the promotion will apply to the configured ranges (Include) or to the excluded values (Exclude).\n - **Configure the postal code ranges:** Complete the \"From\" and \"To\" fields with the desired postal codes.\n - **Add multiple ranges:** Use the + Add range option to include add ranges as necessary.\n\n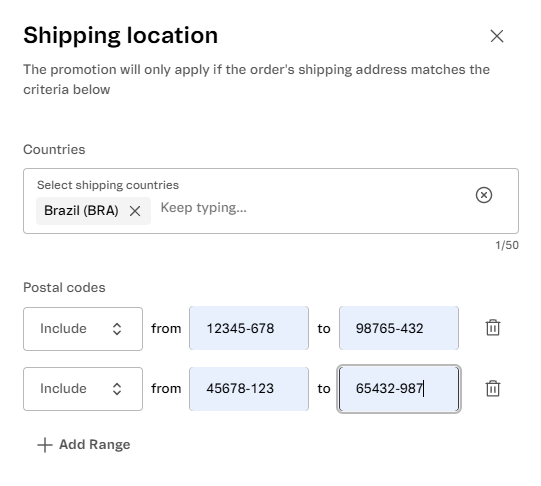 \n\n- **UTM:** Configure the promotion to apply when the site is accessed via a URL with [UTM parameters](/en/docs/tutorials/what-are-the-internal-utms) or when a coupon linked to these parameters is used. Set the UTM parameters according to the formatting rules, using only letters, numbers, hyphens, and underscores.\n\n > ℹ️ Using these parameters is optional and allows you to apply discounts to specific campaigns.\n\nSet the following parameters if necessary:\n\n- **utm_source:** Apply the discount when browsing occurs through the configured utm_source parameter.\n- **utm_campaign:** Apply the discount when browsing occurs through the configured utm_campaign parameter.\n- **Create coupon from the UTM parameters above:** Generate a coupon based on the UTM parameters entered in the `UTM_source` and `UTM_campaign` fields.\n- **View linked coupons:** View the coupons that have already been associated with the defined UTM parameters.\n- **Payment method:** The promotion is only applied when the customer uses one of the previously configured payment methods. The options include:\n - Boleto Bancário (Brazil).\n - Credit cards, such as Visa or Mastercard.\n - Other methods, such as Diners or Hipercard.\n\n## Setting usage restrictions\nIn this section, determine whether the promotion can be combined with other promotions. The available options are:\n\n- **Limit the use of the promotion in the store:** Restrict the number of times the promotion can be used in the store.\n- **Limit the use of the promotion per customer:** Restrict the number of times each customer can use the promotion.\n- **Limit the number of eligible items per cart:** Define the maximum number of items per order that will get the discount.\n\n## Configure combination and competition\nDefine how the promotion will be combined with other business conditions applied in the store.\n\n- **Allow combining with manual prices:** Select this setting so that the promotion is applied to products whose price has been adjusted.\n\n## Displaying the promotion on the product page\nIn this section, you can highlight the promotion on the product listing page and add custom data for in-store customizations.\n\n- **Highlight promotion on products:** Check this option to display the promotion directly on the product listing pages.\n\n> ⚠️ Remember [configure this option in the CMS module](/en/docs/tutorials/configuring-promotions-with-a-highlightflag).\n\n- **Additional information:** Click `Create` to add custom fields with name and value, which can be used for store customizations."}