{"section":"tutorials","requestedLocale":"en","requestedSlug":"payment-provider-protocol","locale":"en","slug":"payment-provider-protocol","path":"docs/en/tutorials/payments/payments-overview/payment-provider-protocol.md","branch":"main","content":"The Payment Provider Protocol is the integration protocol between VTEX and other companies that process payments.\n\nThrough it, VTEX offers a public contract available to all providers that wish to integrate into our platform. As a result, providers become more autonomous regarding such integration.\n\nThe protocol has the following features:\n\n- On-line approval process.\n- Pre-authorization support (2-step capture).\n- Mechanism of payment authorization attempt.\n- Payment redirection flow support (3P).\n- OAuth protocol support for authentication.\n\nMore information about the payment protocol flow can be found in the [Payment Protocol flow section](/en/docs/tutorials/payment-provider-protocol#payment-protocol-flow).\nYou can find references to the protocol API [here](https://developers.vtex.com/docs/guides/payment-provider-protocol-api-overview).\n\n## Concepts\n__Provider:__ payment system, gateway or provider that processes payments.\n\n__Payment Provider Protocol:__ integration protocol developed by VTEX.\n\n__Connector:__ name of the partner provider that integrates with VTEX.\n\n__Oauth:__ authorization protocol for web APIs designed to allow client applications to access a protected resource on behalf of a user.\n\n__Acquirer:__ a company that specializes in processing payments. It is responsible for transferring the values which the issuing bank receives from the client to the account of your store.\n\n## Implementation prerequisites\n\n### A business partnership agreement for financial services\n\nFor implementing, publishing, and updating a payment connector on VTEX, you need to sign a partnership agreement for financial services that covers the particularities of this domain and the regulations within the platform. If you do not have a partnership agreement yet but want to become a payment provider, please contact our team through the [website](https://vtex.com/us-en/partners).\n\n### Access to a VTEX environment\n\nTo publish a connector, you need to have a VTEX environment, which you can only get after signing a partnership agreement for financial services. You need the VTEX environment to publish, homologate, update, and have access to our support when developing and maintaining a connector.\n\nIf the partner is a SI (Service Implementer) developing integrations for clients or other payment providers, the VTEX account of the main provider must be used and not the account of the contractor agency.\n\n### Payment method requirements\n\n#### Payment providers with credit, debit or cobranded cards (solutions without redirect)\n\nTo become an integrated VTEX provider, you must use one of the following solutions:\n\n- The infrastructure where the connector will be built must have the PCI-DSS certificate signed by a QSA (Qualified Security Assessor). More information on the [PCI Security Standards Council](https://www.pcisecuritystandards.org/).\n- If you don't have the certificate, the provider may be implemented by using [Secure Proxy](https://developers.vtex.com/vtex-rest-api/docs/payments-integration-secure-proxy).\n\nIf the provider is certified or has already started the certification process, you can contact the VTEX commercial team to begin the integration.\n\nThe provider must forward the [AOC](https://www.pcisecuritystandards.org/document_library) (Attestation of Compliance for Onsite Assessments - Service Provider Version) fully completed to VTEX, observing the following points:\n\n- __Company Name__: the “URL” field (Part 1a.) must be the same as that of the company requesting the integration procedure. If it is filled in with another name (example: a company acquired by another), it will be necessary to send extra documentation that proves the relationship between the companies, and that the PCI DSS evaluated the provider's service URL.\n- __Signature__: document signed by the company representative and the QSA.\n- __Expiration Date__: the validity of the AOC is 1 year after the signing date. The AOC issued more than 11 months ago must not be sent to VTEX, that is, less than 30 days before its expiration date.\n\n> ⚠️ Whenever you need to update a connector that processes payments with credit, debit, or co-branded cards, you’ll have to repeat the [homologation](https://developers.vtex.com/docs/guides/payments-integration-payment-provider-homologation)\nprocess (open a ticket and submit the AOC), except when the connector simultaneously meets the conditions described in this [article](https://developers.vtex.com/docs/guides/payments-integration-payment-provider-homologation#when-is-payment-provider-homologation-not-required).\n\n> ❗ The SAQ (Self-Assessment Questionnaire) and AOC (Attestation of Compliance for Onsite Assessments – Merchants Version) documents are not accepted in the VTEX integration process.\n
\n\n#### Payment providers with notes payables, Brazilian boleto or private label cards (or providers of any kind of card using redirect solutions)\n\nFor these types of providers, VTEX does not require evidence of PCI DSS certification. Just contact the VTEX commercial team to begin the integration.\n\n## First steps\nNext, we will present step-by-step information on integrating payments with VTEX.\n\n### 1. Implementing the protocol\nBefore setting up the VTEX environment, the provider must implement the back-end service required to receive and process payments (APIs). More information about the protocol payment flow can be found in the [Payment Protocol flow section](/en/docs/tutorials/payment-provider-protocol#payment-protocol-flow). You can find references to the protocol API [here](https://developers.vtex.com/docs/guides/payment-provider-protocol-api-overview).\n\n### 2. Specific use cases\nIn some cases, connectors can be built for a specific solution. The references below will help you identify such cases:\n\n- [Payment Provider Framework (PPF)](https://developers.vtex.com/docs/guides/payments-integration-payment-provider-framework): Solution for implementing connectors through VTEX IO from a boilerplate, which already comes with most of the work done, including the protocol endpoints. VTEX IO also speeds up the development process and in-store testing.\n- [Payment Provider Protocol for Point of Sale (POS) - VTEX Sales App](https://developers.vtex.com/docs/guides/payments-integration-ppp-applied-to-pos): PPP application for payments in physical stores using a payment terminal (POS), which can be used with credit and debit cards. The payment flow starts with a purchase made on [VTEX Sales App](https://help.vtex.com/docs/tracks/vtex-sales-app-getting-started-and-setting-up), then communication is established with the POS, where the customer inserts the card.\n\n### 3. Payment Provider Homologation \n\nAfter getting access information and implementing the backend, the provider has to install the Payment Provider Test Suite app to access the testing tool. The installation is done through the VTEX App Store.\n\n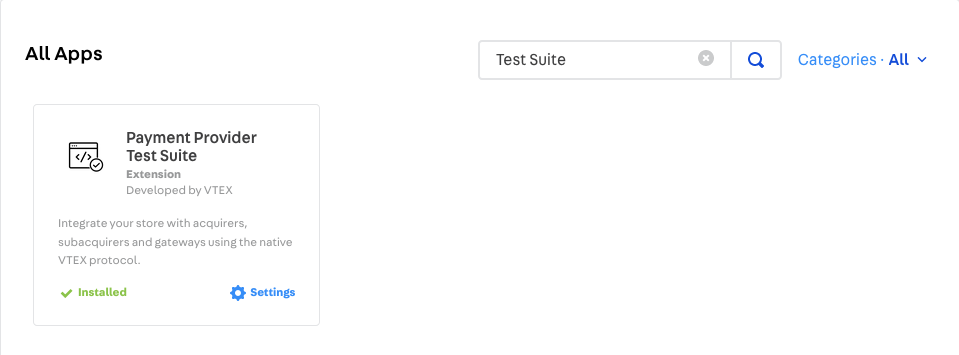\n\n> ⚠️ To pass the homologation process, you need to implement specific logic to handle the test requirements. When sending requests to Test Suite, use the extra header `X-VTEX-API-Is-TestSuite = true` to identify them and mask any required case.
All communication with servers, whether during the homologation process or in production, must be via HTTPS, which by default uses port 443. Note that all HTTPS communication must be exclusively over TLS 1.2. \n\nAfter installing, click __Apps__ in the left menu of the Admin. Then, select the __Payment Provider Test Suite__ app to complete the setup.\n\nDepending on the Admin version that the store account uses, the app will not be visible in the app list. To access it, go to [https://\\{\\{accountName\\}\\}.myvtex.com/admin/test-suite/payment-provider](https://\\{\\{accountName\\}\\}.myvtex.com/admin/test-suite/payment-provider), replacing \\{\\{accountName\\}\\} with the account name of your store.\n\nThen, you will find a form with three sections: Service information, Payment method, and Test cases. Complete the fields following the instructions below.\n\n#### Service information\n\n* **Service URL:** Define the URL of the service provider. This URL will be the base address for the protocol and must follow the format determined by it. For example, if the service URL is `https://example.com/`, the full URL for the /payments endpoint will be `https://example.com/payments`.\n* **AppKey and AppToken:** The Test with AppKey and AppToken button allows you to choose whether or not to configure the values of these fields, which can make testing easier during the development stage. If you do not enable this option, the credentials will be sent in the headers as an empty string.\n\n> ℹ️ The gateway saves the store credentials configured in the affiliation and sends them in the X-VTEX-API-AppKey and X-VTEX-API-AppToken headers. The exceptions are integrations developed using VTEX IO, for which the headers will be sent as x-provider-api-appKey and x-provider-api-appToken. If you are developing using the [Payment Provider Framework (IO)](https://developers.vtex.com/docs/guides/payments-integration-payment-provider-framework), this is configured by the usesProviderHeadersName option. See the available settings [here](https://developers.vtex.com/docs/guides/payments-integration-payment-provider-framework#available-configurable-options). \n\n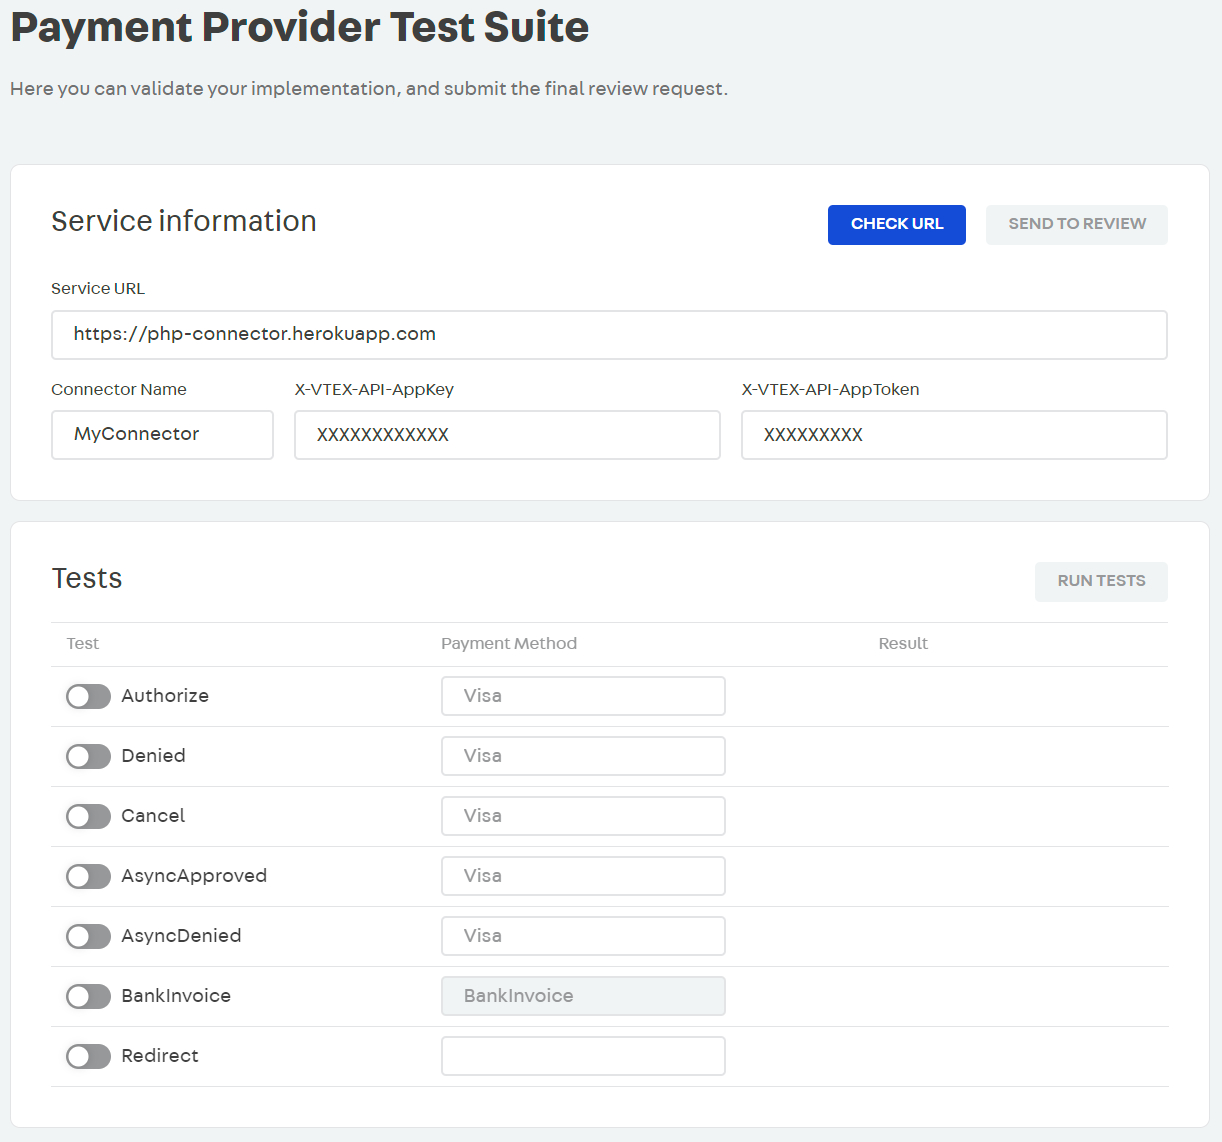\n\n#### Payment method\n\nAfter completing the Service URL field, Test Suite will validate the[ Manifest endpoint](https://developers.vtex.com/docs/api-reference/payment-provider-protocol#get-/manifest) and check the declared payment methods. They will be displayed as options in this field. Select the payment method you want to test.\n\n#### Test cases\n\nIn this section, you need to select the cases you want to test. If you are testing a credit card method, your integration must pass the Approved, Denied, Cancellation, Async Approved, and Async Denied cases. Only the Redirect flow is required for a payment method with [redirect](https://developers.vtex.com/docs/guides/payments-integration-purchase-flows#redirect).\n\n\n\n### 4. Testing\n\nWhen you click the `Run Test` button, Test Suite will call the provided service URL and run the selected test cases. The tests are:\n\n* **Approved flow:** This test is divided in three steps. First, we send a [Create Payment](https://developers.vtex.com/docs/api-reference/payment-provider-protocol#post-/payments) request to `{{ServiceURL}}/payments`, expecting status approved as a response. Second, we send a [Settle Payment](https://developers.vtex.com/docs/api-reference/payment-provider-protocol#post-/payments/-paymentId-/settlements) request to `{{ServiceURL}}/payments/{paymentId}/settlements`, expecting a response with settleId completed. And finally, we send a [Refund Payment](https://developers.vtex.com/docs/api-reference/payment-provider-protocol#post-/payments/-paymentId-/refunds) request to `{{ServiceURL}}/payments/{paymentId}/refunds`, and expect a response with refundId completed.\n* **Denied flow:** In this test, we send a [Create Payment](https://developers.vtex.com/vtex-rest-api/reference/createpayment) request to `{{ServiceURL}}/payments`, expecting status denied as a response.\n* **Cancellation flow:** For this test, first, we need status approved as a response to the [Create Payment](https://developers.vtex.com/docs/api-reference/payment-provider-protocol#post-/payments) request to `{{ServiceURL}}/payments`. Then, we send a [Cancel Payment](https://developers.vtex.com/docs/api-reference/payment-provider-protocol#post-/payments/-paymentId-/cancellations) request to `{{ServiceURL}}/payments/{paymentId}/cancelations` and expect status canceled as a response.\n* **Async Approved flow:** This test is divided in two steps. First, we send a[ Create Payment](https://developers.vtex.com/docs/api-reference/payment-provider-protocol#post-/payments) request to \\{\\{ServiceURL\\}\\}/payments, expecting the status undefined as a response. After 15 seconds, we expect to receive another response in the same format via a POST with the URL sent in the callbackUrl field with status approved. When the integration is in production, this last call made by callbackUrl is authenticated using the partner’s environment keys: vtex-app-key and vtex-app-token. Learn more about the callback flow in the [Payment Authorization](#payment-authorization) section.\n* **Async Denied flow:** This test is also divided in two steps, as the previous one. First, we send a [Create Payment](https://developers.vtex.com/docs/api-reference/payment-provider-protocol#post-/payments) request to \\{\\{ServiceURL\\}\\}/payments, expecting status undefined as a response. After 15 seconds, we expect to receive another response in the same format via a POST with the URL sent in the callbackUrl field and with status denied. When the integration is in production, this last call made by callbackUrl is authenticated using the partner’s environment keys: vtex-app-key and vtex-app-token. You can learn more about the callback flow in the [Payment Authorization](#payment-authorization) section.\n* **Boleto flow:** Boleto is a popular payment method in Brazil. In this test, we send a[ Create Payment](https://developers.vtex.com/docs/api-reference/payment-provider-protocol#post-/payments) request to \\{\\{ServiceURL\\}\\}/payments, expecting the status undefined as a response and the bankIssueUrl field containing the boleto ticket URL. After 15 seconds, we expect to receive another response in the same format via a POST with the URL sent in the callbackUrl field and with status approved. When the integration is in production, this last call made by callbackUrl is authenticated with the partner’s environment keys: vtex-app-key and vtex-app-token. Learn more about the callback flow in the [Payment Authorization](#payment-authorization) section.\n* **Redirect flow:** This test is divided in two steps. First, we send a [Create Payment](https://developers.vtex.com/docs/api-reference/payment-provider-protocol#post-/payments) request to `{{ServiceURL}}/payments`, expecting the status undefined as a response and the redirectUrl field containing the URL that will be used to redirect the customer. After 15 seconds, we expect to receive another response in the same format via a POST with the URL sent in the callbackUrl field and with status approved. When the integration is in production, this last call made by callbackUrl is authenticated with the partner's environment keys: vtex-app-key and vtex-app-token. Learn more about the callback flow in the [Payment Authorization](#payment-authorization) section. Connectors that will use **Redirect** don’t need to pass all Test Suite tests, only the **Redirect** test.\n\n> ⚠️ For credit cards, the mandatory tests are Authorize, Denied, Cancel, Async Approved, and Async Denied. \n\nUse the following numbers to identify how to correctly respond to each credit card test:\n\n| Card number | Response status |\n| ---------------- | ------------------------------------------- |\n| 4444333322221111 | __approved__ |\n| 4444333322221112 | __denied__ |\n| 4222222222222224 | __undefined__, `callbackUrl` with status __approved__ |\n| 4222222222222225 | __undefined__, `callbackUrl` with status __denied__ |\n\n### 5. Results\n\nAfter running the tests, the system will display the Test Report, where you can see the detailed results of each test case. This way, you can have more visibility into what should be adjusted if an error occurs.\n\n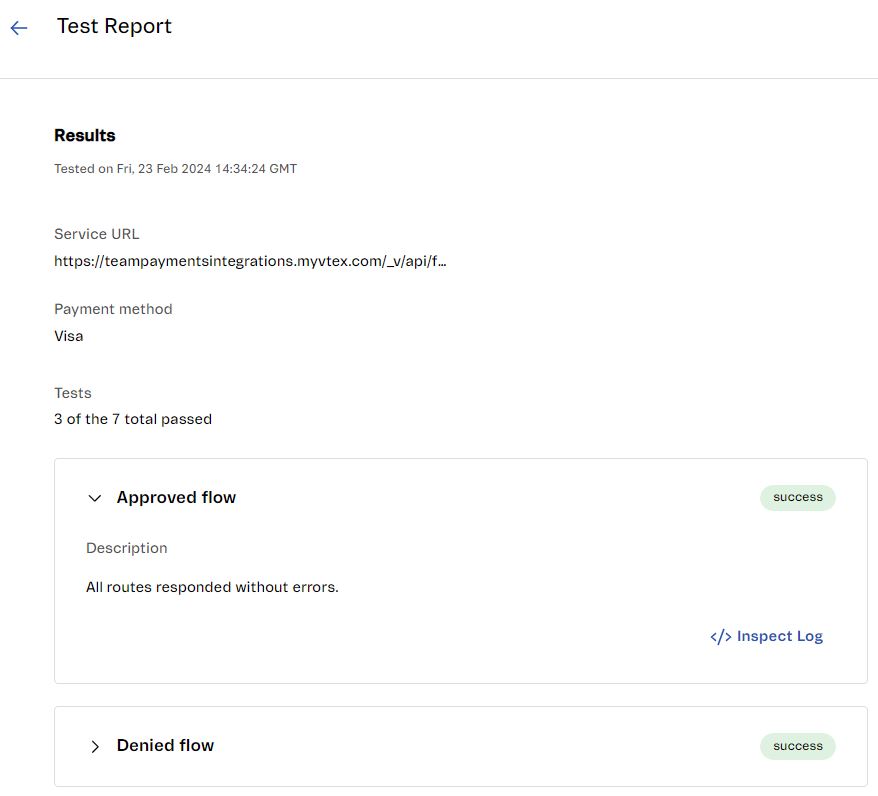\n\nTo see the messages exchanged between Test Suite and the payment provider implementation, click the Inspect Log button for the test case you want. A modal will open showing the message list and the payload of each request and response. The button in the upper right corner allows you to copy the code to the clipboard.\n\n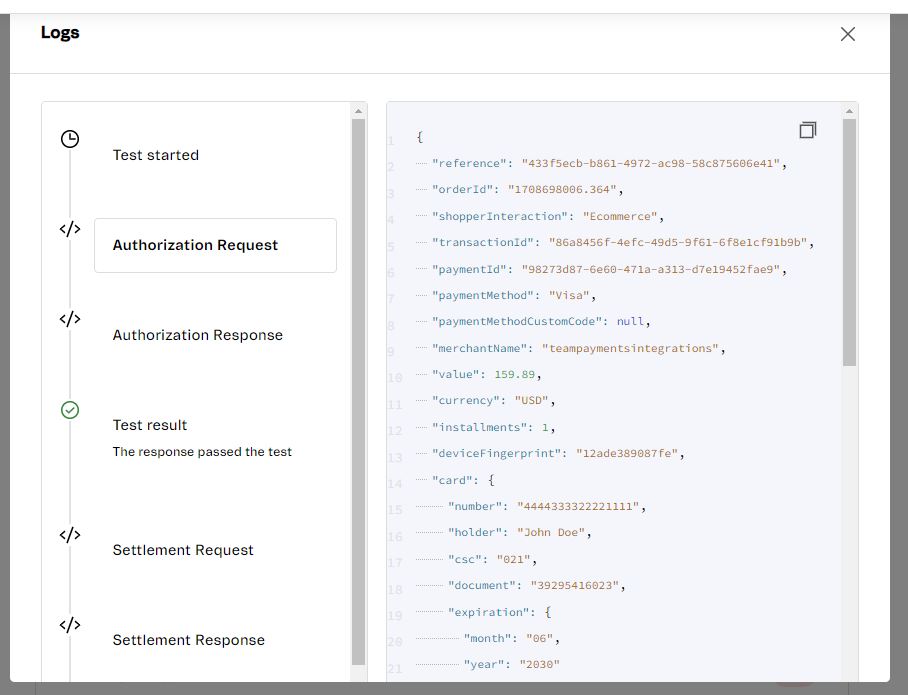\n\n## Payment protocol flow\nHere we explain the integrated payment stream in detail. The image below illustrates the entire flow, showing VTEX Payments and the responsibilities of your supplier.\n\nIt all starts with requesting a new payment after the creation of a new order. VTEX creates a new payment representation and proceeds to the payments processing.\n\n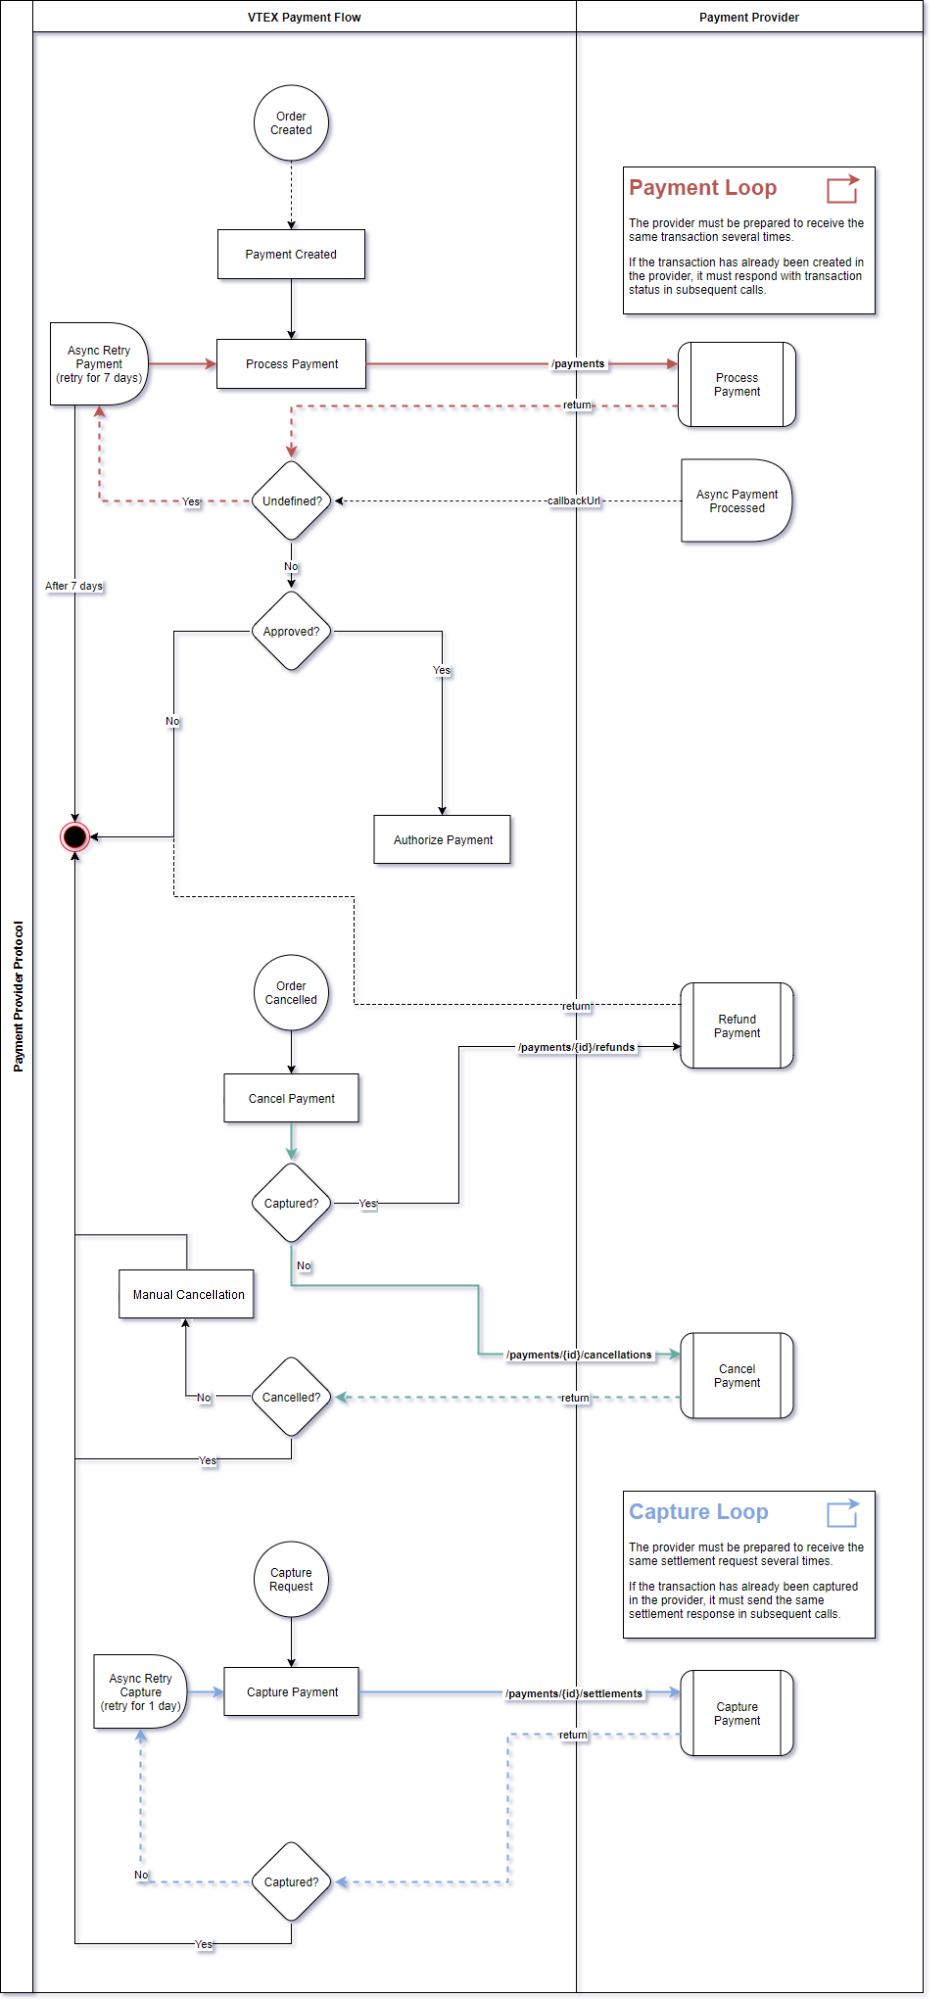\n\n> ℹ️ The default period of 7 days for asynchronous payment retries is only applied when the user does not specify a value in the `delayToCancel` field of the [Create Payment](https://developers.vtex.com/docs/api-reference/payment-provider-protocol#post-/payments) endpoint or when sending the callbackURL.\n\n> ⚠️ The maximum value allowed for the `delayToCancel` field is 30 days (2592000 seconds). However, in payments made through PIX (brazilian instant payment method), the values must be set between 15 and 60 minutes (900 and 3600 seconds). \n\n### Payment Authorization\n\nAt this point VTEX calls the __*/payments*__ endpoint and sends a payload with the payment data to your provider. The provider must process this data and send back the response, which must contain one of the status values: __approved__, __denied__, or __undefined__.\n\nThe __undefined__ status represents the state where the provider could not finish processing the payment. This may be due to a long processing time or some asynchronous processing.\n\nIn any case, once the processing is completed and the provider has a final status (__approved__ or __denied__), it must call our `callbackUrl`. We submit the `callbackUrl` in the body of the __/payments__ request. There are two possible flows when using the `callbackUrl` depending on whether your integration is hosted on the partner infrastructure or on VTEX IO:\n\n- __Without VTEX IO:__ `callbackUrl` contains a callback endpoint for the provider to notify the gateway of the updated status.\n- __With VTEX IO:__ `callbackUrl` contains a retry endpoint. When the provider uses this endpoint to call the gateway, a new Create Payment (/payments) request is made from the gateway to the provider, and the gateway receives the updated payment status in response to this request.\n\nThe complete flow with __undefined__ status and use of notification can be seen below:\n\n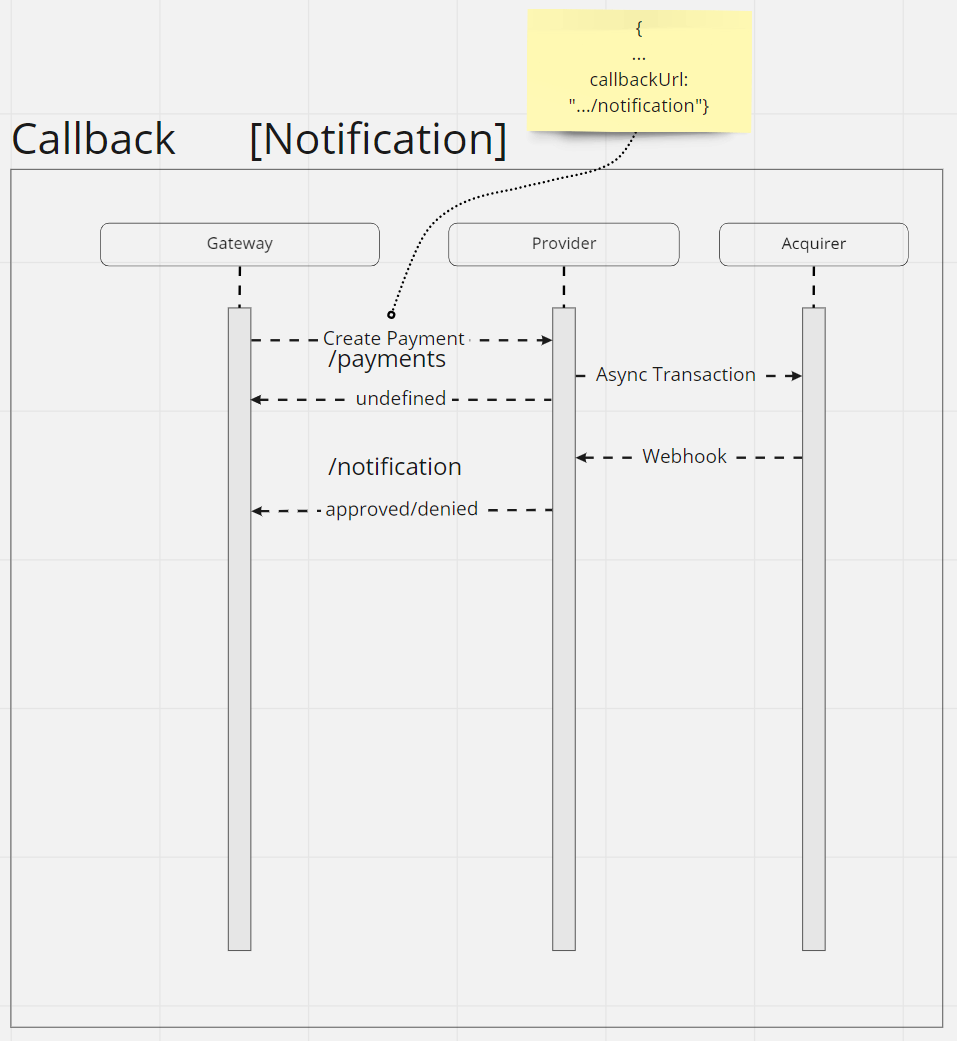\n\n1. The payment authorization is initiated when the gateway calls the Create Payment (__/payment__) endpoint for the provider. The `callbackUrl` field is submitted in the body of the request and contains the URL to send the notification.\n2. The payment occurs asynchronously (it does not generate the final status when the transaction is initiated). The gateway then receives the response with __undefined__ status and waits for the payment processing to be completed. Finally, once the processing is completed, the final status (__approved__ or __denied__) is updated.\n3. When the payment is processed, the acquirer triggers a webhook to the provider with the new status.\n4. The provider, upon receiving the call through the webhook, calls the notification endpoint and returns the updated status to the gateway.\n\nThe complete flow with __undefined__ status and use of __retry__ can be seen below:\n\n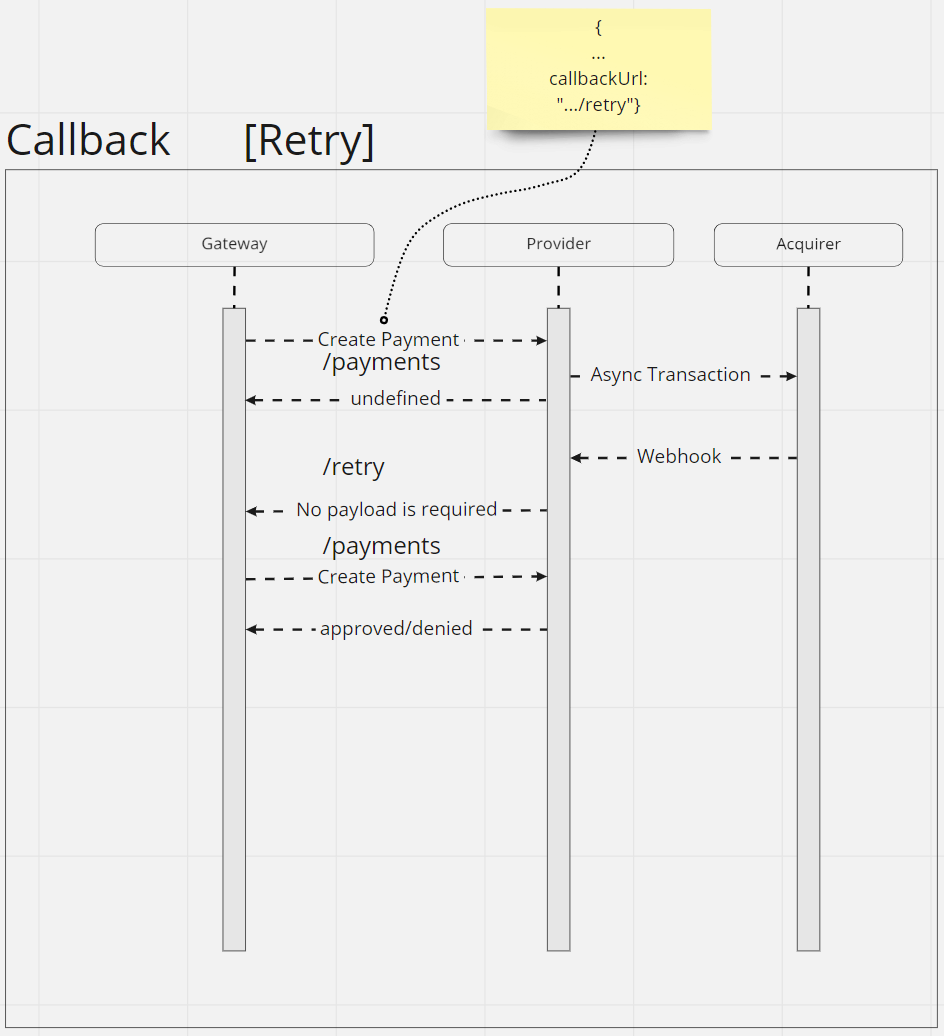\n\n1. The payment authorization is initiated when the gateway calls the Create Payment (__/payment__) endpoint for the provider. The `callbackUrl` field is submitted in the body of the request and contains the URL of the retry endpoint.\n2. The payment occurs asynchronously (it does not generate the final status when the transaction is initiated). The gateway then receives the response with __undefined__ status and waits for the payment processing to be completed. Finally, once the processing is completed, the final status (__approved__ or __denied__) is updated.\n3. When the payment is processed, the acquirer triggers a webhook to the provider with the new status.\n4. The provider, upon receiving the call through the webhook, calls the __retry__ endpoint to the gateway, requesting it to call the __/payment__ endpoint again. __Retry__ does not require any payload.\n5. After receiving __retry__, the gateway calls the __/payment__ endpoint again. Finally, the gateway receives the response from the provider with the new status (__approved__ or __denied__).\n\n#### Callback URL\n\nThe `callbackUrl` field contains an URL that the payment provider uses to make a callback and inform our gateway of the final payment status: `approved` or `denied`. \n\nThis URL has some query parameters, including the `X-VTEX-signature`. This parameter is mandatory and contains a signature token to identify that the request has been generated from VTEX as a security measure. The signature token has at most 32 characters. You can check an example of callback URL with the signature token below:\n\n```\nhttps://gatewayqa.vtexpayments.com.br/api/pvt/payment-provider/transactions/8FB0F111111122222333344449984ACB/payments/A2A9A25B11111111222222333327883C/callback?accountName=teampaymentsintegrations&X-VTEX-signature=R123456789aBcDeFGHij1234567890tk\n```\n\nIn the [Transactions page of the Admin](/en/docs/tutorials/how-to-view-the-orders-details), the signature token appears masked for security reasons, as in this example: `X-VTEX-signature=Rj******tk`.\n\nSee below an example of a payload forwarded along with the callback URL:\n\n```json\n{\"paymentId\":\"8B3BA2F4352545A8B1C5A215F356A01C\",\"status\":\"approved\",\"authorizationId\":\"184520\",\"nsu\":\"21705348\",\"tid\":\"21705348\",\"acquirer\":\"pagarme\",\"code\":\"0000\",\"message\":\"Transação aprovada com sucesso\",\"delayToAutoSettle\":1200, \"delayToAutoSettleAfterAntifraud\":1200, \"delayToCancel\":86400,\"cardBrand\":\"Mastercard\",\"firstDigits\":\"534696\",\"lastDigits\":\"6921\",\"maxValue\":16.6}\n```\n\n> ℹ️ The parameter values sent in the callback payload replace the original values informed in the [Create Payment](https://developers.vtex.com/docs/api-reference/payment-provider-protocol#post-/payments) request.\n\n> ⚠️ If the waiting parameters (*delayToAutoSettle* e *delayToAutoSettleAfterAntifraud*) are not sent with the callback URL, these values will be automatically set to 24 hours.\n\nWhen making the callback request, we recommend that payment providers use the callback URL exactly as received, which guarantees that all the parameters are included.\n\nWhen calling Callback URL, your provider should send in the request the *X-VTEX-API-AppKey* and *X-VTEX-API-AppToken* headers. Check more information about this in the [VTEX credentials section](/en/docs/tutorials/payment-provider-protocol#vtex-credentials).\n\n> ❗ In addition to the Callback URL, if the status is **undefined**, VTEX will try again to call the payment authorization endpoint. If the status returned on these calls remains **undefined**, calls will continue for up to 7 days. That's why **it's important that your provider be ready to receive the same payment authorization several times**.\n\nOnce the payment has been processed by your provider, either directly or asynchronously, we move the payment transaction within VTEX to the *authorized* or *canceled* status, according to the processing response status.\n\nCheck more references on the authorization API [here](https://developers.vtex.com/docs/guides/payment-provider-protocol-api-overview).\n\n### Refund/Cancellation\nAfter the first call for payment authorization, the store may cancel the order at any time. At the time of cancellation, the following situations may occur:\n\n1. __Payment transaction has already been settled__: the cancellation request will then result in a refund call to the provider endpoint _/payments/\\{id\\}/refunds_, where _\\{id\\}_ stands for the payment ID in VTEX. \n2. __Payment transaction has not yet been settled__: we will call the provider’s endpoint _/payments/\\{id\\}/cancellations_, where _\\{id\\}_ is the payment ID in VTEX. If there is any difficulty in processing the automatic cancellation, an email will be sent to the merchant so that he can manually cancel it.\n\nThe Payment Provider Protocol also allows partial refunds. For example, if after completing a purchase in the amount of USD 1,000, it is necessary to refund the customer in the amount of USD 300, two scenarios are possible:\n\n1. __Payment has already been settled__: a partial refund of USD 300 will be made to the customer. The remaining amount (USD 700) remains at the merchant's disposal.\n2. __Payment has not yet been settled__: a settlement occurs in the amount of USD 300 and a partial settlement approval in the amount of USD 700 will be made to the merchant. \n\nMore information about the refund and cancellation API [here](https://developers.vtex.com/docs/guides/payment-provider-protocol-api-overview).\n\n### Settlement\n\nIf the payment transaction is authorized in VTEX Payments, it can receive settlement requests. When we receive a settlement request, we call the __/payments/\\{id\\}/settlements__ provider endpoint, where *\\{id\\}* is the payment ID inside VTEX.\n\nWhen the provider receives a request for settlement, it must settle the payment and respond with settlement information. If this call fails, we do some retries for up to 1 day.\n\n> ❗ Your provider must be prepared to receive the same settlement call multiple times.\n\nIf the settlement call works fine, we move the payment transaction to the *Finished* status, and the stream ends successfully.\n\nMore information about the Settlement API [here](https://developers.vtex.com/docs/guides/payment-provider-protocol-api-overview).\n\n## VTEX Credentials\n\nWhen calling `CallbackURL`, you must specify the authentication headers, which in VTEX are _X-VTEX-API-AppKey_ and _X-VTEX-API-AppToken_. You can find these credentials (which are unique to your account) in the VTEX License Manager module.\n\nUse the `https://{{AccountName}}.myvtex.com/admin/license-manager/#/home` URL, replacing `{{AccountName}}` with your account name. Then follow the instructions explained in [this tutorial](https://developers.vtex.com/docs/guides/authentication-overview) to learn how to create appKeys and appTokens."}