{"section":"tutorials","requestedLocale":"en","requestedSlug":"managing-admin-users","locale":"en","slug":"managing-admin-users","path":"docs/en/tutorials/account-management/users/managing-admin-users.md","branch":"main","content":"User management for your VTEX store’s administrative environment is done under [Account management](/en/docs/tutorials/visao-geral-configuracoes-da-conta--6USYxLuzNt4uAkvjdPF7I8) on the **Users** page. To access the page, click your **profile avatar** on the VTEX Admin top bar (the circle with the initial of your email) and click **Account settings** > **Users**.\n\nThis page allows you to: \n\n* [Create a user](#creating-a-new-user)\n* [Edit a user](#editing-a-user)\n* [Delete a user](#deleting-a-user)\n* [Export users](#exporting-users)\n\n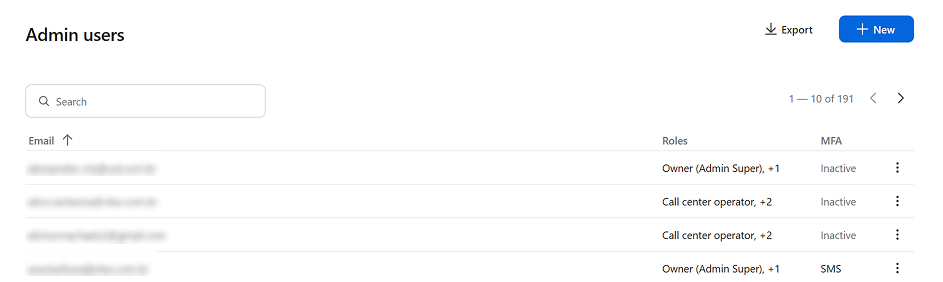\n\nThe table on the page shows: \n\n| Columns | Description |\n| :---- | :---- |\n| Email | Email address of the admin user registered in the VTEX Admin. |\n| Roles | Roles associated with the admin user. |\n| MFA | Multi-factor authentication (MFA) configuration. The status can be *Inactive* or show the configured method (*SMS* or *Authenticator*). Learn more in [Enable two-factor authentication login](/en/docs/tutorials/habilitar-login-por-autenticacao-de-2-fatores--4Ae1fcQi12g8u4SkQKCqWQ). |\n\nThe search bar lets you search by users’ email addresses and displays results in real time.\n\n## Requirements\n\nTo manage admin users, you need to have a [role](/en/docs/tutorials/roles) with the following [License Manager resources](/en/docs/tutorials/license-manager-resources):\n\n| Resource name | Resource key (resource_key) | Description |\n| :---- | :---- | :---- |\n| Edit Admin Users | EditAdminUsers | Allows creating, editing, and removing admin users. |\n| View Admin Users | ViewAdminUsers | Allows viewing user information and roles. |\n\n## Creating a new user\n\nTo add someone to the VTEX Admin, register their email and assign the appropriate roles. Follow the steps below to complete the process:\n\n1. In the VTEX Admin top bar, click your profile avatar (the circle with your email initial), then go to **Account settings** > **Users**.\n2. Click the `+ New` button.\n3. Complete the **Email** field.\n4. Select the desired [Roles](/en/docs/tutorials/roles).\n5. Click `Save`.\n\nThe user will receive an email confirming the information was received, with a link to set the password. The password must be at least eight characters and include a number, an uppercase letter, and a lowercase letter. After the password is set, an access key will be sent by email to confirm the account.\n\n## Editing a user\n\nIf you need to adjust access permissions or update the roles of an existing user, edit the user as follows.\n\nApply the principle of least privilege: assign each user only the roles and resources that are strictly necessary for their daily activities. This minimizes security risks and helps maintain tighter control over the environment.\n\n1. In the VTEX Admin top bar, click your **profile avatar** (the circle with your email initial), then go to **Account settings** > **Users**.\n2. To edit an existing user, click the ⋮ menu button on the user’s row and select **Edit**.\n You can’t change the email of a registered user. If needed, delete the existing record and create a new one.\n3. On the edit screen, you can add or remove the user [roles](/en/docs/tutorials/roles).\n4. After making the desired changes, click `Save`.\n\n> ℹ️ An alert will be displayed when adding roles to a user who doesn’t use multi-factor authentication (MFA). The article [Enable login by 2-factor authentication](/en/docs/tutorials/enabling-2-factor-authentication-login) shows how to enable this setting.\n\n> ⚠️ If you remove all roles from a user, they will no longer have access to the VTEX Admin.\n\n## Deleting a user\n\nWhen a team member should no longer access the VTEX Admin, you must remove their user account. Follow the steps below to complete this removal safely.\n\n1. In the VTEX Admin top bar, click your **profile avatar** (the circle with your email initial), then go to **Account settings** > **Users**.\n2. Click the menu button next to the user you want to remove.\n3. Click **Delete**.\n\n A message will appear to confirm the removal of the user.\n4. To confirm, click `Yes, revoke all access`.\n\n## Exporting users\n\nTo view or save a list of all admin users, you can export the data as a CSV file. See below how to generate this report:\n\n1. In the VTEX Admin top bar, click your **profile avatar** (the circle with your email initial), then go to **Account settings** > **Users**.\n2. To export user data, click `Export`.\n\nThe CSV download starts automatically. The file includes each user’s ID, email, roles, and MFA configuration.\n\n## Learn more\n\n* [Account settings overview](/en/docs/tutorials/account-settings-overview)\n* [Roles](/en/docs/tutorials/roles)\n* [License Manager resources](/en/docs/tutorials/license-manager-resources)\n* [Enable login by 2-factor authentication](/en/docs/tutorials/enabling-2-factor-authentication-login)"}