{"section":"tutorials","requestedLocale":"en","requestedSlug":"how-my-account-works","locale":"en","slug":"how-my-account-works","path":"docs/en/tutorials/apps/my-account/how-my-account-works.md","branch":"main","content":"The __My Account__ page offers your customers autonomy to manage their orders and personal data on a single page. This feature facilitates the operation of your business by reducing operational costs associated with customer service.\n\nIn [basic settings](#basic-settings), you can configure which sections will appear for the client. The existing sections are as follows:\n\n- [Profile](#profile)\n- [Addresses](#addresses)\n- [Orders](#orders)\n- [Credit cards](#credit-cards)\n- [Subscriptions](#subscriptions)\n- [Authentication](#authentication)\n\n> ℹ️ To learn about **My Account** customization, see our developer documentation [My Account - StoreV2 version](https://developers.vtex.com/docs/guides/vtex-my-account). Be aware that VTEX does not offer support for **My Account** when customized.\n\n## Profile\n\nIn this section, customers can manage their personal data saved in the store. They can [edit their profile information](#edit), [set a new password](#password), and [choose whether to receive emails with promotions](#newsletter).\n\n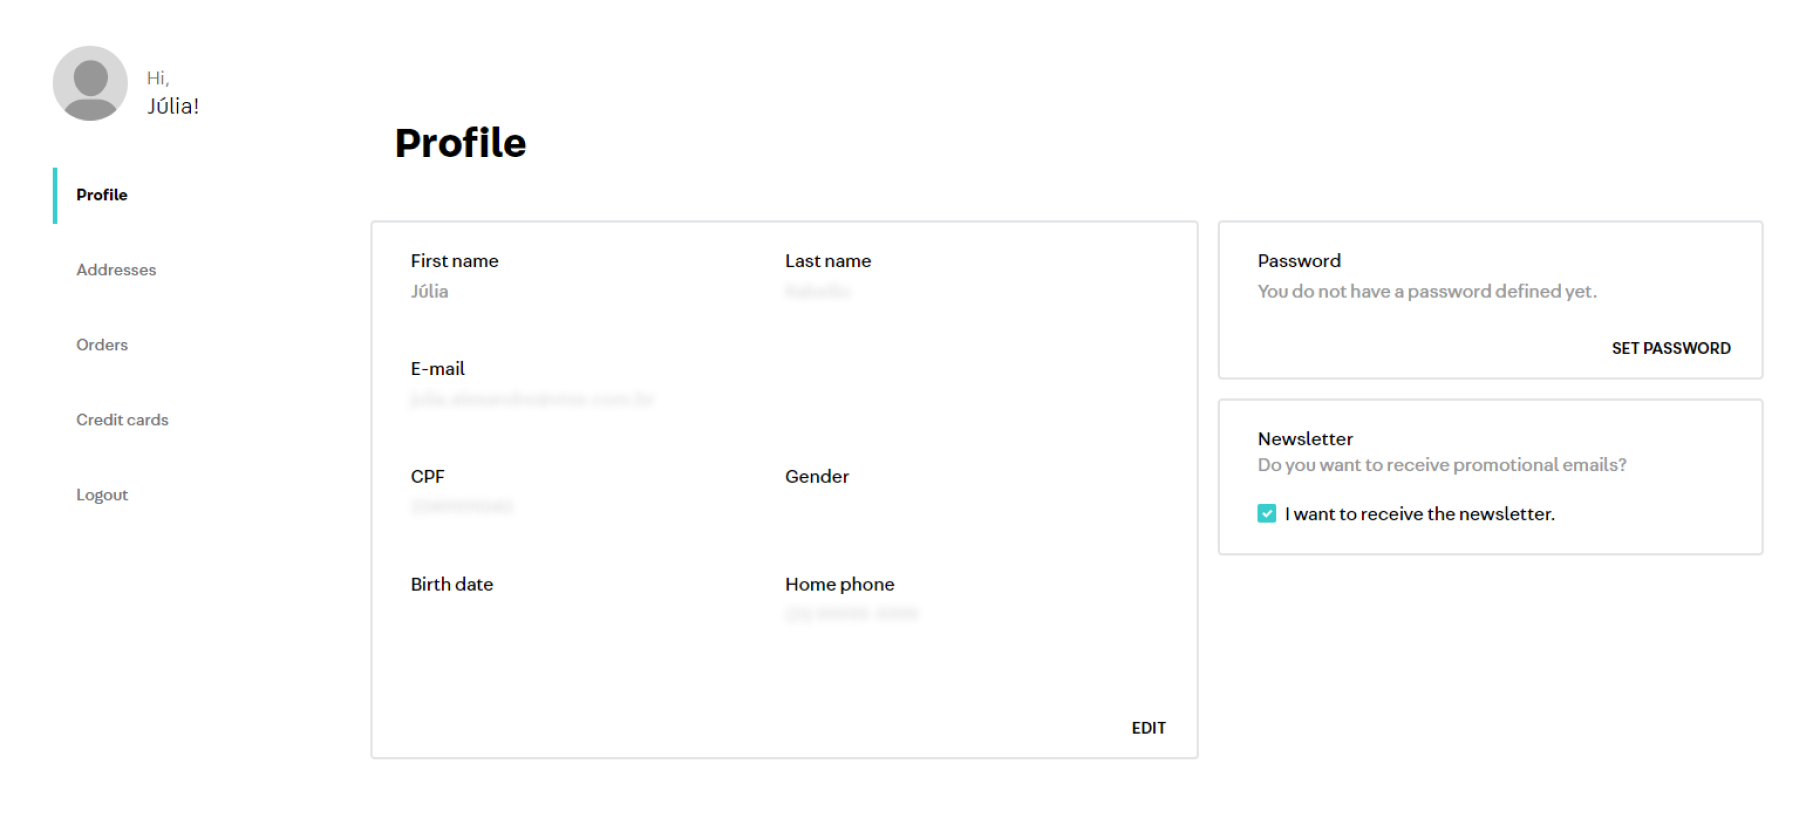\n\n### Edit\n\nThe `Edit` button allows you to change the following profile information:\n\n* First name\n* Last name\n* ID type and number\n* Phone number\n* Gender (optional)\n* Date of birth (optional)\n\nIf the customer is a legal entity, they can `Include business fields` and fill in the following information about their company:\n\n* Corporate name\n* Business name\n* Corporate phone\n* State registration\n* Trade name\n\n### Password\n\nThe `Set password` button allows you to create a new password.\n\n### Newsletter\n\nCustomers can check the option **I want to receive the newsletter** to receive promotions by email.\n\n## Addresses\n\nThis section displays all customer’s addresses saved in previous purchases.\n\n### Edit\n\nThe `Edit` button allows customers to change their address information saved in the store.\n\n### Add address\n\nThe `Add address` button allows customers to include new addresses besides the ones added in previous purchases.\n\n## Orders\n\n> ℹ️ In [My Account](/en/docs/tutorials/how-my-account-works), customers can only access their orders from the last two years.\n\nThis section displays a list of all orders placed by the customer in your store. The list is sorted by creation date and displays details such as order date, total price of the order, order ID, status, and items purchased.\n\n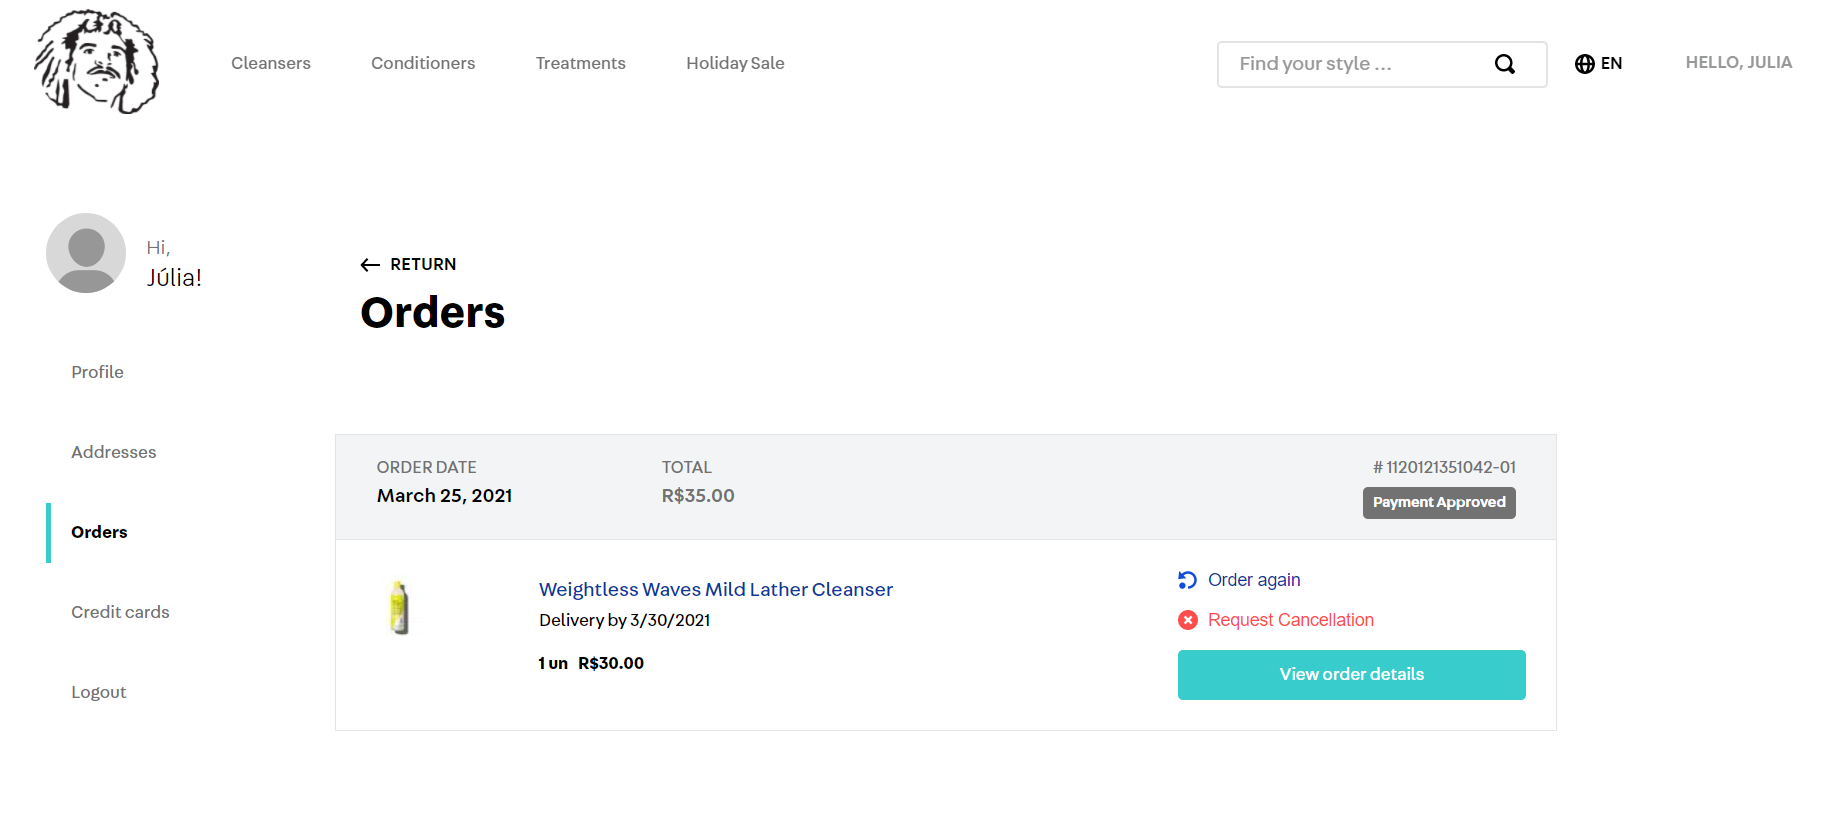\n\nThe **Orders** section allows customers to track the progress of their orders and offers options such as cancel or change orders. See below all available options.\n\n* [Order again](#order-again)\n* [Request Cancellation](#request-cancellation)\n* [View order details](#view-order-details)\n * [Change order](#change-order)\n\n### Order again\n\nIn **Order again**, the selected shopping cart will be duplicated. This means that the customer can place a new order by generating a new cart with the same items as in previous ones.\n\n### Request Cancellation\n\nCustomer may request cancellation of his or her order at any time. If requested during the [grace period for cancellation](/en/docs/tutorials/setting-the-grace-period-for-order-cancellation), store approval is not required for the cancellation to take effect.\nLearn more about [setting the grace period for order cancellation](/en/docs/tutorials/order-cancellation-requested-by-the-customer) \n\n### View order details\n\nBy clicking on an order in the list, the customer will be able to view the details of that order, such as delivery address, payment method, and total amount. In addition, they can view tracking information and a timeline indicating the [order flow](/en/docs/tutorials/order-flow-and-status).\n\nCustomers can also use the option [Order again](#order-again) in this page. By clicking on [More options](#more-options), the [Change order](#change-order) and [Request cancellation](#request-cancellation) features will be displayed (if enabled in your store and the order is in the `Handling shipping` status).\n\n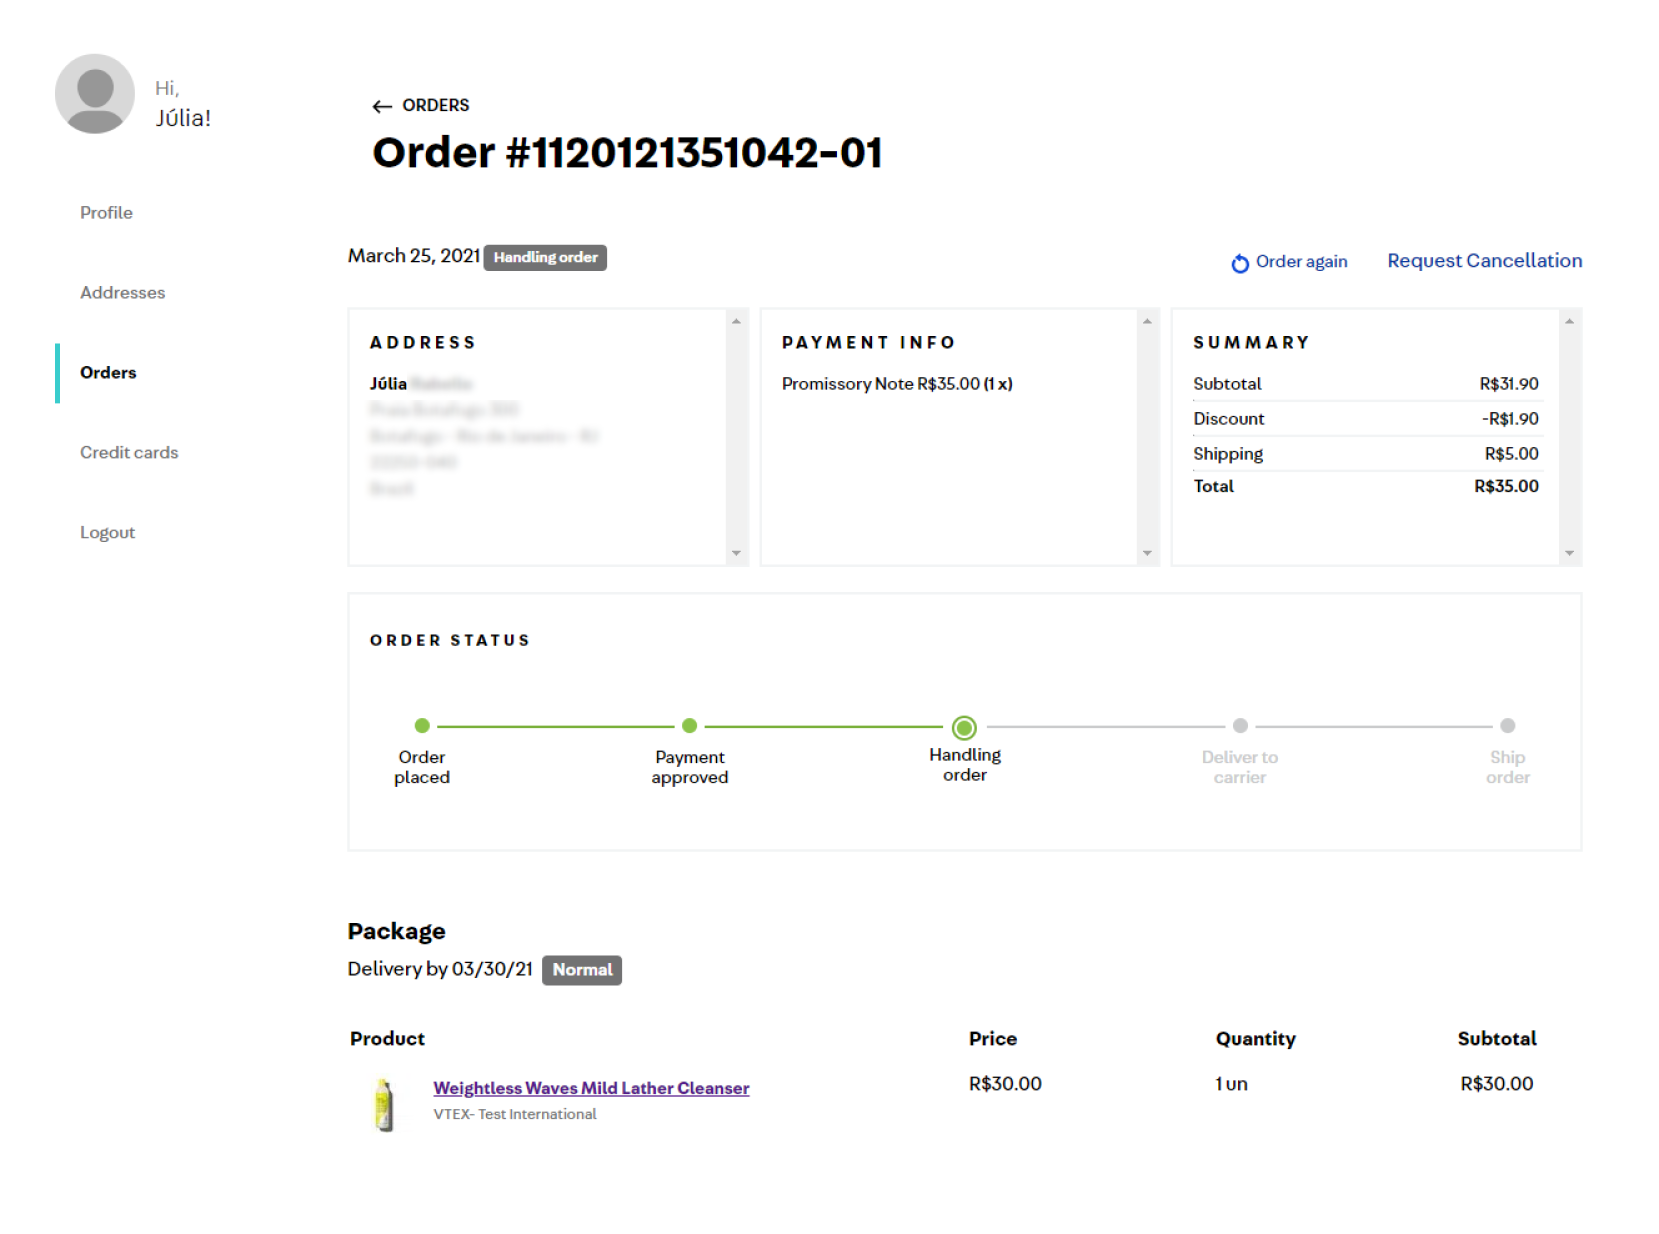\n\n#### Change order\n\nIf the order is in the `Handling shipping` status, they can `Change order` by clicking on `More options` on the order details page.\n\nTo provide this option, the retailer must [allow customers to change orders](/en/tutorial/como-funciona-a-substituicao-de-pedidos#como-ativar-a-substituicao-de-pedidos) in the **Orders** module.\n\nThe `More options` button allows customers to change their order information, such as address, payment method and items, without the need to place a new order or contact the store's customer service team. Read the article [How Order replacement works](/en/tutorial/como-funciona-a-substituicao-de-pedidos) to learn more.\n\n## Credit cards\n\nIn the **Credit cards** section, the customer has autonomy to manage the credit cards related to his account through the following actions:\n\n- Add new cards\n- Remove cards with an expired expiration date\n\nTo add new cards, follow the steps below:\n\n1. Open **My Account** in the store.\n2. Click the **Credit cards** tab.\n3. Click the **ADD NEW CARD** button.\n4. Enter the card and billing address details.\n5. Click the **SAVE NEW CARD** button.\n6. Solve the reCaptcha challenge.\n7. The card validation process will happen automatically. If there is no problem, you will be redirected to the card list and the new card will appear on the list.\n\n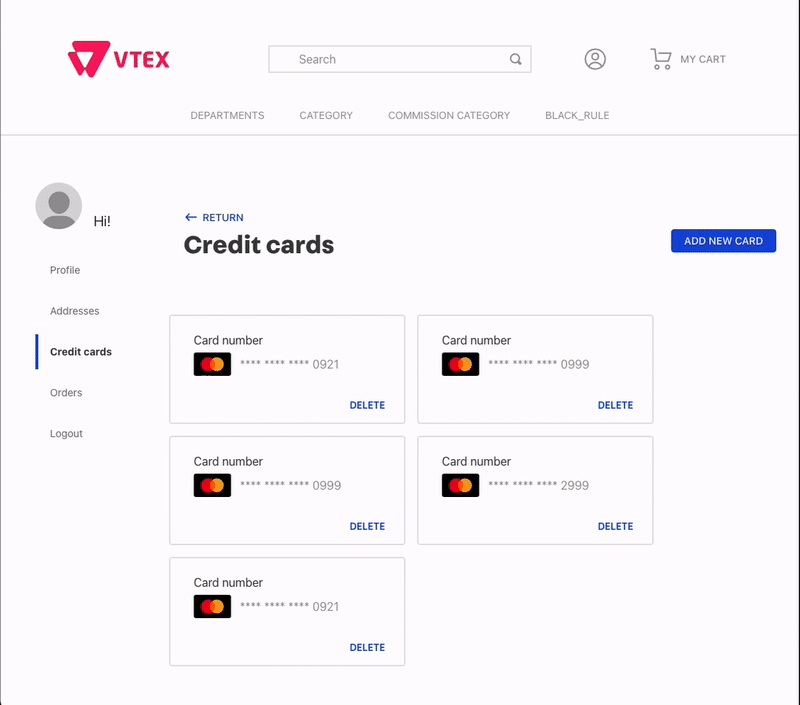\n\nHowever, there are limitations for stores using [3DS](/en/docs/tutorials/what-is-3d-secure) authentication (V1 or V2) in their acquirers:\n\n* If the customer tries to add a new card that has not been previously used in your store, the following message will be displayed: _There was an error while trying to save the card._ For more details, visit our documentation [The \"Save new card\" option does not work when using 3-D Secure (3DS)](/en/known-issues/the-save-new-card-option-does-not-work-when-using-3-d-secure-3ds--20INELA5LVhY1XqFWG7047).\n\n* In **Subscriptions**, it is not possible to save the card and then enable the subscription option. For this reason, it is necessary to enable the subscription when making a purchase, so the card will be saved automatically.\n\n* If the credit card saved in the **Credit cards** section expires, the user will need to remove it and make a new purchase to save a new card. This is because 3DS authentication requires a transaction to update and confirm credit card details.\n\n* For marketplaces, the `Save card` option in the **Credit cards** section will not be available if the payment condition for that credit card is associated only with the [white label seller](/en/docs/tutorials/white-label-seller). This is because the credit card validation occurs directly on the main account, through a test transaction that charges an amount of 1.50 USD on the given card. This amount is refunded after the card is verified.\n\n So, to save a credit card, the credit card [payment condition](/en/docs/tracks/configuring-a-payment-condition) also needs to be associated with the main account, in this case, the Marketplace.\n\n## Subscriptions\n\nIn this section, customers can manage all their subscriptions, as well as modify their subscription data. Read the article [How subscriptions work](/en/docs/tutorials/how-subscriptions-work#how-your-customers-view-and-manage-their-subscriptions) to learn more.\n\n## Authentication\n\nThis section can be accessed on the left side menu by clicking on **Authentication** in the user profile settings. It offers options for password and session management.\n\n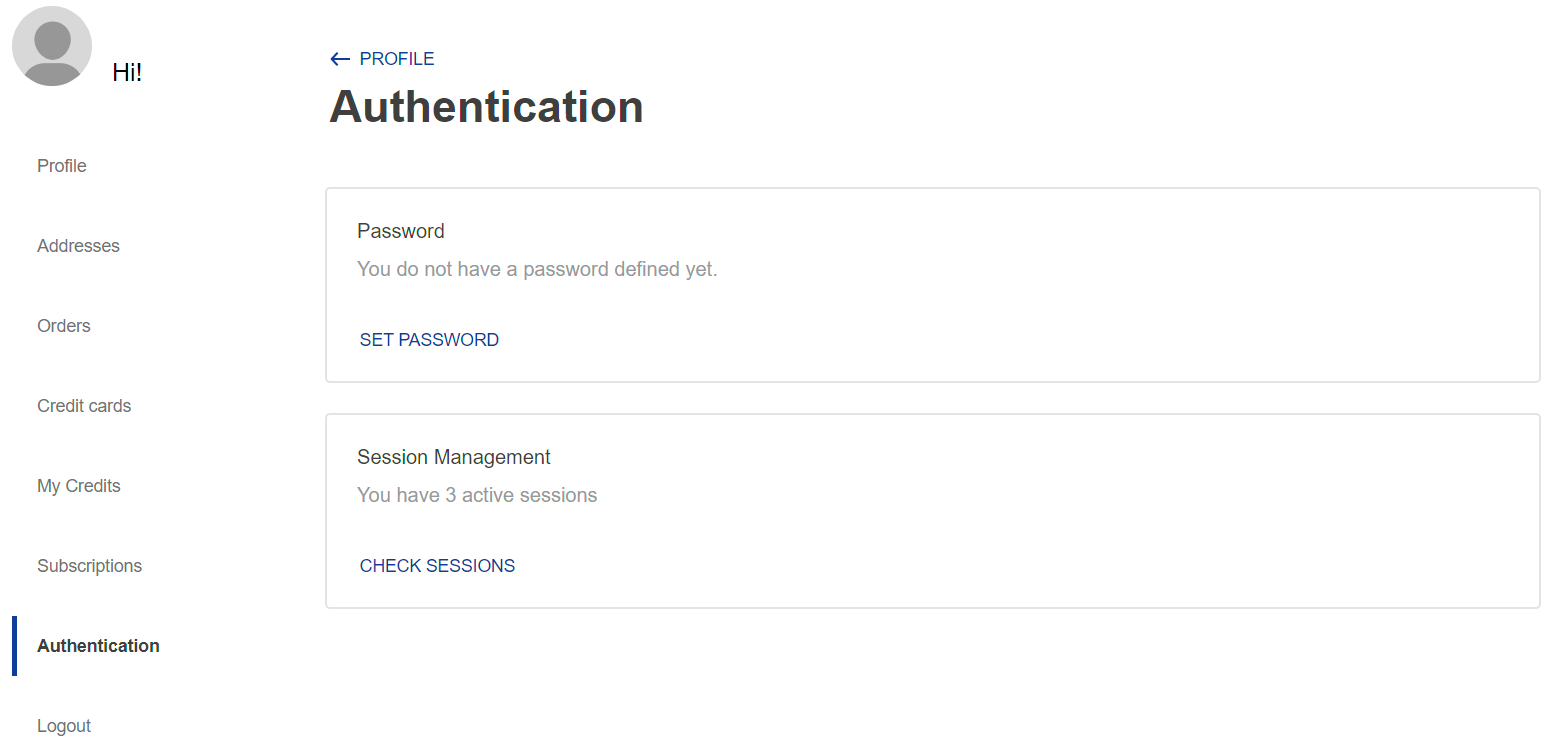\n\n### Password management\n\nThe **Password** component allows users to create their passwords, if they do not already have one, or change their existing passwords. To create a new password, follow the instructions below:\n\n1. Click on the `SET PASSWORD` button. The fields to create a password will be displayed, and the user will receive an email with a code to authorize the procedure. The email address to which the verification email was sent will appear at the top of the component.\n2. In the **Code** field, enter the verification code received by email.\n3. In the **New password** field, enter a new password. Below those fields, you will see the requirements for setting a valid password. As the user types the password meeting those requirements, their symbols will change from red to green. The password will be valid only if all symbols are green.\n4. Once you have entered a valid password, click on the `SAVE PASSWORD` button. \n\n\nTo change an existing password, follow the instructions below:\n\n1. Click on the `RESET PASSWORD` button.\n2. Enter the current password in the corresponding field.\n3. Enter the new password in the corresponding field, following all the requirements.\n4. Click on `SAVE PASSWORD`.\n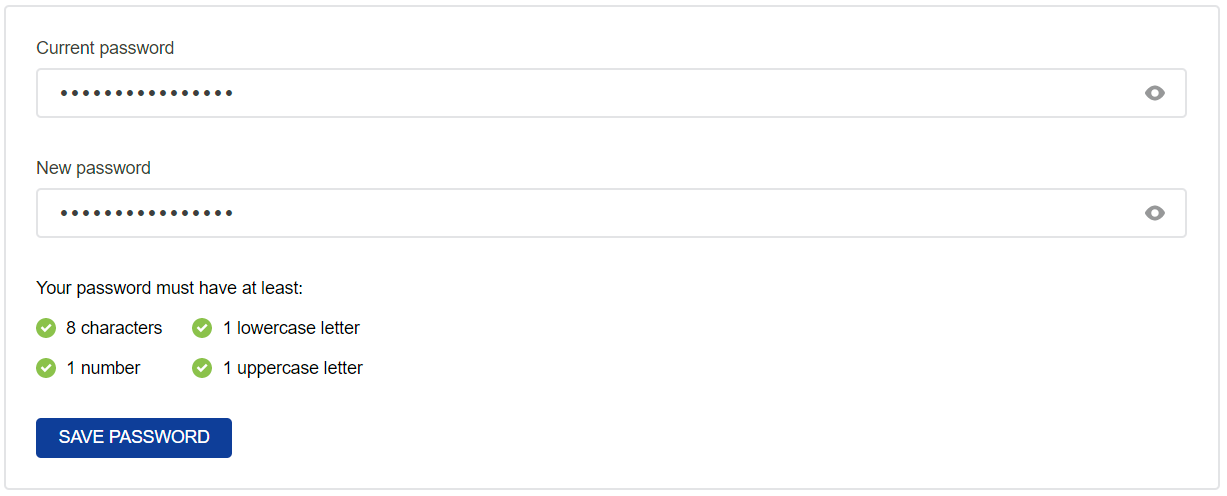\n\n> ℹ️ If you have forgotten your password, you cannot recover it using the option for resetting passwords. To recover your password, you must log out of your current session, try to log in using your email address and password, and click on **I forgot my password**.\n\n### Session management\n\nThe **Session management** component allows you to view all your active sessions, including the current session, and remotely revoke access to other sessions.\n\nTo view active sessions, click on the `VIEW SESSIONS` button, and you will be redirected to the session management page. This page will display all of your active sessions. For each session, there will be information about the type of device logged in, the last access, browser, operating system, IP address, and the date and time of the first access. The first component refers to the current session and cannot be used to log out. From the second component on, in case there is one, you can see other sessions.\n\nTo revoke access from other sessions, click on the `LOG OUT` button of that session.\n\n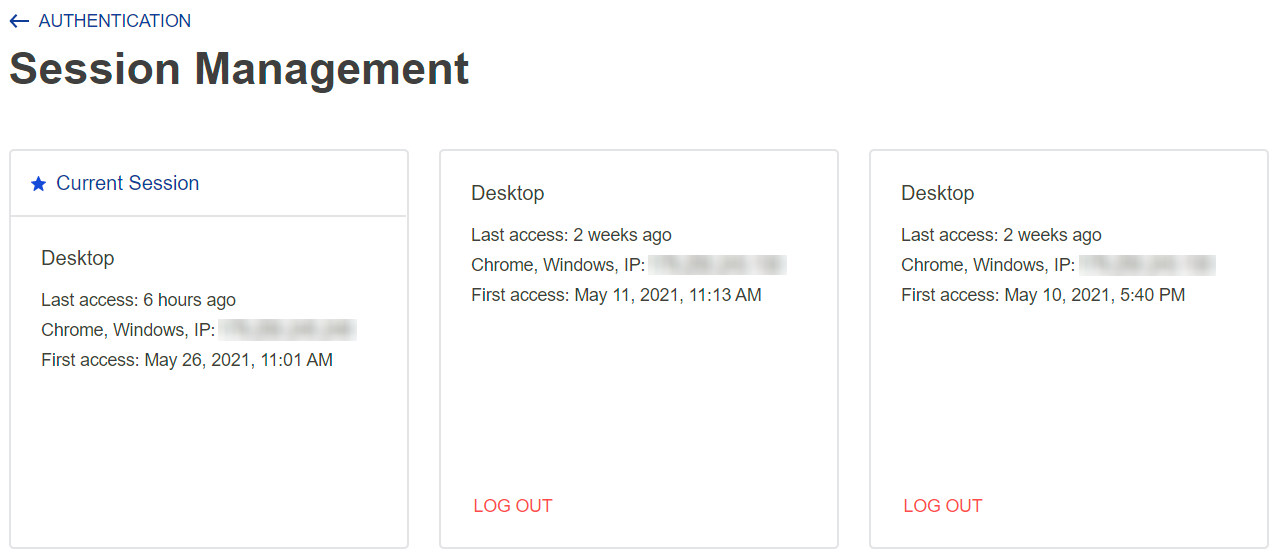\n\n## Basic settings \n\nIn **My Orders**, you determine which sections will be visible to the customer in their space. The configurable options are as follows:\n\n* In **PROFILE**, the _Show non-binary genders when editing profile_ option determines whether the customer is treated as gender-neutral when editing their [Profile](#profile). \n* In **CARDS**, the _Visible_ option defines whether the customer will have the [Cards](#credit-cards) section to manage their credit cards. \n* In **ORDERS**, the _Visible_ option determines whether the customer has the [Orders](#orders) section to track their orders. \n* In **ADDRESSES**, the _Visible_ option defines whether the customer will have the [Addresses](#addresses) section with their address’ details.\n\n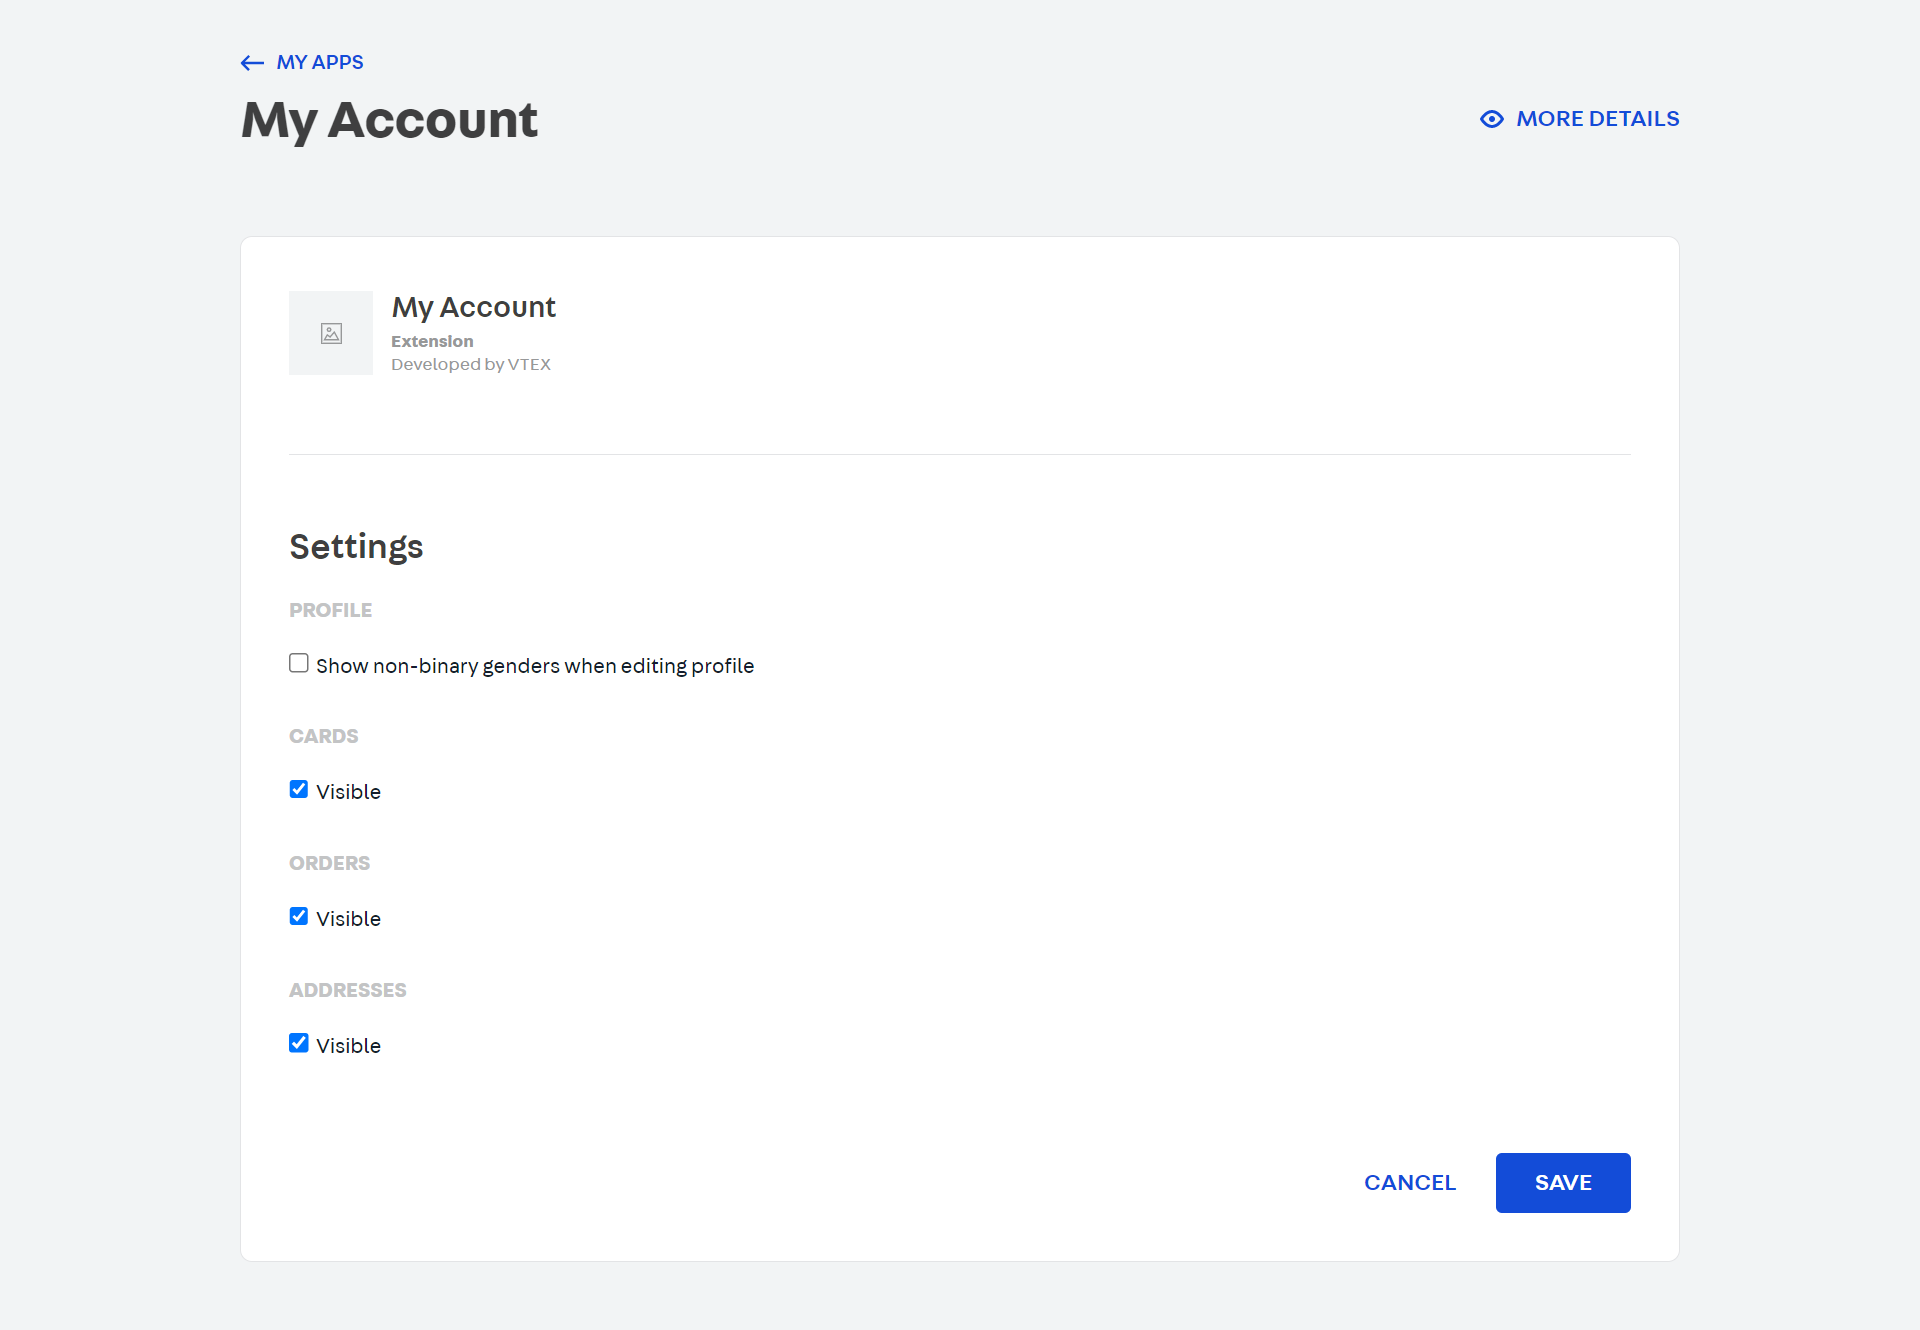\n\nBy default, the **CARDS** and **ORDERS** options are configured as visible. To change these settings or enable others, follow the steps below: \n\n1. In Admin VTEX, access **Apps > App Store**, or type **App Store** in the search bar at the top of the page. \n2. In the **All Apps** section, use the search bar to find _My account_. \n3. On the _My account_ card, click on `Settings`. \n4. Select the checkboxes as desired. \n5. Click `Save`."}