{"section":"tutorials","requestedLocale":"en","requestedSlug":"creating-or-editing-categories-attributes-and-variations-beta","locale":"en","slug":"creating-or-editing-categories-attributes-and-variations-beta","path":"docs/en/tutorials/beta/catalog-beta/creating-or-editing-categories-attributes-and-variations-beta.md","branch":"main","content":"> ℹ️ This feature is in beta, which means that we are working to improve it. If you have any questions, please contact [our Support](https://supporticket.vtex.com/support).\n\nIn the VTEX Admin, under **Catalog > Categories**, you'll find the page for managing your store's category tree. This article guides you through creating and configuring categories, [attributes, and variations](#terminology). It's divided into the following sections:\n\n- [Terminology](#terminology)\n- [Interface overview of categories, attributes, and variations](#interface-overview-of-categories-attributes-and-variations)\n- [Actions on categories](#actions-on-categories)\n - [Adding categories](#adding-categories)\n - [Editing categories](#editing-categories)\n - [Searching categories by name](#searching-categories-by-name)\n - [Hiding categories](#hiding-categories)\n- [Actions on groups of attributes or variations](#actions-on-groups-of-attributes-or-variations)\n - [Adding groups](#adding-groups)\n - [Editing groups](#editing-groups)\n - [Identifying groups and inherited attributes](#identifying-groups-and-inherited-attributes)\n- [Actions on attributes](#actions-on-attributes)\n - [Adding attributes](#adding-attributes)\n - [Editing attributes](#editing-attributes)\n - [Viewing attribute activation status and values](#viewing-attribute-activation-status-and-values)\n - [Hiding inactive attributes](#hiding-inactive-attributes)\n- [Actions on variations](#actions-on-variations)\n - [Adding variations](#adding-variations)\n - [Editing variations](#editing-variations)\n - [Viewing variation activation status and values](#viewing-variation-activation-status-and-values)\n - [Hiding inactive variations](#hiding-inactive-variations)\n\n> ❗ Once a category, attribute, or variation is created, it can't be deleted; only edited, deactivated, or hidden in the interface.\n\n## Terminology\n\nIn the beta phase, we'll use a new name for the following terms:\n\n| **Current name** | **Beta name** |\n| --- | --- |\n| [Product specifications](/en/tracks/catalogo-101--5AF0XfnjfWeopIFBgs3LIQ/2NQoBv8m4Yz3oQaLgDRagP#product-specification) | Attributes |\n| [SKU specifications](/en/tracks/catalogo-101--5AF0XfnjfWeopIFBgs3LIQ/2NQoBv8m4Yz3oQaLgDRagP#sku-specifications) | Variations |\n| [Groups (of product specifications or SKUs)](/en/docs/tutorials/creating-a-specification-group-in-a-category) | Groups (of attributes or variations) |\n\n## Interface overview of categories, attributes, and variations\n\nIn the VTEX Admin, when you go to **Catalog > Categories**, the interface by displays **Categories** and **Attributes** by default, as shown in the image below:\n\n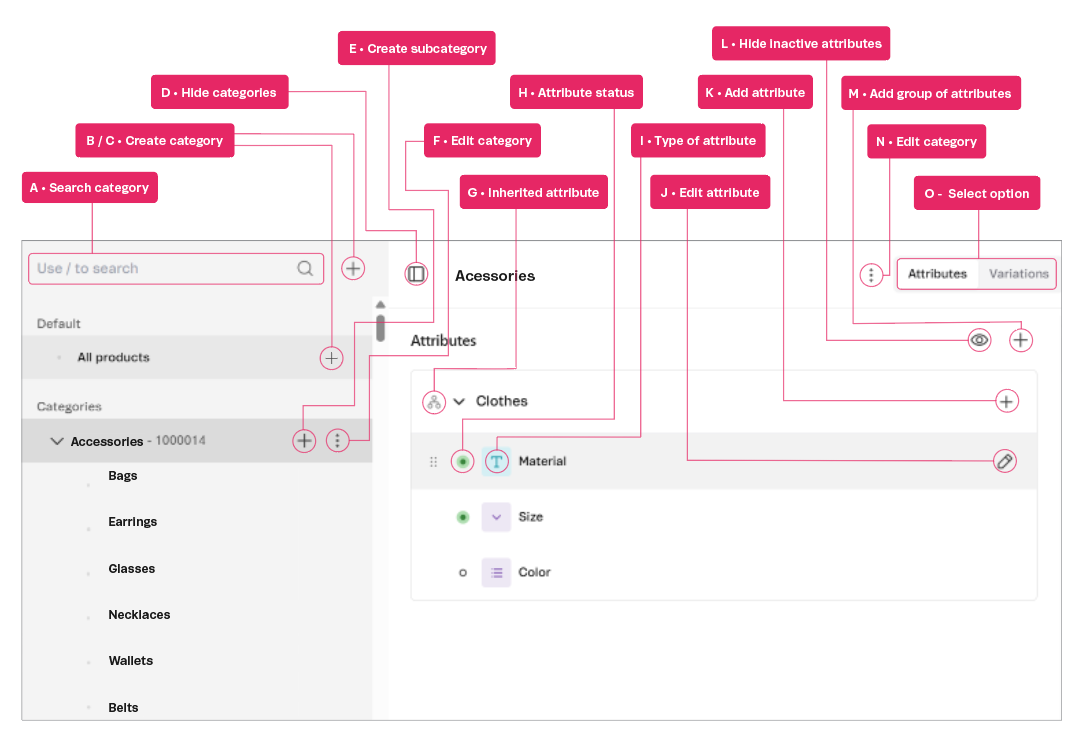\n\nOn this page, you can view information and perform the following actions:\n\n- **A - Search category:** After [adding categories](#adding-categories), you can use the [search bar to search](#searching-categories-by-name) for the desired option by name.\n- **B / C - Create category:** You can [add a new category](#adding-categories) by clicking the + icon next to the search bar, or by hovering over **All products** and clicking the + icon that displays.\n- **D - Hide categories:** You can [hide the list of categories](#hiding-categories) by clicking the icon at the top of the page next to the name of the page category.\n- **E - Create subcategory:** When you hover over the name of a category, the + icon displays, allowing you to create a nested category, which is a subcategory.\n- **F - Edit category:** When you hover over the name of a category, the vertical ellipsis displays, allowing you to [edit the category](#editing-categories).\n- **G - Inherited attribute:** The share icon displayed next to an attribute indicates that it has been [inherited](#identifying-groups-and-inherited-attributes) as a category setting applied to **All products**. Subcategories have all the attributes configured in the parent category, so they \"inherit\" these configurations.\n- **H - Attribute status:** An [attribute can be active](#viewing-attribute-activation-status-and-values), indicated by a green circle, which means it's enabled and can display on the storefront. If inactive, it’s represented by a white circle.\n- **I - Type of attribute:** The icon next to the attribute name represents the attribute type, which can be \"Free text\", \"Large text\", \"Single selection\", or \"Multi selection\".\n- **J - Edit attribute:** After adding an attribute, you can [edit it](#editing-attributes) by clicking the pencil icon on the row of the desired attribute.\n- **K - Add attribute:** You can [add an attribute](#adding-attributes) by clicking the + icon in the attribute group name.\n- **L - Hide inactive attributes:** You can [hide inactive attributes](#hiding-inactive-attributes) in the interface by clicking the eye icon .\n- **M - Add group of attributes:** You can [create a group of attributes](#adding-groups) by clicking the + icon at the top right of the page.\n- **N - Edit category:** You can [edit the selected category](#editing-categories) by clicking the vertical ellipsis at the top right of the page.\n- **O - Select option:** When accessing the **Categories** page, you can choose between viewing their `Attributes` (related to products) or `Variations` (related to SKUs).\n\nSelecting the **Variations** option displays an interface like the one shown below:\n\n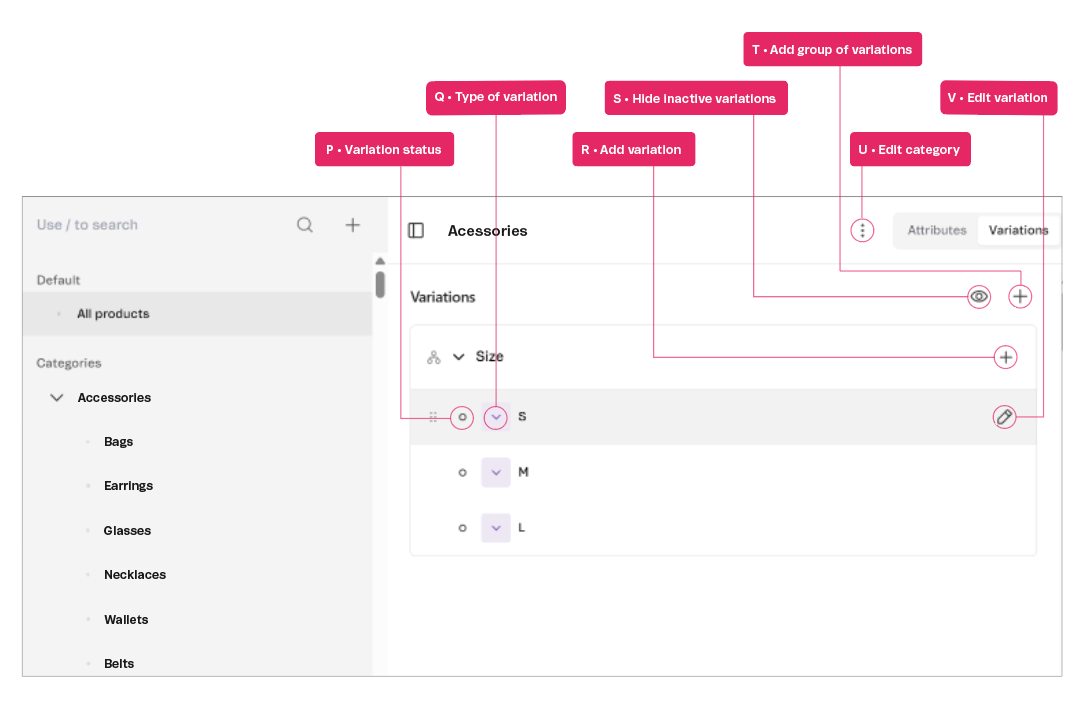\n\nOn this page, you can view information and do the following:\n\n- **P - Variation status:** A [variation status can be active](#viewing-variation-activation-status-and-values), indicated by a green circle, meaning that it has been activated to display on the storefront, or inactive, indicated by a white circle.\n- **Q - Type of variation:** The icon next to the attribute name indicates the variation type, which can be \"Single selection\" or \"Multi selection\".\n- **R - Add variation:** You can [add a variation](#adding-variations) to a group by clicking the + icon in the group name.\n- **S - Hide inactive variations:** You can [hide inactive variations](#hiding-inactive-variations) in the interface by clicking the eye icon .\n- **T - Add group of variations:** You can [create a group of variations](#adding-groups) by clicking the + icon at the top right of the page.\n- **U - Edit category:** You can [edit the selected category](#editing-categories) by clicking the vertical ellipsis at the top right of the page.\n- **V - Edit variation:** After adding a variation, you can [edit it](#editing-variations) by clicking the pencil icon on the row of the desired variation.\n\n## Actions on categories\n\nIn the Admin VTEX, go to **Catalog > Categories**, or type **Categories** in the search bar at the top of the page. The category editing interface is always displayed on the left, whether you select `Attributes` or `Variations`.\n\nCategory actions include:\n\n- [Adding categories](#adding-categories)\n- [Editing categories](#editing-categories)\n- [Searching categories by name](#searching-categories-by-name)\n- [Hiding categories](#hiding-categories)\n\n> ⚠️ When a category is added, it can't be removed, only [edited](#editing-categories) or deactivated.\n\n### Adding categories\n\nTo create a category, follow the steps below:\n\n> ❗ Once a category has been created as a parent category, it can't be edited as a subcategory. The same rule applies to subcategories, which can't become categories or change their parent category.\n\n1. In the left corner of the page, next to the search bar, click the + icon, or hover over **All products** and click the + displayed. You can also click the + icon next to the category name.\n2. In the modal displayed, enter the category name. This is the only required field.\n\n > ⚠️ The category name is crucial for [SEO](/en/docs/tutorials/improving-the-seo-of-product-listing-pages) (Search Engine Optimization), so we recommend the following:- Use simple words.
- Avoid using other languages.
- Avoid complex spelling.
- Use up to 150 characters.
\n\n3. If you want to activate the category you're creating, select the checkbox **Active.** To keep it deactivated, leave the option unchecked.\n4. In the **Basic information** section, complete the following fields:\n - **Parent category:** If the category you’re creating is a subcategory (for example, nested under another category), enter the numerical code of the parent category it belongs to.\n - **VTEX global category:** The [global category](/en/docs/tutorials/setting-up-the-global-category) is a taxonomy created by Google for the [Merchant Center](https://support.google.com/merchants/answer/6324436?hl=pt-BR), predefined as a single tree on the VTEX platform.\n\n5. In the **Storefront and SEO** section, complete the following fields:\n - **Similar words:** Synonyms of the category names. Use this field to improve the coverage of search results. You can add multiple words, separated by commas, up to 200 characters.\n - **Page title:** Text displayed in the browser tab that corresponds to the title of the category page on the site. This field is crucial for SEO, as it doesn't allow HTML tags and must contain up to 150 characters.\n - **Description:** Brief summary of the category. We recommend using up to 200 characters, so that search engines display the description correctly on the results pages. The field only supports plain text and doesn't allow HTML tags.\n - **Store search priority:** Integers used to define the category's priority in search results. The highest value means the highest priority in the results, and the value zero or the field left blank means no priority. Learn more in the article [How the score field works](/en/docs/tutorials/how-does-the-score-field-work).\n\n6. In the **Storefront** section, you can check any of the following options:\n - **Show on menu:** Makes the category or department visible on the store's top and side menus.\n - **Menu with active link:** Determines whether the category visible in the store is clickable, which redirects to a category page.\n - **Brand filter:** Defines whether the category or department page should display the option to filter by [brands](/en/docs/tracks/brands-concept-definition).\n\n7. In **Product display mode**, you determine how the SKUs of the products in the category will be displayed in the store product listing page. You can choose the following options:\n - **SKU list:** Items organized in a list format. If you don’t choose another option, this one will be used by default.\n - **Combo boxes:** Items selected from combo boxes.\n - **Radio selection icons:** Items selected from a list where you can select a single item at a time.\n - **Follows the variation setting:** The product presentation follows the configuration at the SKU level, for example, defined by the variation.\n\n8. Click `Create`.\n\nOnce this is done, the confirmation message \"*Category created successfully*\" will be displayed.\n\n### Editing categories\n\nTo edit a category, follow the steps below:\n\n1. Hover over the desired category and click the vertical ellipsis menu .\n2. Click **Edit category**.\n3. Edit the information you want.\n\n > ❗ The following configurations can't be edited:- Hierarchy level of the category, whether it's a parent category or subcategory.
- Relationship between categories and subcategories.
\n\n4. Click `Apply`.\n\nOnce this is done, the confirmation message \"*Category updated successfully*\" will be displayed.\n\n### Searching categories by name\n\nOnce you've created categories, you can find them using the search bar indicated by the magnifying glass icon . The search only considers the names of categories and subcategories.\n\n> ℹ️ You can use a shortcut for this search. By pressing the `/` key, the cursor moves to the search field to enter the name of the desired category.\n\n### Hiding categories\n\nOn the **Categories** page, you can hide the list of categories by clicking the icon next to the category name at the top of the page. To display the list of categories again, click the same icon.\n\n## Actions on groups of attributes or variations\n\nIn **Catalog**, a group is a set of related attributes or variations. To manage your groups, go to **Catalog > Categories** and select `Attributes` or `Variations`. The possible actions for groups are:\n\n- [Adding groups](#adding-groups)\n- [Editing groups](#editing-groups)\n- [Identifying groups and inherited attributes](#identifying-groups-and-inherited-attributes)\n\nEvery group created on the **Attributes** page is reflected on the **Variations** page, and vice versa. However, each group only displays the attributes or variations configured in it, which are displayed based on the selected page.\n\n### Adding groups\n\nTo create a group, follow the steps below:\n\n1. At the top of the **Attributes** or **Variations** page, click the + icon.\n2. Enter the group name, up to 100 characters.\n3. Click outside the text area to view the `Save` button.\n4. Click `Save`.\n\nOnce this is done, the confirmation message \"*Category group saved successfully*\" will be displayed. The group will be automatically listed in alphabetical order after being added.\n\n> ℹ️ To learn how to add attributes to a group, go to [Adding attributes](#adding-attributes), and to learn how to add variations to a group, go to [Adding variations](#adding-variations).\n\n### Editing groups\n\nYou can edit a group by changing its name,[including attributes](#adding-attributes) or [including variations](#adding-variations), as will be explained in the following sections.\n\nTo rename a group, follow the steps below:\n\n1. On the **Attributes** or **Variations** page, double-click the name of the desired group.\n2. Edit the name.\n3. Click outside the text area to see the `Save` button.\n4. Click `Save`.\n\nOnce this is done, the confirmation message *\"Category group saved successfully\"* will be displayed.\n\n### Identifying groups and inherited attributes\n\nWhen a group of attributes is created in the parent category, it becomes mandatory for all subcategories, so we say it's an \"inherited\" group.\n\nIn the **Attributes** interface, you can identify groups and inherited attributes by the share icon, located to the left of the name, as in the image below:\n\n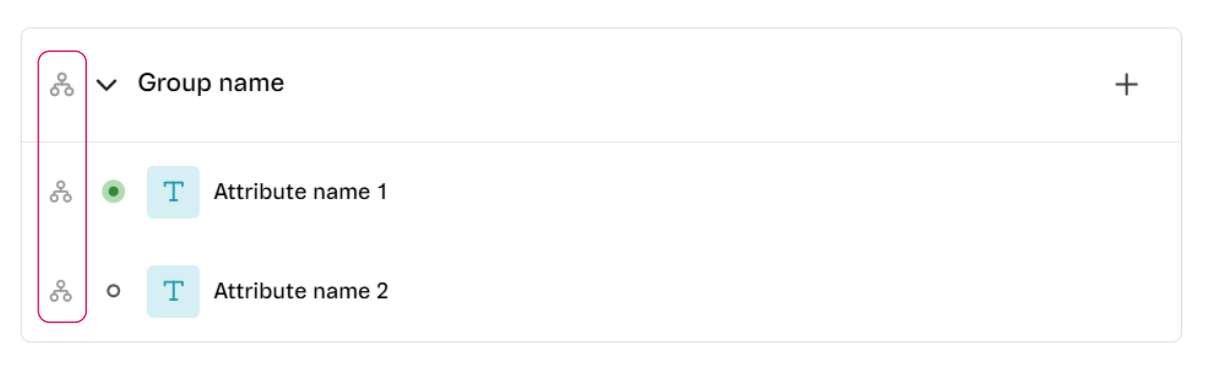\n\n> ℹ️ To learn about attribute status, see the section [Viewing attribute activation status and values](#viewing-attribute-activation-status-and-values).\n\n## Actions on attributes\n\nIn beta, *attributes* is the terminology for what used to be called [product specifications](/en/tracks/catalogo-101--5AF0XfnjfWeopIFBgs3LIQ/2NQoBv8m4Yz3oQaLgDRagP#product-specification) — the informative properties that can be added to products. In **Catalog > Categories**, the **Attributes** page allows you to:\n\n- [Adding attributes](#adding-attributes)\n- [Editing attributes](#editing-attributes)\n- [Viewing attribute activation status and values](#viewing-attribute-activation-status-and-values)\n- [Hiding inactive attributes](#hiding-inactive-attributes)\n\nTo view its interface, see the section [Interface overview of categories, attributes, and variations](#interface-overview-of-categories-attributes-and-variations).\n\n### Adding attributes\n\nTo add an attribute, follow the steps below:\n\n> ❗ Once an attribute has been added to a group, it can't be removed; it can only be edited, deactivated, or hidden in the interface. The attributes' type can't be edited.\n\n1. On the **Attributes** page, after you've [added a group](#adding-groups), click the + icon next to the name of the group you want, or click the down arrow next to the name of the group and then click `Add first attribute`.\n2. Click the type of attribute you want:\n - **Free text:** Character-free typing, suitable for short text. The field doesn't support HTML tags. Example: Description of ingredients.\n - **Large text:** Character-free typing, suitable for longer text. The field doesn't support HTML tags. Example: Size charts for fashion stores.\n - **Single selection:** There are two or more predefined values, but you can select only one. Example: Shoe sizing, using values such as 34, 35, 36, etc.\n - **Multiple selection:** There are at least two predefined values, and you can select multiple options. Example: Gender for which a product is intended, which can be a combination of Male, Female, and Unisex.\n3. In the side drawer, complete the title field with the attribute name. This is the only required field.\n4. If you want to activate the attribute you're creating, select the **Active** checkbox. To keep it deactivated, leave the option unchecked.\n5. In **Settings**, complete the following fields:\n - **Required:** Select this checkbox to make the attribute required. Leave it unchecked to keep it optional. If the attribute is required, the product can only be activated once the field is completed.\n - **Default value:** Common value for the attribute. Example: In a t-shirt store, the default value for the \"material\" attribute is \"cotton\", the most commonly used type.\n - **Description:** Description of the attribute and its values.\n\n6. In **Storefront**, all the fields refer to the customers' shopping experience, and you can select the options you want from the following:\n - **Show specification:** Determines whether the attribute is displayed on the storefront.\n - **Use as filter:** Defines whether the attribute can be used as a filter in the product search.\n - **Top menu link:** Defines whether the attribute is displayed as a clickable link in the top menu of the site.\n - **Side menu link:** Defines whether the attribute is displayed as a clickable link in the site's side menu.\n\n7. Click `Create`.\n\nOnce this is done, the confirmation message \"*Attribute created*\" will be displayed.\n\n### Editing attributes\n\nTo edit an attribute, follow the steps below:\n\n1. On the **Attributes** page, hover over the name of the attribute you want to edit and click the pencil icon that will be displayed.\n2. In the side drawer, change the attribute settings as desired. For more information on **Settings** or **Storefront**, see the section [Adding attributes](#adding-attributes).\n\n > ⚠️ The attribute type is the only setting that can't be changed.\n\n3. (Optional). This step doesn't apply to the **Free text** and **Large text** attribute types. However, for **Single selection** and **Multiple selection**, there's the **Values** section, in which you determine the exact values for the attribute.\n - 3.1 To create a value, click the + icon, or click the down arrow next to **Values** and select `Add first value`.\n - 3.2 Enter the text of the value and then click somewhere on the screen outside the value row.\n - 3.3 The value is created as active, identified by the green icon next to the name. To deactivate it, leave the **Active** checkbox unchecked.\n - 3.4 The values are displayed in the order they were created. To change a value's position in the list, click the icon to the left of the attribute value name and drag it to the desired position.\n\n4. Click `Apply`.\n\nOnce this is done, the confirmation message \"*Attribute updated successfully*\" will be displayed.\n\n### Viewing attribute activation status and values\n\nBoth the attribute and its values can have two possible statuses, as shown in the table below:\n\n| **Status** | **Attribute** | **Attribute value** | **Icon color** |\n| :---: | :--- | :--- | :---: |\n| Active | The attribute can be reflected on the storefront, displaying only the activated values. | The attribute value can be reflected on the storefront if the attribute itself is active. | 🟢 Green |\n| Inactive | The attribute isn't reflected on the storefront, regardless of the value status. | The attribute value isn't reflected on the storefront, regardless of whether the attribute is active. | ⚪ White |\n\nTo activate or deactivate an attribute or its values, see the section [Editing attributes](#editing-attributes).\n\n> ℹ️ For more information on the icon that can be displayed next to the attribute's status, see the section [Identifying groups and inherited attributes](#identifying-groups-and-inherited-attributes).\n\n### Hiding inactive attributes\n\nA created attribute can't be deleted from your catalog, but you can hide it from the interface after [deactivating it](#viewing-attribute-activation-status-and-values).\n\nTo do this, at the top right of the **Attributes** page, click the eye icon to **Hide inactive attributes**. To display the inactive attributes again, click the same icon.\n\n## Actions on variations\n\nIn beta, *variations* is the terminology for what used to be called [SKU specifications](/en/tracks/catalogo-101--5AF0XfnjfWeopIFBgs3LIQ/2NQoBv8m4Yz3oQaLgDRagP#sku-specifications) — the SKU options in which products could be purchased. In **Catalog > Categories**, the **Variations** page allows you to:\n\n- [Adding variations](#adding-variations)\n- [Editing variations](#editing-variations)\n- [Viewing variation activation status and values](#viewing-variation-activation-status-and-values)\n- [Hiding inactive variations](#hiding-inactive-variations)\n\nTo view its interface, see the section [Interface overview of categories, attributes, and variations](#interface-overview-of-categories-attributes-and-variations).\n\n### Adding variations\n\nTo create a variation, follow the steps below:\n\n> ❗ Once a variation has been added to a group, it can't be removed; it can only be edited, deactivated, or hidden in the interface. The variations' type can't be edited.\n\n1. On the **Attributes** page, after you've [added a group](#adding-groups), click the + icon next to the name of the group you want, or click the down arrow next to the name of the group and then click `Create first variation`.\n2. Click the desired type of variation:\n - **Single selection:** There are two or more predefined values, but the customer can choose only one option. Example: The appliance's voltage is 110V or 220V.\n - **Multiple selection:** There are two or more predefined values, and the customer can choose more than one option. Example: Defining the colors of a product (red, yellow, blue and/or black).\n3. In the side drawer, complete the title field with the name of the variation. This is the only required field.\n4. If you want to activate the variation you're creating, select the **Active** checkbox . To keep it deactivated, leave the option unchecked.\n5. In **Settings**, complete the following fields:\n - **Required:** Select this checkbox to make the variation required. Leave it unchecked to keep it optional. If the variation is required, the SKU can only be activated once it's completed.\n - **Default value:** Common value for the chosen variation type.\n - **Description:** Description of the variation and its values.\n\n6. In **Storefront**, all the fields refer to the customers' shopping experience, and you can select the options you want from the following:\n - **Show specification:** Determines whether the variation is displayed on the storefront.\n - **Use as filter:** Defines whether the variation can be used as a filter in the product search.\n - **Top menu link:** Defines whether the variation is displayed as a clickable link in the top menu of the site.\n - **Side menu link:** Defines whether the variation is displayed as a clickable link in the site's side menu.\n\n7. Click `Create`.\n\nOnce this is done, the confirmation message \"*Variation created successfully*\" will be displayed.\n\n### Editing variations\n\nTo edit a variation, follow the steps below:\n\n1. On the **Variations** page, hover over the name of the variation you want to edit and click the pencil icon that will be displayed.\n2. In the side drawer, change the variation settings as desired. For more information on **Settings** or **Storefront**, see the section [Adding variations](#adding-variations).\n\n > ⚠️ The variation type is the only setting that can't be changed.\n\n3. When editing, the **Values** section determines the predefined values for the variation.\n - 3.1 To create a value, click the + icon, or click the down arrow next to **Values** and select `Add first value`.\n - 3.2 Enter the text of the value and then click somewhere on the screen outside the value row.\n - 3.3 The value is created as active, identified by the green icon next to the name. To deactivate it, leave the checkbox unchecked.\n - 3.4 The values are displayed in the order they were created, which is reflected on the storefront. To change a value's position in the list, click the icon to the left of the name and drag it to the desired position.\n\n4. Click `Apply`.\n\nOnce this is done, the confirmation message \"*Updated attribute successfully*\" will be displayed.\n\n### Viewing variation activation status and values\n\nBoth the variation and its values can have two possible statuses, as shown in the table below:\n\n| **Status** | **Variation** | **Variation value** | **Icon color** |\n| :---: | :--- | :--- | :---: |\n| Active | The variation is reflected on the storefront and only displays the activated values. | The variation value can be reflected on the storefront if the variation itself is active. | 🟢 Green |\n| Inactive | The variation isn't reflected on the storefront, regardless of the value status. | The value of the variation isn't reflected on the storefront, regardless of whether the variation is active. | ⚪ White |\n\n> ℹ️ To activate or deactivate a variation or its values, see the section [Editing variations](#editing-variations).\n\n### Hiding inactive variations\n\nA created variation can't be deleted from your catalog, but you can hide it from the interface after [deactivating it](#viewing-variation-activation-status-and-values).\n\nTo do this, at the top right of the **Variations** page, click the eye icon to **Hide inactive variations**. To display them again, click the same icon."}