{"section":"tutorials","requestedLocale":"en","requestedSlug":"audit","locale":"en","slug":"audit","path":"docs/en/tutorials/security/platform-security-resources/audit.md","branch":"main","content":"To increase transparency and trust among your store admin users, VTEX records different operations, their authors and timestamps in **Audit**, a module used to query and investigate this history through filters.\n\nTo access the Audit page in the VTEX Admin, go to **Apps > Installed Apps > Audit**, or type **Audit** in the search bar. On this page, you can do the following:\n\n* [Query events in Audit](#querying-events-in-audit)\n* [View the last queries in Audit](#viewing-the-last-queries-in-audit)\n\n> ℹ️ To view Audit events, you must have a [role](/en/docs/tutorials/roles) associated with the *Insights Metrics* [resource](/en/docs/tutorials/license-manager-resources).\n\n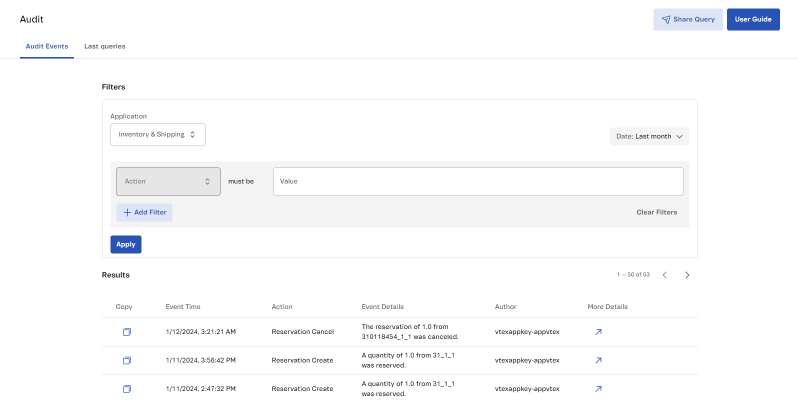\n\n## Querying events in Audit\n\nAudit allows you to query events using filters related to the following information: application, date, action, author, and event details. Below, we explain how to use Audit [filters](#filters) and how the [results](#results) are displayed. We also use practical [examples](#query-examples) to demonstrate the use of filters.\n\n### Filters\n\nFollow the instructions to search for an event using the filters available in Audit:\n\n1. In the VTEX Admin, go to **Apps > Installed Apps > Audit**, or type _Audit_ in the search bar. You will be redirected to the **Audit Events** tab.\n2. In the **Application** menu under **Filters**, select the application related to the query.\n3. In the **Date** menu, choose a predefined date for the query. If you prefer to set the exact date range for the query, select the **Custom** option and choose the **Start** and **End** dates for the query.\n\n > ℹ️ Only records from the last 3 months can be searched. If you need data older than this period, please open a [support ticket](https://help.vtex.com/en/support).\n\n4. If you wish, add a filter by Action. To do this, in the field next to `Action` **must be**, type the name of the action and press `Enter`. You can enter more than one value by pressing `Enter` after each selection. Check the name of each action in [Events available in Audit](/en/docs/tutorials/events-available-in-audit).\n5. If necessary, you can add specific filters to search for events more accurately. To do this, click the `Add Filter` button.\n5. Select the filter parameter (_Author_ or _Event Details_) and enter the value to which the parameter should be compared.\n\n When adding filters with the same parameter (for example: `Action = Change Promotion Configuration` or `Change Coupon Configuration`), the results include events that match any of the values entered. When adding filters with different parameters (for example: `Action = Change Coupon Configuration` and `Author = email@mail.com`), the criteria are combined. Note that you can repeat steps 4 and 5 to add more filters.\n\n For example, the query in the image below returns results for `Change Promotion Configuration` or `Change Coupon Configuration` actions whose author is `email@mail.com`.\n\n 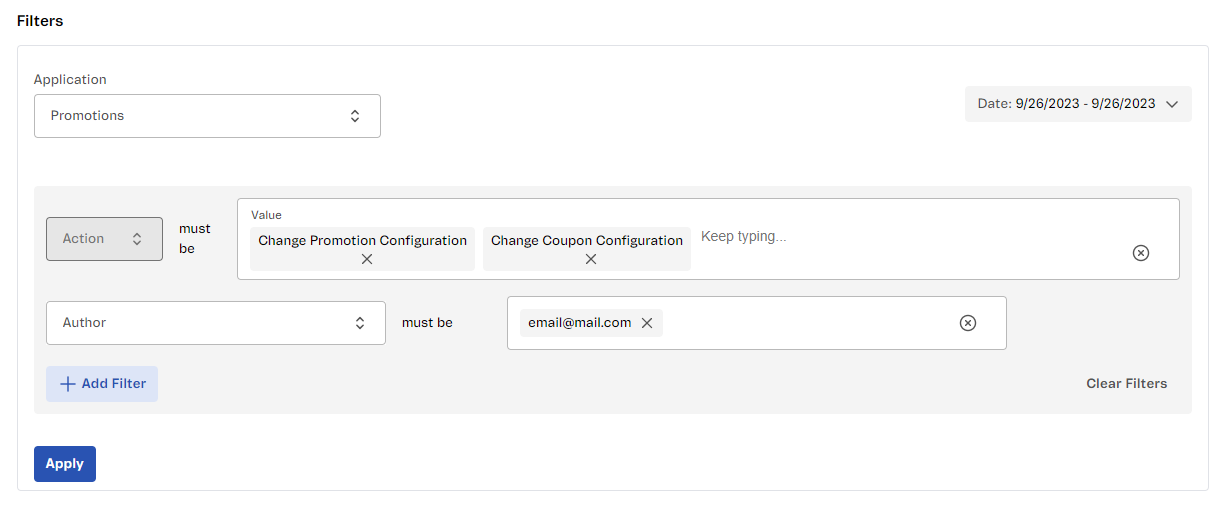\n\n7. Click the `Apply` button to obtain the events found.\n\n Check the [Results](#results) section to see how the events are displayed.\n\n> ⚠️ The query results correspond exactly to the content entered in the filter field. To avoid unexpected results, make sure you haven't typed extra spaces in the query terms.\n\nIf you wish, you can share a query with another user. To do this, click `Share Query` in the top right-hand corner of the page. The link to the Audit search will be copied to your clipboard.\n\n### Results\n\nThe **Results** section lists all events found in the query and displays information about each event, as shown in the table below.\n\n| Column | Description |\n|---|---|\n| __Copy__ | Button to copy the event information displayed in the table to the clipboard. |\n| __Event Time__ | Date and time of the event, displayed in the browser or operating system timezone. |\n| __Action__ | Action performed in the selected application for the query. Check the possible actions in the [list of events available in Audit](/en/docs/tutorials/events-available-in-audit). |\n| __Event Details__ | Additional information about the event. Check the details displayed for each event in the [list of events available in Audit](/en/docs/tutorials/events-available-in-audit). |\n| __Author__ | Email, ID, or token of the user who performed the event. |\n| __More Details__ | Button that opens a modal with more information about the event, when applicable. The details displayed may include: - **Entity name:** The ID of the entity that was changed.
- **Entity before action:** dInformation about the entity before the event, in [JSON](http://www.json.org/) format.
- **Entity after action:** Information about the entity after the event, in [JSON](http://www.json.org/) format.
Depending on the event, not all the information above is displayed. For example, an event that deleted information only displays the entity before the action. In contrast, an event that added information only displays the entity after the action.
Some events have no additional information. In such cases, the modal is left blank. |\n\n### Exporting results\n\nIn addition to viewing the list of events and their information, you can also export these results and share them with others. \nWhen performing a query, after applying the filters, the `Export to CSV` button will be enabled.\n\nClick `Export to CSV` to send the file with the events. The email will be sent to the address currently being used in the VTEX Admin.\n\n> ℹ️ The exported file may take around 20 minutes to deliver via email.\n\nSee the example of the file that will be exported: \n\n```csv\napp,source.application,source.author,source.entityName,source.eventTime,source.workflow,table,time\ncheckout,checkout,john.doe@example.com,Order,2025-10-28T21:01:01.165Z,order-processing,orders,2025-10-28T21:01:01.166Z\ninventory,inventory,jane.smith@example.com,Product,2025-10-28T21:01:01.166Z,inventory-management,products,2025-10-28T21:01:01.166Z\ncatalog,catalog,admin@example.com,Category,2025-10-28T21:01:01.166Z,catalog-update,categories,2025-10-28T21:01:01.166Z\npricing,pricing,pricing-bot@example.com,Price,2025-10-28T21:01:01.167Z,,,2025-10-28T21:01:01.167Z\n\n```\n\n> ⚠️ Events from the following applications cannot be exported: OMS, Catalog (API), Catalog (Admin), Subscriptions, Portal CMS, and Portal.\n\n> ℹ️ Only one event export is performed at a time. You must wait until you receive the email with the CSV file to perform a new event export.\n\n### Query examples\n\nBelow, we've listed some common query scenarios to illustrate how filters should be arranged depending on what you want to query.\n\n#### Product activation\n\nTo query if a product was activated in the Catalog on a given date:\n\n1. Select the desired date.\n2. In the **Application** menu, select _Catalog (Admin)_.\n3. Add a filter whose **Action** must be `Product Activation`.\n4. Add a filter whose **Event Details** must be equal to `activated product ID \"X\"`, where `X` must be replaced by the ID of the product queried.\n\n#### Price change\n\nTo query whether the price of an SKU changed on a given date:\n\n1. Select the desired date.\n2. In the **Application** menu, select _Prices_.\n3. Add a filter whose **Action** must be `Put Price`.\n4. Add a filter whose **Event Details** must be the SKU ID of the item queried.\n\n> ℹ️ To identify whether the price change was made through the import of a fixed price list, check the Author column in the search results. If the **author** is `vtex-service::pricing-wrk::Stable`, it means the price was updated through an imported spreadsheet. If the author is a user’s email address, the change was made manually. \n\n#### Warehouse deletion\n\nTo query whether a warehouse was deleted on a given date:\n\n1. Select the desired date.\n2. In the **Application** menu, select _Inventory & Shipping_.\n3. Add a filter whose **Action** must be `Warehouse Delete`.\n4. Add a filter whose **Event Details** must be the ID of the item queried.\n\n#### Carrier deletion\n\nTo query whether a carrier was deleted on a given date:\n\n1. Select the desired date.\n2. In the **Application** menu, select _Inventory & Shipping_.\n3. Add a filter whose **Action** must be `Carrier Delete`.\n4. Add a filter whose **Event Details** must be the ID of the carrier queried.\n\n## Viewing the last queries in Audit\n\nEvery query made in Audit is saved in the **Last queries** tab. To redo a query in this tab, click the button corresponding to the query you want to redo.\n\nSee below the information available in this tab:\n\n| Column | Description |\n|---|---|\n| Queried on | Date and time the query was made in Audit. |\n| Application | VTEX application in which the events were queried. |\n| Terms | Filters applied to the query. |\n| Period | Start and end date of the period selected for the query. |\n| Redo Query | Button to redo the query. |\n\n> ⚠️ The **Last queries** tab only saves up to 50 queries. If you want to save a query beyond this limit, add it to your browser favorites."}