{"section":"tutorials","requestedLocale":"en","requestedSlug":"adding-or-editing-skus","locale":"en","slug":"adding-or-editing-skus","path":"docs/en/tutorials/catalog/products-and-skus/adding-or-editing-skus.md","branch":"main","content":"The [Products and SKUs](/en/docs/tutorials/products-and-skus) page allows merchants to manage existing products and variations or add new ones. This article describes how to add or edit SKUs. For information on products, see [Adding or editing products](/en/docs/tutorials/adding-or-editing-products).\n\nEvery new SKU must be linked to a product. Once the product is created, follow the steps below to add a new SKU:\n\n1. In the VTEX Admin, go to **Catalog > Products and SKUs**, or type **Products and SKUs** in the search bar at the top of the page.\n2. Click the row of the desired product.\n3. Click the **SKUs** tab.\n4. Click the add icon + to **open the options to add SKUs**.\n5. Click `Add new SKU`.\n\n > ℹ️ You can create a new SKU from an existing one within a product. To do this, on the SKUs tab, click the **SKU menu icon > Duplicate > Save**.\n\n6. Complete the fields on the SKU form as described in the sections:\n\n * [Name and status](#name-and-status)\n * [Specifications](#specifications)\n * [Media](#media)\n * [Identifiers](#identifiers)\n * [Logistics](#logistics)\n * [Commercial strategy](#commercial-strategy)\n * [Customizations](#customizations)\n * [Cross-sell and up-sell recommendations](#cross-sell-and-up-sell-recommendations)\n * [Attributes](#attributes)\n\n > Required fields are marked with an asterisk (*).\n\n7. Click `Save`.\n\n> ❗ You can deactivate a SKU after creating it, but you can't delete a single SKU. The platform only allows bulk deletion of products and SKUs via [Database Maintenance (Full Cleanup)](/en/docs/tutorials/database-maintenance-full-cleanup).\n\nAfter creating the SKU, you can track its availability for sale through the colored icon. Hovering over the icon displays a tooltip with the meaning of the color, as in the image below. Learn more in [Products and SKUs](/en/docs/tutorials/products-and-skus).\n\n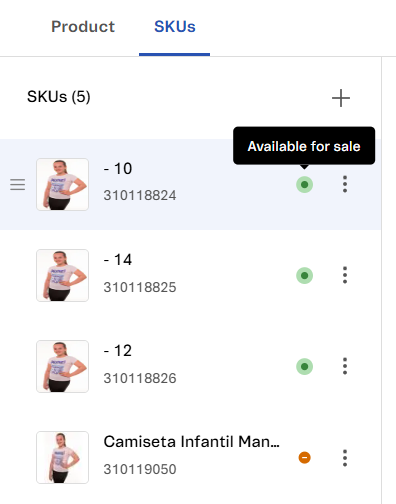\n\nAdditionally, once the SKU is created, you can include it in a [bundle](/en/docs/tutorials/what-is-a-bundle). To do so, in the row of the desired SKU, click the menu icon and select the `Create bundle` option. Note that converting a SKU into a bundle can't be undone.\n\nSee the following sections for details about the form fields and instructions on how to complete them.\n\n> ⚠️ There is a limit of 50 SKUs per product. To request an extension of the limit, please contact [our Support](https://help.vtex.com/en/support).\n\n## Name and status\n\nThe first section of the form includes the name and status of the SKU:\n\n* **Name*:** Enter the SKU name, which identifies the product variation. The name is limited to 200 characters. Example: For the product \"Refrigerator\", the SKU name could be \"28.6-Cu\".\n* **Active:** To activate the SKU, enable the toggle switch . To keep it inactive, leave the toggle switch disabled. If the SKU remains unavailable for sale after activation, check the article [Why is the product not visible on the website?](/en/faq/why-is-the-product-not-visible-on-the-website).\n\n## Specifications\n\nSpecifications are properties configured in the SKU that customers can select before adding the product to the cart. For example, the capacity of an appliance is a specification, allowing customers to choose between 25 cu ft or 21.4 cu ft.\n\nThe **Specifications** section may display different fields depending on the product associated with the SKU.\n\n> ⚠️ If a SKU has specifications, they must be completed. For more information, see the article [Adding SKU specifications or fields](/en/docs/tutorials/adding-sku-specifications-or-fields).\n\n> ❗ It's not possible to create a SKU with the same values combination as another SKU. For example, if the combination of SKU A is color black and size S, it would not be possible to create SKU B with the color black and size S, as this would generate a conflict. However, if the SKU A was black and the SKU B color was blue, even if you kept the size S for both, there would be no conflict as the combinations would differ. It is worth mentioning that you can deactivate but not delete a single SKU.\n\n## Media\n\nIn this section, you can add images or videos to the SKU.\n\n### Images\n\nIn the **Images** field, clicking `Add` displays two options for uploading photos and images:\n\n* `Choose files`: Upload images stored locally on your computer or another device.\n* `Add links`: Upload images using a URL.\n\nThe table below shows the size limits and formats accepted for each image:\n\n| **File size and format** | **Description** |\n| :--- | :--- |\n| Maximum size in pixels | 5,000 x 5,000 pixels |\n| Minimum size in pixels | 600 x 600 pixels |\n| Maximum size in MB | 4 MB |\n| Minimum size in KB | 300 KB |\n| Allowed file extensions | |\n\n> ℹ️ For more recommendations, check the article [Best practices for using images in the Catalog](/en/docs/tutorials/best-practices-for-using-images-in-the-catalog).\n\nAfter uploading an image, you can edit its metadata by following the steps below:\n\n1. Hover over the image to view the existing icons.\n2. Click the menu icon .\n3. Click `Edit metadata`.\n4. In the modal, complete the metadata information.\n5. Click `Apply`.\n\nIn addition to adding new images to an SKU, you can replicate images from one SKU to other SKUs associated with the same product. To do so, follow the steps below:\n\n1. In the top right corner of the **Images** section, click the copy icon .\n2. In the **Select the SKUs where you want to replicate the media** modal, click the SKUs to which you want to copy the images.\n3. Click `Apply`.\n\n> ⚠️ A SKU must have at least one image to be activated. For more information on the conditions for displaying an item on the storefront, see the article [Why is the product not visible on the website?](/en/faq/why-is-the-product-not-visible-on-the-website).\n\n### Videos\n\nIn the **Videos** field, click `+ Add` to open the **Add SKU media links** window. To add a video, enter its URL and then click `Apply`.\n\nA SKU can have up to 6 videos, and you can only add them using links from either the Vimeo or YouTube platforms**. The accepted formats are:\n\n**Vimeo**\n\n* `https://vimeo.com/{VIDEO_ID}`\n\n**YouTube**\n\n* `https://youtu.be/{VIDEO_ID}`\n* `https://www.youtube.com/watch?v={VIDEO_ID}`\n* `https://www.youtube.com/embed/{VIDEO_ID}`\n* `https://www.youtube.com/v/{VIDEO_ID}`\n\n> ⚠️ Replace `{VIDEO_ID}` with the ID of the video you want to display.\n\n## Identifiers\n\nThe fields in this section refer to the codes that identify the SKU:\n\n* **Reference code:** Unique reference code created to help merchants with catalog management.\n* **EAN/UPC:** The EAN (European Article Number) and the UPC (Universal Product Code) are in ternational identification codes corresponding to an item's barcode. Each SKU can be associated with only one of these codes, and they can be differentiated by the number of alphanumeric characters: 13 for the EAN and 12 for the UPC.\n* **Manufacturer code:** Code provided by the manufacturer to identify the SKU. If a SKU has a specific code, this field must be completed.\n\n## Logistics\n\nThese are the SKU fields related to [logistics](/en/docs/tutorials/fulfillment-logistics-vtex):\n\n## Modal (optional)\n\n[Modal](/en/docs/tutorials/how-does-the-modal-work) is a carrier configuration for specialized deliveries, as some products require special transport conditions, such as refrigeration or the ability to carry chemical cargo.\n\nWhen previously created, modal options for the SKU will be displayed in a list, allowing you to select a single option. To learn more, see the article [Setting up modal for carriers](/en/docs/tutorials/configure-modal).\n\n### Shipping weight and dimensions\n\nThe following fields are used to [calculate the cubic weight factor](/en/docs/tutorials/understanding-the-cubic-weight-factor) of the SKU and refer to the package used for its transportation:\n\n* **Package weight:** Absolute weight value.\n* **Package width:** Absolute width value.\n* **Package height:** Absolute height value.\n* **Package length:** Absolute length value.\n\n> ℹ️ Fields should only be completed with numbers, without units of measure, as they automatically apply the units configured in the store catalog.\n\n### Actual weight and dimensions\n\nThe fields below correspond to the actual dimensions of the product — the same that are displayed on the product detail page (PDP) — and should be completed with numbers only:\n\n* **Actual weight:** Absolute product weight value, excluding packaging.\n* **Actual width:** Absolute product width value, excluding packaging.\n* **Actual height:** Absolute product height value, excluding packaging.\n* **Actual length:** Absolute product length value, excluding packaging.\n\n### Inventory unit\n\nDefine inventory aspects in the Catalog context:\n\n> ❗ The **Unit of measure** and **Unit multiplier** fields are used for catalog purposes and don't generate any impact on inventory, stock, or other shipping configurations.\n\n* **Unit of measure:** Identifies the unit of measure used to count items in stock.\n* **Unit multiplier:** Numeric value by which the SKU will be multiplied to determine its quantity in the cart. For example, a multiplier of 5 means that each SKU represents 5 units in the cart, allowing purchases only in multiples of 5, such as 10 or 15 units. Fractional values can be separated by either a period or a comma. For example, 0.5 or 0,5 for half a kilogram.\n\n## Commercial strategy\n\nThis section includes fields related to the store's sales strategies:\n\n* **Commercial condition:** Defines the promotions or [payment conditions](/en/docs/tutorials/difference-between-payment-methods-and-payment-conditions) that are valid for the SKU. If no commercial condition is needed, select the `Default` option. Learn more in [Registering a commercial condition](https://help.vtex.com/docs/tutorials/registering-a-commercial-condition).\n* **Presale date:** Sets a presale date for the SKU, indicating when the item is expected to arrive in stores and be available for sale. To configure this setting, you need to consider both the item release date and the [estimated shipping](/en/docs/tutorials/how-shipping-calculation-works) to customers.\n* **Generate credit with gift card:** When enabled, indicates that the SKU is a gift list item.\n* **Loyalty amount**: Determines the credit the customer receives when purchasing 1 unit of a given SKU. For example, if this field is set to $1.00, the customer who buys the SKU will receive a $1.00 store credit for future purchases.\n\n## Customizations\n\nSKUs can be configured to offer customization options to customers. For example, a customer can add a name to a t-shirt. There are two types of customizations: [attachments](/en/docs/tutorials/what-is-an-attachment) and [services](/en/tutorial/o-que-e-um-servico).\n\nTo link a customization to a SKU, click the add + icon, select the desired option, and follow these steps:\n\n* `Attachments`: Clicking this option opens the **Choose the attachments you want to link** modal. Select the desired attachments and click `Apply`.\n* `Services`: Clicking this option opens the **New service** modal. Complete the fields and set the toggle switch to **Active**. Click `Apply` to save the information.\n\n> ⚠️ The attachment and service options for the SKU must be configured in advance. For more information, see the articles [Adding an attachment](/en/docs/tutorials/adding-an-attachment) and [Creating a service for a SKU](/en/docs/tutorials/creating-service-for-a-sku).\n\n## Cross-sell and up-sell recommendations\n\nThis section allows the store to configure [cross-selling](/en/docs/tutorials/setting-up-a-similar-product-suggestions-accessories-and-generics#what-is-cross-selling) and [up-selling](/en/docs/tutorials/setting-up-a-similar-product-suggestions-accessories-and-generics#what-is-up-selling) options for the new SKU, reflecting them on the storefront and in the customer browsing experience.\n\nTo configure cross-sell and up-sell options, follow the steps below:\n\n1. In the **Cross-sell and up-sell recommendations** section, click the add icon `+`.\n2. Select an option from the following:\n\n * **Accessories:** Complimentary items suggested for the main product.\n * **Suggestions:** Product recommendations.\n * **Similar products:** Alternatives to the selected item or products with similar characteristics.\n * **Show together:** Suggestions for buying together.\n\n3. Click `Add SKUs`\n4. Select the SKUs you want to add. You can use the search bar if you wish.\n5. Click `Apply`.\n\n> ℹ️ For more information, see the article [How to set up similar product, suggestions, accessories and generics](/en/docs/tutorials/setting-up-a-similar-product-suggestions-accessories-and-generics).\n\n## Attributes\n\nThis section allows the store to configure custom fields with specific values for each SKU. For example, in a lipstick (product), each of the colors (SKUs) can have the field ingredients (SKU attribute) with different values.\n\nTo configure an attribute for the SKU, follow the steps below:\n\n1. In the **Attributes** section, click the add icon `+`.\n2. Fill in the field **Name** with the attribute identifier.\n3. (Optional) If you want to replicate the attribute for all SKUs, check the box **Apply to all SKUs**.\n4. Click `Create`.\n\n> ℹ️ Attributes for the SKU are not linked to the category tree.\n\n## Learn more\n\n* [Products and SKUs](/en/docs/tutorials/products-and-skus)\n* [Adding or editing products](/en/docs/tutorials/adding-or-editing-products)\n* [Catalog: Overview](/en/docs/tutorials/catalog-overview)\n* [Catalog](/en/tracks/catalogo-101--5AF0XfnjfWeopIFBgs3LIQ) (track)"}