{"section":"tracks","requestedLocale":"en","requestedSlug":"vtex-modules-i","locale":"en","slug":"vtex-modules-i","path":"docs/en/tracks/onboarding-guide/vtex-store-overview/vtex-modules-i.md","branch":"main","content":"The VTEX platform is structured in modules for each part of the store's operation. This article provides an overview and describes the main settings of the following modules:\n\n- [Catalog](#catalog)\n- [Prices](#prices)\n- [Promotions](#promotions)\n- [Logistics](#logistics)\n\n> ℹ️ The [VTEX modules II](/en/docs/tracks/vtex-modules-ii) article describes the [Payments](/en/tracks/vtex-store-overview--eSDNk26pdvemF3XKM0nK9/3MYcZaojb5HSUg6ufm6GxQ#payments), [Orders](/en/tracks/vtex-store-overview--eSDNk26pdvemF3XKM0nK9/3MYcZaojb5HSUg6ufm6GxQ#orders), and [Checkout](/en/tracks/vtex-store-overview--eSDNk26pdvemF3XKM0nK9/3MYcZaojb5HSUg6ufm6GxQ#checkout) modules.\n\n## Catalog\n\n[Catalog](/en/docs/tracks/catalog-concept-definition) is the VTEX module where merchants configure their products to make them available in the store. The catalog structure defines the customers' experience when navigating the product categories in the store. Check out the [Catalog](https://developers.vtex.com/docs/guides/catalog-overview) guide for an [overview](/en/docs/tutorials/catalog-overview) of the [Catalog API](https://developers.vtex.com/docs/guides/catalog-overview) for developers.\n\n### Before you begin with Catalog\n\nThere are no prior settings to make before configuring the Catalog, but the following should be noted:\n\n- __Customer navigation on the site__: You need to plan how you want to arrange your [category tree](#category-tree) and know in advance what browsing experience you want to offer to customers in the category hierarchy.\n- __Making products available to customers__: To [make a product available in the store](/en/faq/why-is-the-product-not-visible-on-the-website), after the Catalog settings, you must add a [price](#prices) and shipping [logistics](#logistics) to the SKU. Also, the store's CMS must be correctly configured.\n\n### Catalog architecture\n\nThe Catalog architecture has some key concepts: category, brand, product, SKU (_Stock Keeping Unit_) and specification. The image below shows the relation between these concepts:\n\n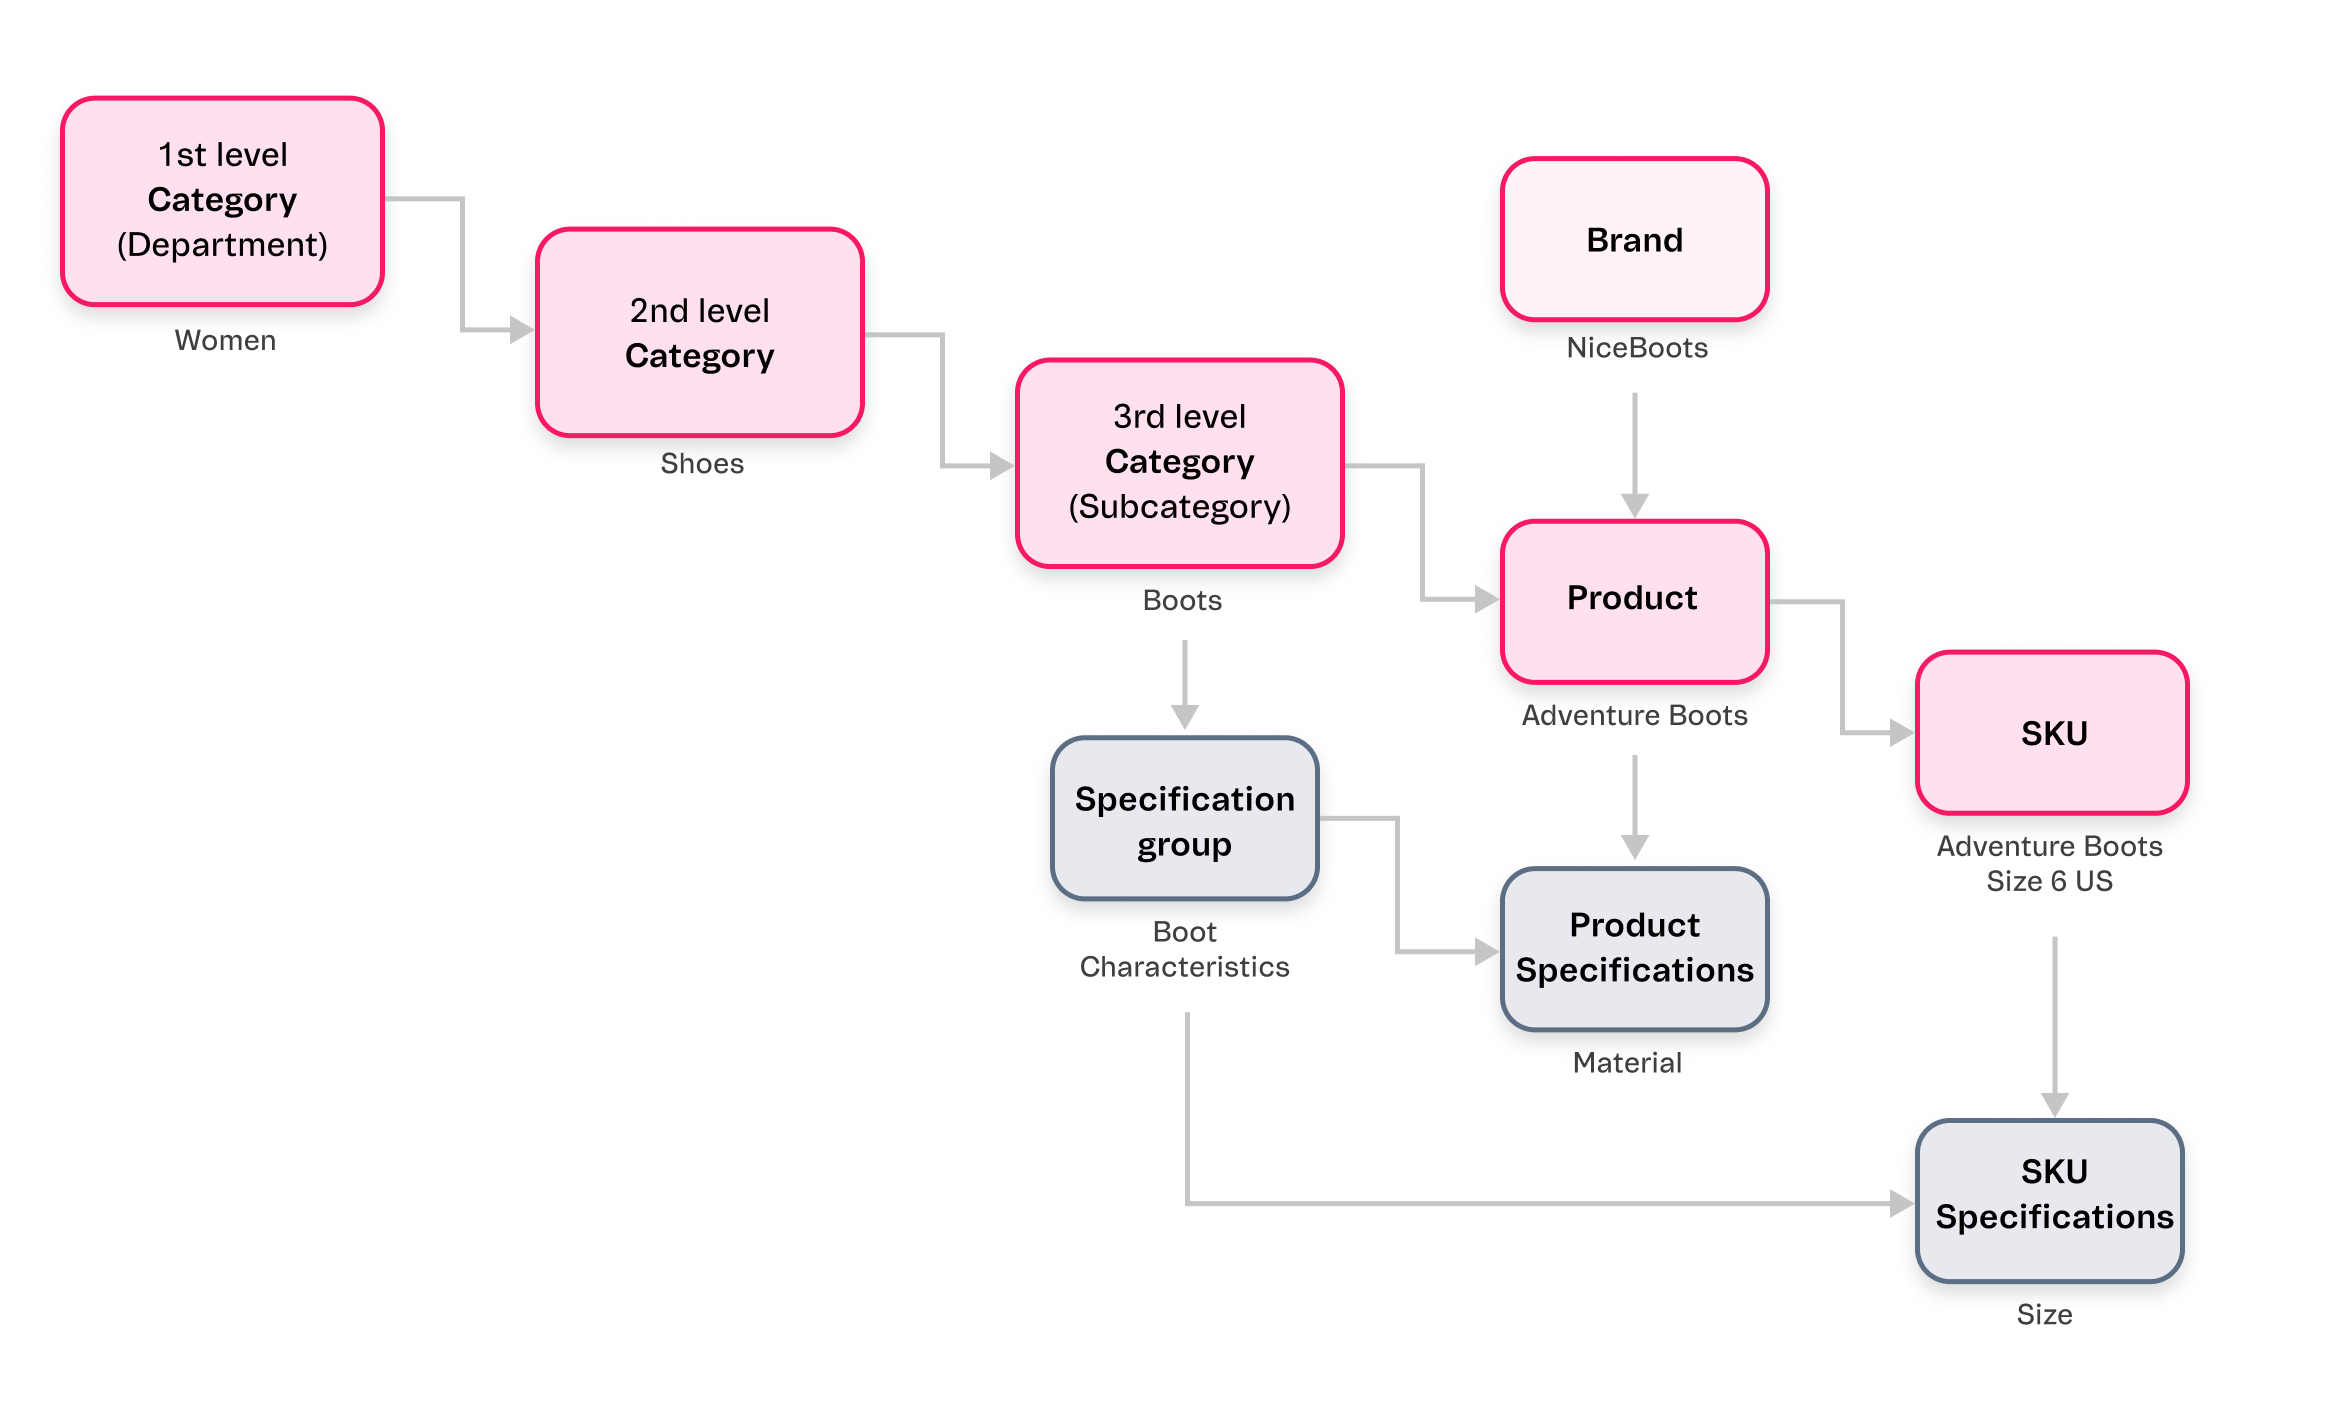\n\nThe store catalog must be created following the steps below:\n\n1. Create a [category tree](#category-tree).\n2. Add [brands](#brands).\n3. Add [specifications](#specifications).\n4. Import [produts](#products).\n5. Import [SKUs](#skus).\n\nThe following table shows the store's main Catalog settings based on their creation order:\n\n| **Topic** | **Configuration via VTEX Admin** | **Configuration via API** |\n| :--- | :--- | :--- |\n| 1. [Category tree](/en/docs/tutorials/catalog-overview#categories) | [Add a category](/en/docs/tutorials/registering-a-category) | - [Categories](https://developers.vtex.com/docs/guides/categories)
- [Create Category](https://developers.vtex.com/docs/api-reference/catalog-api#post-/api/catalog/pvt/category) |\n| 2. [Brands](/en/docs/tracks/brands-concept-definition) | [Add brands](/en/docs/tutorials/registering-brands) | - [Brands](https://developers.vtex.com/docs/guides/brands)
- [Create Brand](https://developers.vtex.com/docs/api-reference/catalog-api#post-/api/catalog/pvt/brand) |\n| 3.1. [Product specifications](/en/tracks/catalogo-101--5AF0XfnjfWeopIFBgs3LIQ/2NQoBv8m4Yz3oQaLgDRagP#product-specification) | [Add product specifications or fields](/en/docs/tutorials/adding-specifications-or-product-fields) | - [Product specifications](https://developers.vtex.com/docs/guides/product-specifications)
- [Create Specification](https://developers.vtex.com/docs/api-reference/catalog-api#post-/api/catalog/pvt/specification) |\n| 3.2. [SKU specifications](/en/tracks/catalogo-101--5AF0XfnjfWeopIFBgs3LIQ/2NQoBv8m4Yz3oQaLgDRagP#sku-specifications) | [Add SKU specifications or fields](/en/docs/tutorials/adding-sku-specifications-or-fields) | - [SKU specifications](/en/docs/tutorials/adding-sku-specifications-or-fields)
- [Create Specification](https://developers.vtex.com/docs/api-reference/catalog-api#post-/api/catalog/pvt/specification) |\n| 4. [Products](/en/docs/tracks/products-concept-definition) | [Add products](/en/docs/tutorials/adding-or-editing-products) | - [Products](/en/docs/tutorials/adding-or-editing-products)
- [Create Product with Category and Brand](https://developers.vtex.com/docs/api-reference/catalog-api#post-/api/catalog/pvt/product) |\n| 5. [SKUs](/en/docs/tracks/sku-concept-definition) | [Complete the SKU fields](/en/docs/tutorials/adding-or-editing-skus) | - [SKUs](https://developers.vtex.com/docs/guides/skus)
- [Create SKU](https://developers.vtex.com/docs/api-reference/catalog-api#post-/api/catalog/pvt/stockkeepingunit) |\n\n
\n\n> ⚠️ To learn how to import products from an ERP (Enterprise Resource Planning) or PIM (Product Information Manager) system to the VTEX platform, read the [Backend integrations](/en/docs/tracks/backend-integrations) article.\n\n#### Category tree\n\nThe [category tree](/en/docs/tutorials/catalog-overview#categories) defines the Catalog's basic structure. The categories act as hierarchical levels for classifying products, which simplify the customer's search and keep the store's catalog organized.\n\nWe recommend creating a three-level hierarchy, including [Departaments](/en/tracks/catalogo-101--5AF0XfnjfWeopIFBgs3LIQ/2gkZDjXRqfsq62TlAkj4uf#department), [Categories](/en/docs/tutorials/catalog-overview#categories) and [Subcategorias](/en/tracks/catalogo-101--5AF0XfnjfWeopIFBgs3LIQ/2gkZDjXRqfsq62TlAkj4uf#subcategory). However, some stores may benefit from a two-level structure with Departments and Categories. This depends on the operation's complexity and the types of products offered.\n\n__Example__: Department `Women`, Category `Shirts and T-shirts`, and Sub-category `T-shirts`.\n\nBefore importing the store catalog to VTEX, we recommend that you start working on the category tree by creating a table such as the one below. This allows you to better view the tree's organization and the display of specifications.\n\n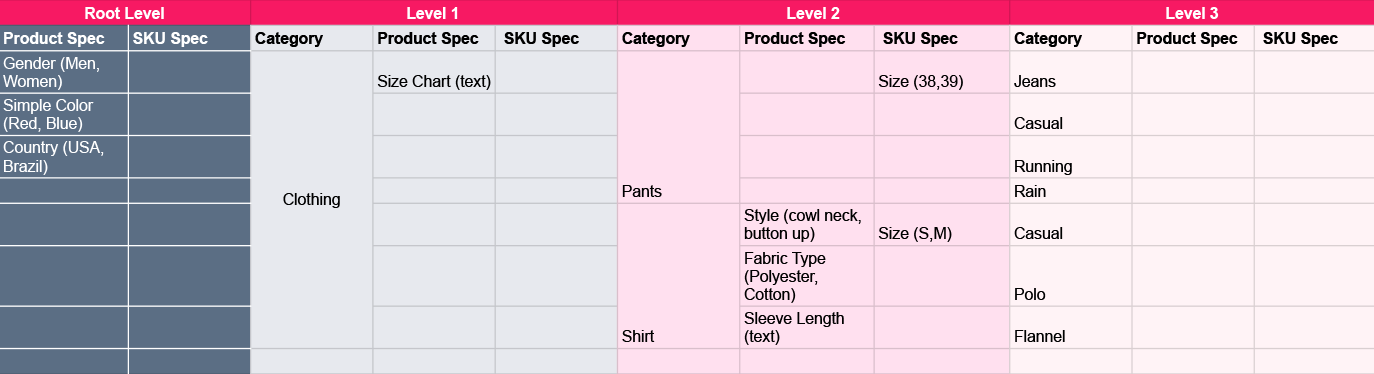\n\n> ℹ️ For more information on how to import back-office specifications, read the [Backend integrations](/en/docs/tracks/backend-integrations) article.\n\n#### Brands\n\n[Brands](/en/docs/tracks/brands-concept-definition) generally refer to the company that manufactures or resells the products. On VTEX, brands must be created independently, and when creating a product, it must be associated with a brand already listed in the store.\n\n#### Specifications\n\n[Specifications](/en/docs/tracks/specifications-concept-definition) are additional properties that can be added to the products and SKUs, such as size, color, voltage, or material. In other words, there are [product specifications](/en/tracks/catalogo-101--5AF0XfnjfWeopIFBgs3LIQ/2NQoBv8m4Yz3oQaLgDRagP#product-specification) and [SKU specifications](/en/tracks/catalogo-101--5AF0XfnjfWeopIFBgs3LIQ/2NQoBv8m4Yz3oQaLgDRagP#sku-specifications).\n\nIn the VTEX __Catalog__, specifications are created as follows:\n\n1. __Specification groups__: These are specification field groups. They must be linked to categories. Usually, only one group is created at the root level, and all the specification fields are associated with this group.\n2. __Specification fields__: Fields with additional product and SKU information. They must be linked to categories and specification groups.\n3. __Specification values__: Values you can choose to add to the specification fields.\n\nThe specifications follow the Catalog hierarchy, so when one of these groups is created in a Department or Category, it follows the levels below.\n\n#### Products\n\n[Products](/en/docs/tracks/products-concept-definition) is the level of catalog organization that is located in the hierarchy below Categories and above SKUs. As the product is above the SKU in the catalog hierarchy, we can understand it as a generic definition of the items sold in your store. A product must have at least one SKU associated with it.\n\n#### SKUs\n\n[SKU](/en/docs/tracks/sku-concept-definition) (_Stock Keeping Unit_) is a product variation and represents the physical unit in stock that can be purchased by the customer. The SKU is the last level in the catalog organization, and in order to be active, the SKU must have an image and specifications.\n\n### Optional Catalog settings\n\nThe following table shows optional Catalog settings on VTEX:\n\n| **Feature** | **Description** | **Learn more** |\n| :---: | :--- | :--- |\n| Collections | A collection is a combination of two or more products that may or may not share specific characteristics.
Collections can be created to associate products based on different criteria, such as commemorative dates, launches, or best-selling products. | __Help Center__
- [Collections - Concept definition](/en/docs/tracks/collections-concept-definition)
- [Creating Collections (Beta)](/en/docs/tutorials/creating-collections-beta)
__Developer Portal__
- [Create Collection](https://developers.vtex.com/docs/api-reference/catalog-api#post-/api/catalog/pvt/collection/)
- [Get All Inactive Collections](https://developers.vtex.com/docs/api-reference/catalog-api#get-/api/catalog/pvt/collection/inactive)
- [Get All Collections](https://developers.vtex.com/docs/api-reference/catalog-api#get-/api/catalog_system/pvt/collection/search)
- [Get Collections by search terms](https://developers.vtex.com/docs/api-reference/catalog-api#get-/api/catalog_system/pvt/collection/search/-searchTerms-)
- [Import File Example](https://developers.vtex.com/docs/api-reference/catalog-api#get-/api/catalog/pvt/collection/stockkeepingunit/importfileexample)
- [Add products to Collection by imported file](https://developers.vtex.com/docs/api-reference/catalog-api#post-/api/catalog/pvt/collection/-collectionId-/stockkeepingunit/importinsert) |\n| Attachments | An attachment is an optional and free product customization used to add information to a SKU. | __Help Center__
- [Adding an attachment](/en/docs/tutorials/adding-an-attachment)
- [How to create a subscription attachment](/en/docs/tutorials/how-to-create-a-subscription-attachment-via-the-catalog-module)
- [What is an Attachment?](/en/docs/tutorials/what-is-an-attachment)
__Developer Portal__
- [Catalog API - Attachment](https://developers.vtex.com/docs/api-reference/catalog-api#get-/api/catalog/pvt/attachment/-attachmentid-)
- [Catalog API - SKU attachment](https://developers.vtex.com/docs/api-reference/catalog-api#post-/api/catalog/pvt/skuattachment) |\n| Assembly Options | Assembly Options are a type of attachment for complex cases, such as product customization, in which you can manage different combinations of products, quantity, additional items, costs, and inventory. Then, you will be able to display these options on the product page. | __Developer Portal__
- [Assembly Options](/en/docs/tutorials/assembly-options)
- [Assembly Option App](https://developers.vtex.com/docs/guides/assembly-options-app) |\n| Services | Service with extra cost, offered optionally with a product. It is used to add an additional service to an SKU, such as gift wrapping, customization, or special warranty agreements. | __Help Center__
- [What is a Service?](/en/docs/tutorials/what-is-a-service)
- [Service Management](/en/docs/tutorials/service-management)
- [Services Import](/en/docs/tutorials/services-import)
- [Services Report](/en/docs/tutorials/services-report)
- [Services scheduling](/en/docs/tutorials/services-scheduling)
__Developer Portal__
- [Catalog API - SKU service](https://developers.vtex.com/docs/api-reference/catalog-api#put-/api/catalog/pvt/skuservice/-skuServiceId-)
- [Catalog API - SKU service attachment](https://developers.vtex.com/docs/api-reference/catalog-api#post-/api/catalog/pvt/skuservicetypeattachment)
- [Catalog API - SKU service type](https://developers.vtex.com/docs/api-reference/catalog-api#post-/api/catalog/pvt/skuservicetype)
- [Catalog API - SKU service value](https://developers.vtex.com/docs/api-reference/catalog-api#post-/api/catalog/pvt/skuservicevalue) |\n| Kits | A kit is a set of SKUs sold together, i.e., an SKU consisting of one or more SKUs. | __Help Center__
- [What is a kit?](/en/docs/tutorials/what-is-a-bundle)
- [Kit registration](/en/docs/tutorials/bundle-registration)
__Developer Portal__
- [Catalog API - SKU Kit](https://developers.vtex.com/vtex-rest-api/reference/catalog-api-get-sku-kit) |\n\n## Prices\n\n[Prices](/en/docs/tracks/prices-module-overview) is the VTEX module for creating, editing, and storing price details for the store's SKUs. For a product to be sold, the customer needs to know the price of each item displayed in the store. The pricing module has features that allow you to use different pricing strategies in your business.\n\n### Before you begin with Prices\n\nBefore configuring the store's prices, you need to create a [catalog](#catalog) with your products. The store catalog must contain [categories](/en/docs/tutorials/registering-a-category), [brands](/en/docs/tutorials/registering-brands), [products](/en/docs/tutorials/adding-or-editing-products) and [SKUs](/en/docs/tutorials/adding-or-editing-skus) already added and active. If the catalog was created via [ntegration with an ERP system](/en/tracks/vtex-store-overview--eSDNk26pdvemF3XKM0nK9/7euXDZR5CCnVFSrXyczIhu#erp-integration), you should check the information before proceeding.\n\n### How the Prices module works\n\nIt is important to familiarize yourself with the main terms related to the module. These terms are outlined in the table below:\n\n| **Term** | **Definition** |\n| :---: | :--- |\n| Prices | Information on the sales values of the store's SKUs. |\n| [Price tables](/en/docs/tracks/tabelas-de-preco-definicao-de-conceito) | Set of SKU prices that can be applied to a given context, such as a [sales channel](/en/docs/tutorials/how-trade-policies-work). These tables contain the price information displayed on the store's storefront. |\n| Cost price | Price paid by the store when purchasing the SKU. |\n| Markup | The store's desired profit margin from selling the SKU. |\n| [Base price](/en/docs/tracks/preco-base-definicao-de-conceito) | Amount calculated by combining the __cost price__ and the __markup__. This is the SKU's reference price for all price tables. |\n| [List price](/en/tracks/prices-101--6f8pwCns3PJHqMvQSugNfP/3XcXp0r5WrJvogB8KIX4Kx#list-price) | Suggested selling price for an SKU. This price will be displayed on the product page as the __From__ price, while the base price will be displayed as the __To__ price. |\n| [Price rule](/en/docs/tracks/regra-de-preco-definicao-de-conceito) | Changes the SKU price on a specific price table without changing the base price on other tables. To do so, you need to create a price rule and associate it with the desired table. |\n| [Fixed price](/en/docs/tracks/preco-fixo-definicao-de-conceito) | Price that overrides all other price settings in a price table. |\n| [Price rounding](/en/docs/tracks/rounding-rules-concept-definition) | A pricing strategy based on price rounding. This method aims to influence the consumer's purchasing decision by displaying prices in a more user-friendly and intuitive format. |\n| [Price variation limiter](/en/docs/tracks/trava-de-preco-definicao-de-conceito) | Sets the maximum and minimum price variations for an item. This feature ensures that SKU prices are not changed to undesirable values. |\n\nFor more information on pricing architecture, read the [Pricing System Architecture](/en/docs/tracks/pricing-system-architecture) article.\n\n### Creating price tables\n\nThe Pricing module's architecture is structured based on three key concepts:\n\n- Prices\n- Price tables\n- Contexts for applying price tables\n\nPrices are the sales value information for your SKUs. These prices are stored in price tables, which can be applied to different contexts.\n\nThe image below illustrates the relationship between prices, the price table, and the context in which they will be applied:\n\n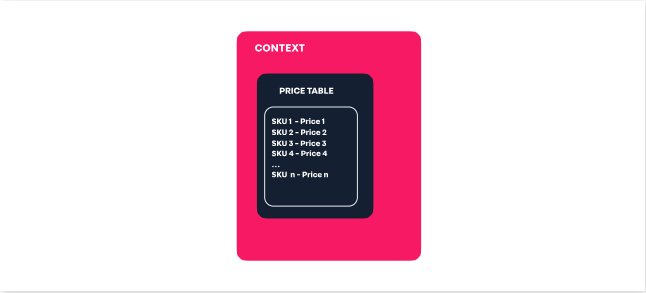\n\nYou can create price tables for your SKUs in three ways:\n\n- [Via Admin VTEX](/en/tracks/precos-101--6f8pwCns3PJHqMvQSugNfP/2WQ3pVYfQpXkJnHr7VTFBv#admin)\n- [Via spreadsheet](/en/docs/tracks/exporting-and-importing-via-a-price-spreadsheet)\n- [Via API](https://developers.vtex.com/docs/api-reference/pricing-api)\n\nPrices can be scheduled for special events, as described in the [Scheduling prices](/en/docs/tutorials/scheduling-prices) article.\n\n### Relationship between price tables and sales channels\n\nThere is a difference between price tables created for [sales channels](/en/docs/tutorials/how-trade-policies-work) and price tables created for other contexts.\n\nPrice tables not associated with sales channels can be used in contexts such as __promotions__ and __customer clusters__. Tables created for sales channels can only be associated with the sales channel itself. Thus, the price table associated with a sales channel shows the SKU price specific to that policy and cannot be associated with other contexts.\n\n> ⚠️ The concepts of **price table** and [sales channel](LINK) are different. Sales channel is the context with which a price list is associated.\n\nWhen setting up a sales channel, you must [specify the currency that will be used in the store](/en/docs/tutorials/creating-a-trade-policy). Creating different sales channels associated with a different currency allows the store to display prices in different currencies to customers. \n\n## Promotions\n\nOn VTEX, the merchant can create a set of rules to indicate if customers can have discounts applied to certain shopping contexts. [Promotions](/en/docs/tracks/how-promotions-work) is the VTEX module for creating, editing, and applying discounts to customers' shopping carts.\n\n### Before you begin with Promotions\n\nBefore configuring your store's promotions, you must create a [Catalog](/en/docs/tutorials/catalog-overview) with your products and enter the [prices](/en/docs/tracks/prices-module-overview) of the store's SKUs.\n\n### How the Promotions module works\n\nIn this context, it is important to be familiar with the main terms related to the module. These terms are outlined in the table below:\n\n| **Term** | **Definition** |\n| :---: | :--- |\n| Promotion | Discount given to customers, which can be linked to one or more products in the cart, to shipping or a gift. |\n| Coupon | Promotional code consisting of a sequence of letters and numbers. Coupons are associated with promotions applied to the cart total amount. Thus, by entering a valid coupon at checkout, the customer can get discounts on the order total amount. |\n| Campaign audience | Campaign audience is a feature that allows you to define the [target audience](/en/docs/tutorials/campaign-audiences#target-audience) or a promotion. It consists of setting up criteria to segment customers from which the VTEX platform automatically validates whether customers are eligible for a particular campaign audience and, consequently, for the associated [campaign promotions](/en/docs/tutorials/campaign-promotion). |\n| Campaign promotion | A campaign promotion is always linked to a campaign audience, i.e., a specific target audience. This type of promotion will only be applied to the target audience of the campaign. |\n\n### Creating promotions\n\nOn VTEX, merchants can create rules that determine the application of discounts based on the purchase context. These rules take into account various parameters, including product lists, customer lists, postal code ranges, minimum value of items in the cart, and others.\n\nDiscounts can be of two main types:\n\n- __Nominal__: Discount of the gross amount, such as $20.\n- __Percentage__: Discount of a percentage value, such as 10% of the total amount of the cart.\n\nThere are six types of promotion, each related to a different scenario:\n\n| **Promotion type** | **Definition** |\n| :---: | :--- |\n| [Regular Promotion](/en/docs/tracks/creating-regular-promotions) | Promotion that allows the store to offer flexible discounts, combining multiple conditions, restrictions, and benefits. |\n| [Buy Together](/en/docs/tutorials/buy-together) | Promotion used to give a discount on products added together in the cart. The discount can be applied to both products. There's also the option to only apply the discount if a specific quantity of one of the product is added to the cart. |\n| [More for Less](/en/docs/tutorials/creating-a-more-for-less-promotion) | Promotion used to give a discount when the customer adds multiple units of the same product to the cart. |\n| [Progressive Discount](/en/docs/tutorials/progressive-discount) | Promotion used when you want to offer a percentage discount for a specific number of products in the cart. |\n| [Buy One Get One](/en/docs/tutorials/buy-one-get-one) | Promotion used to provide free shipping or a giveaway when a specific product is purchased. |\n| [Campaign Promotion](/en/docs/tutorials/campaign-promotion) | A campaign promotion is always linked to a campaign audience, i.e., a specific target audience. |\n\nFor all promotions, you can define their duration, restrictions, and limitations on usage. Promotions can also be scheduled for special events, as described in the [Scheduling features for special events](/en/docs/tutorials/scheduling-features-for-special-events#scheduling-promotions) article.\n\nFor more information on how promotions can be applied, read the [Promotion examples](/en/docs/tutorials/promotion-examples) article.\n\n### Creating coupons\n\nYou can create discount coupons through the [VTEX Admin](/en/docs/tutorials/creating-a-coupon-beta) ou via [API](https://developers.vtex.com/docs/guides/creating-and-managing-coupons-with-promotions-api). A coupon must be linked to at least one promotion to be applicable. \n\n> ⚠️ There is a maximum number of active coupons. We strongly recommend reusing coupons, as a large number of coupons can compromise the performance of the Promotions module.\n\n### Creating campaign promotions\n\nCreating campaign promotions [campaign audience](/en/docs/tutorials/creating-a-campaign-audience) to set the promotion's target audience. You can then choose eligible customer segments for the promotion. These segments act as a trigger based on criteria defined by the merchant.\n\nOnce the campaign audience has been created, it needs to be linked to a [Regular Promotion](/en/docs/tracks/creating-regular-promotions), thus creating a campaign promotion. This type of promotion encompasses all the possibilities available in the [Regular Promotion](/en/docs/tracks/creating-regular-promotions) and a few more options:\n\n- Specific target audience.\n- Free shipping for all available shipping options.\n- Promotional price table.\n- Giveaways delivered by sellers.\n\n### Highlighting promotions on the product page\n\nYou can highlight a promotion on the product page (PDP). To do so, follow the steps below:\n\n1. [Create a promotion](/en/docs/tutorials/promotion-list-beta#creating-promotions) of any type, except for the Buy Together promotion.\n2. Activate the __Promotion is highlighted__ field in the promotion form.\n3. Save the promotion.\n4. In the [Legacy CMS](/en/docs/tracks/legacy-cms-portal), enter the promotion display control in the template: ``. \n\n### Syncing promotion dates, banners, and digital assets\n\nEnsure that you sync your promotion timeline with the delivery dates on your banners and digital assets to ensure perfect coordination. To do so, you should check the dates on both promotions and banners. This strategic alignment ensures that promotional campaigns are supported by relevant visual materials, maximizing their impact and effectiveness.\n\n## Logistics\n\nOn VTEX, the [Logistics](/en/docs/tracks/getting-started-with-logistics) module is responsible for the store's [logistics and order fulfillment](/en/docs/tutorials/fulfillment-logistics-vtex). It includes planning, transportation, storage, and shipping orders to customers.\n\n### Before you begin with Logistics\n\nTo configure the logistics settings, you must have completed the following steps:\n\n- __Creating catalog__: As the order fulfillment is related to storing items, the store's products and SKUs must be listed in the [Catalog](#catalog).\n- __Configuring sales channels__: [Sales channels](/en/docs/tutorials/how-trade-policies-work) shape the customer experience on a store's website. They encompass sales conditions for each audience, the products offered, pricing, promotions, and shipping methods.\n\nBesides, if the business model includes international stores and [cross-border](/en/docs/tracks/cross-border-stores) sales, you should first consider the [store's architectural](/en/tracks/vtex-store-overview--eSDNk26pdvemF3XKM0nK9/4yPqZQyj0t675QpcG7H6yl#store-architecture) model.\n\n### Logistics required settings\n\nThe set of essential logistics settings for a VTEX store is called [Shipping Strategy](/en/docs/tutorials/shipping-strategy) and consists of three main concepts: shipping policy, warehouse, and loading dock.\n\n- __[Shipping policy](#shipping-policy)__: set of rules that define the order's shipping options and conditions.\n- __[Loading dock](#loading-dock)__: distribution location for the items to be sold.\n- __[Warehouse](#warehouse)__: physical storage space for the products to be sold.\n\nThe image below shows how these concepts relate to each other when selling a product:\n\n\n\nThe following table shows the store's main logistics settings on VTEX:\n\n> We recommend configuring the shipping policy first, followed by the loading dock, and then the warehouse.\n\n| **Topic** | **Configuration via VTEX Admin** | **Configuration via API** |\n| :---: | :--- | :--- |\n| [Shipping policy](#shipping-policy) | [Shipping Policy](/en/docs/tutorials/shipping-policy) | [Create shipping policy](https://developers.vtex.com/docs/api-reference/logistics-api#post-/api/logistics/pvt/shipping-policies) |\n| [Loading dock](#loading-dock) | [Managing Loading Docks](/en/docs/tutorials/managing-loading-docks) | [Create/update dock](https://developers.vtex.com/docs/api-reference/logistics-api#post-/api/logistics/pvt/configuration/docks) |\n| [Warehouse](#warehouse) | [Managing Warehouses](/en/docs/tutorials/managing-warehouses) | [Create/update warehouse](https://developers.vtex.com/docs/api-reference/logistics-api#post-/api/logistics/pvt/configuration/warehouses) |\n| [Inventory](#inventory-management) | [Inventory Management](/en/docs/tutorials/managing-stock-items) | [Update inventory by SKU and warehouse](https://developers.vtex.com/docs/api-reference/logistics-api#put-/api/logistics/pvt/inventory/skus/-skuId-/warehouses/-warehouseId-) |\n\n#### Shipping policy\n\n[Shipping policy](/en/docs/tutorials/shipping-policy) is a set of rules that define the shipping options and conditions that will be displayed to customers at checkout. These conditions include carriers, delivery times, shipping costs, etc. The shipping policy is linked to the warehouse by the loading dock.\n\nThe [carrier](/en/docs/tutorials/carriers-on-vtex) delivering the order is defined via the shipping policy. First, carriers are added to the [shipping rate template](/en/docs/tutorials/shipping-rate-template), then the shipping rate template is associated when a shipping policy is created.\n\n#### Loading dock\n\nThe [loading dock](/en/docs/tutorials/loading-dock) is where items are distributed and shipped from and is the intermediate step between the warehouse and the carriers. The loading dock integrates the warehouse, sales channel, and shipping policy. Some use cases are:\n\n- Different distribution centers for a single warehouse.\n- Loading dock as a distribution center.\n- Loading dock and warehouse correspond to the same physical space.\n\nFor certain products, you may not need a physical distribution center. Even so, configuring the loading dock is essential for the proper functioning of the VTEX platform's operations.\n\n#### Warehouse\n\nThe logistics route starts with the [warehouse](/en/docs/tutorials/warehouse). It corresponds to the physical storage space for the products the store sells. Once the items sold are picked from the warehouse, they are sent to the loading dock.\n\n### Inventory management\n\nStore [inventory](/en/docs/tutorials/managing-stock-items) corresponds to the stored items available for sale. Warehouse is the identification of the physical location of storage location, while inventory is the set of SKUs in stock that are available for sale.\n\n> ❗ On VTEX, the store must manage inventory updates after selling items. Thus, after a sale, the merchant ensures proper control of the remaining items and invoice operations with ERP. Information on inventory import via the back office can be found in the [Backend integrations](/en/docs/tracks/backend-integrations) article.\n\n### Lead time\n\nIn the VTEX Admin, under __Catalog > Inventory > Inventory Management__, existe you can configure the [Lead time](/en/docs/tutorials/lead-time-shipping-time-at-sku-level), an optional setting that allows you to assign a shipping time at SKU level. Configuring the lead time means adding a period of time to the order shipping [calculation](#order-shipping-calculation) which is strategic in some contexts.\n\nThe [main use cases](/en/docs/tutorials/lead-time-shipping-time-at-sku-level#main-use-cases), include products from external suppliers, _dropshipping_ scenarios, and the sale of custom items. Having the option to configure the lead time means having more flexibility to set deadlines for handling and shipping products by third parties.\n\n### Order shipping calculation\n\nThe VTEX platform considers the following settings to [calculate the order shipping time](/en/docs/tutorials/how-shipping-calculation-works):\n\n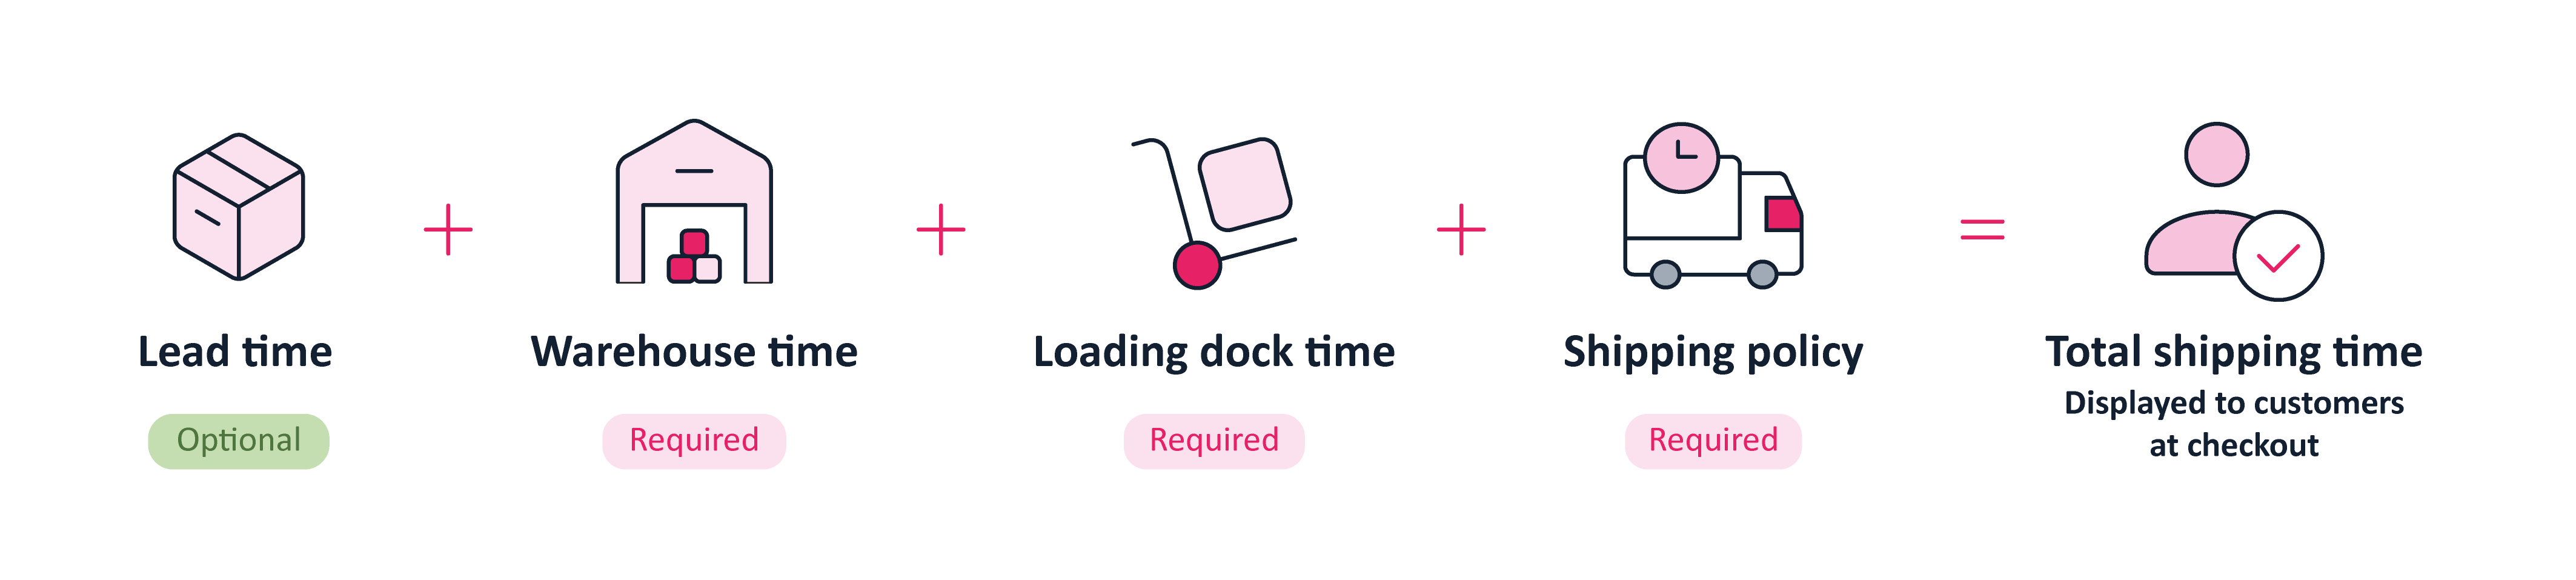\n\n- [Lead time](/en/docs/tutorials/lead-time-shipping-time-at-sku-level): Configurable amount of time for an SKU in stock. This configuration is optional and is set to zero days by default.\n- [Warehouse time](/en/docs/tutorials/managing-warehouses): time it takes for an SKU to move from a warehouse to a [loading dock](/en/docs/tutorials/loading-dock). This configuration is required, but you can set the time to zero.\n- [Loading dock time](/en/docs/tutorials/managing-loading-docks): time it takes for an SKU to leave the dock and be shipped to the customer. This configuration is required, but you can set the time to zero.\n- [Shipping policy](/en/docs/tutorials/shipping-policy): groups together the shipping rules and conditions displayed to customers at checkout, including carriers, shipping costs, carrier business hours, delivery windows, and delivery capacity.\n\nThe [shipping simulator](/en/docs/tutorials/shipping-simulation) allows merchants to simulate and analyze the delivery options available for an order in a given location. The simulation checks the viability and shipping conditions of the order, such as item availability, shipping methods, costs, and shipping time.\n\n### Logistics optional settings\n\nTo serve different business models, the VTEX platform offers many optional settings, as shown in the table below:\n\n| **Feature** | **Description** |\n| :---: | :--- |\n| Pickup points | [Pickup points](/en/docs/tutorials/pickup-points) are physical locations set up by the store for customers to pick up their orders. Setting up pickup points is interesting for omnichannel operations, especially when there are many physical stores, as each can be used as a pickup option for customers, increasing the flexibility of your logistics network. |\n| Holidays | [Holidays](/en/docs/tutorials/registering-holidays) is a feature that allows the store to set up days that are not valid for shipping, which will be considered when calculating the order's shipping time. |\n| Reservation | [Reservation](/en/docs/tutorials/how-does-reservation-work) is a solution that prevents the same item from being sold more than once. When the customer only adds the product to the cart, this does not generate a reservation; your priority over the item only occurs once the order has been placed. |\n| Delivery capacity | [Delivery capacity](/en/docs/tutorials/scheduled-delivery#delivery-capacity) is the limit of shipments that can be made by the store in a given period. Being able to delimit the number of items or orders that can be shipped in each shipping window means having more control over order handling and increasing the chances of fulfilling the delivery agreement made with the customer at checkout. |\n| Geolocation | [Geolocation](/en/docs/tutorials/registering-geolocation) involves adding delivery locations based on the latitude and longitude of addresses. This feature is often used for addresses in rural and industrial areas, which are divided into lots or risk areas, and when it's necessary to remove certain delivery locations within a region. |\n\nFor more information on logistics concepts on VTEX, read the [Logistics Glossary](/en/docs/tutorials/logistics-glossary) article. For developer content on the [Logistics API](https://developers.vtex.com/docs/api-reference/logistics-api#overview), read the [Fulfillment and Logistics](https://developers.vtex.com/docs/guides/fulfillment) article."}