{"section":"tracks","requestedLocale":"en","requestedSlug":"configuring-event","locale":"en","slug":"configuring-event","path":"docs/en/tracks/omnichannel/vtex-live-shopping-getting-started/configuring-event.md","branch":"main","content":"In the VTEX Admin, when you go to **Apps > Live Shopping**, or type **Live Shopping** in the search bar at the top of the page and click the arrow icon of a [created event](https://help.vtex.com/docs/tracks/creating-event), you access its **Event Information** page. Under the **Manage** tab, you'll find the following setup options, divided by page section:\n\n* [Layout type - Configuring the style](#layout-type-configuring-the-style)\n* [Chat - Configuring the administrator name](#chat-configuring-the-administrator-name)\n* [Promotions - Configuring coupons and promotions](#promotions-configuring-coupons-and-promotions)\n* [Settings - Configuring features](#settings-configuring-features)\n* [Product Highlight - Configuring collection display](#product-highlight-configuring-collection-display)\n* [CMS Configuration - Configuring content presentation](#cms-configuration-configuring-content-presentation)\n\n> ⚠️ This article describes the main settings for an event. It doesn't cover all sections of the **Event Information** page. For more information, see [Live Shopping: Events article](/en/docs/tutorials/live-shopping-events).\n\n## Layout type - Configuring the style\n\nThe layout defines the screen format seen by customers during the event transmission; therefore, it determines the event recording format.\n\n> ❗ The broadcasting studio uses the layout of the first person who enters it. You must set up the event layout before entering the streaming studio. Even though you can change the layout through the VTEX Admin later, you can't change it within the streaming studio.\n\n### Screen format\n\nIn the **Layout Type** section, you can choose the desired layout format for broadcasting the event from the following:\n\n* **Landscape (16:9):** Provides a horizontal view of the transmission, optimized for desktop screens.\n* **Portrait (9:16):** Provides a vertical view of the transmission, optimized for mobile screens.\n\n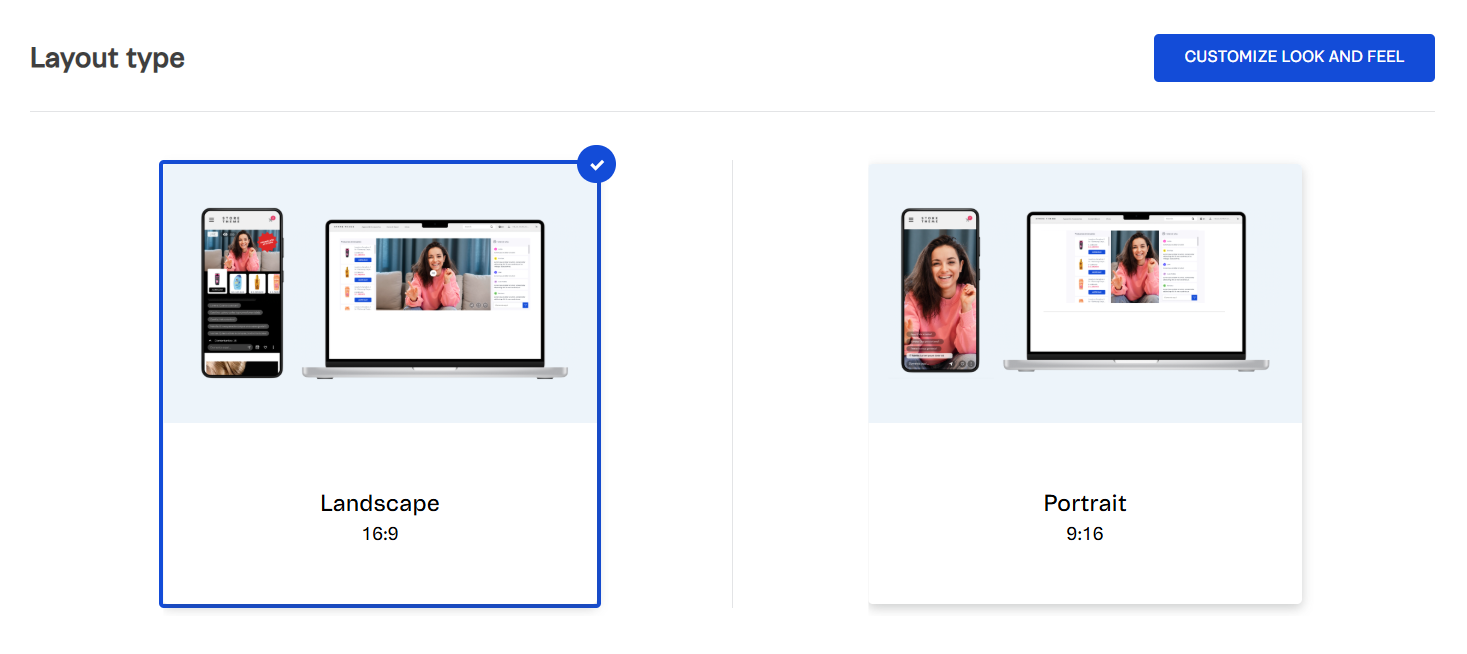\n\nThe screen format is **Landscape (16:9)** by default, but you can change it by clicking the **Portrait (9:16)** view. The blue checkmark indicates the selected option.\n\n> ℹ️ Note that once the transmission using Bundle studio starts, the screen layout can't be changed anymore. To change it, you would need to create a new event.\n\n### Style customization\n\nBy default, an event has a neutral visual style that is suitable for stores and doesn’t affect brand image. However, if you want, you can customize the following styles:\n\n* Text font\n* Colors\n* Product cards\n* Product price\n* Add to cart button\n* Featured product\n* Product section title\n* Chat title\n* Send message button\n\n> ℹ️ The customizations above are made by clicking the **Customize the look and feel** button and completing the Look and Feel page to align with your preferences. For complete instructions, check [Live Shopping: Events](/en/docs/tutorials/live-shopping-events).\n\n## Chat - Configuring the administrator name\n\nThe **Chat** section is where you manage the live chat during your event. If you want to configure a specific name to identify the administrator sending messages, follow the steps below:\n\n1. In the **Chat** section, click the profile icon.\n2. In the **Store Information** window, enter the desired administrator name in the box.\n3. Click `Confirm`.\n\n> ℹ️ To learn how to pin messages, block users, delete messages, and perform other actions in the event chat, check [Live Shopping: Events](/en/docs/tutorials/live-shopping-events).\n\n## Promotions - Configuring coupons and promotions\n\nIn this section, you can configure coupons and promotions based on event viewers or likes, for example. The available options will be those previously configured in the [Promotions](https://help.vtex.com/en/docs/tutorials/creating-promotions) module.\n\nTo offer a promotion during your **Live Shopping** event, follow the steps below:\n\n1. In the **Promotions** section, click `New promotion`.\n2. Select a promotion option using the dropdown menu.\n3. Choose a variable:\n\n * Likes\n * Comments\n * Viewers\n * Orders\n\n4. In the **Goal** field, enter the condition the audience must meet to activate the coupon or promotion. This information isn't visible to the public and is limited to 20 characters. See below an example for each variable:\n\n * **Likes:** Reach 100 like reactions.\n * **Comments:** Get 150 comments.\n * **Viewers:** Gather an audience of over 200 people.\n * **Orders:** Receive the first 100 orders.\n\n >⚠️ Coupons become active immediately once the goal is met. Promotions activate five minutes after the goal is met.\n\n5. In the **Display message** field, enter the text to be shown to your audience about the goal to unlock the promotion or coupon. Limited to 20 characters. For example, `40% off`.\n6. Select an animation to display the promotion or coupon during the event.\n7. Click `Save`.\n\nOnce a promotion has been created, it will be displayed in a table with the following columns:\n\n* **State:** Allows activating or deactivating the promotion by switching the toggle. Although promotions or coupons are automatically activated when the audience meets the goal, you can manage their activation status during the event.\n* **Promotion:** Name that identifies the promotion.\n* **Variable:** What the promotion is based on, which can be `Likes`, `Comments`, `Viewers` or `Orders`.\n* **Goal:** Variable value that, once achieved, triggers the promotion activation.\n* **Actions:** Allows editing or deleting the promotion. All promotion settings can be edited. Deleting removes the promotion only this event’s configuration, not from the **Promotions** module.\n\n## Settings - Configuring features\n\nIn the **Settings** section, you can enable or disable the following event features:\n\n| **Topic** | **Feature** |\n| :---: | :--- |\n| Chat | - **Email required:** By default, to allow the audience to participate in the live event chat, only their name is required. When you enable this field, they also have to provide an email address.
- **Enable email sending:** When this field is enabled, if the audience asks a question and the administrator responds through the chat, an email notification is sent to the user with the response. This helps maintain the interaction with the end user outside the chat.
|\n| Player | - **Viewer visibility:** Displays the number of viewers currently watching the live stream event. This number isn’t cumulative.
- **Popup transmission:** Allows displaying the entire Live Shopping component (chat, player, and product sidebar) in a popup format, drawing the full attention of the audience while they’re watching the event. The audience can close the popup anytime by clicking the X in the corner to return to the normal format.
|\n| Products | - **Apply tax:** Allows applying taxes to products showcased during the live event. When this option is enabled, the module **Promotions > Surcharges** will display the product price along with the applicable tax.
|\n\n## Product Highlight - Configuring collection display\n\nThe **Product Highlight** section is where you manage highlighting products during the event. The products displayed belong to the collection you selected when [creating the event](https://help.vtex.com/en/docs/tracks/creating-event), or to the collection you add or update before or during the stream.\n\n>⚠️ To ensure your collection appears correctly in a **Live Shopping** event, we recommend creating it at least a few hours in advance. This allows the platform enough time to index the information. Otherwise, the page may be cached during the event, which could prevent the collection from displaying properly.\n\nTo highlight a product, activate the toggle switch in the **Actions** column. You can choose two products at a time. Once selected, the product will display above the column names.\n\n## CMS Configuration - Configuring content presentation\n\nIn the **CMS Configuration** section, you can set up how the content will be presented during the event. The existing functionalities are the following:\n\n* **Sidebar products:** Displays a sidebar that showcases a collection of products alongside the video player. The products are shown vertically on the left side of the player.\n* **Product carousel:** Displays a carousel with a collection of products in a landscape view under the video player during the live event.\n* **Chat:** Enables your audience to interact via chat during the live event. Note that if the chat is hidden, the question option will also be hidden, as this functionality is displayed above the chat.\n* **Like:** Allows users to react during the live event using the heart-shaped like button.\n\n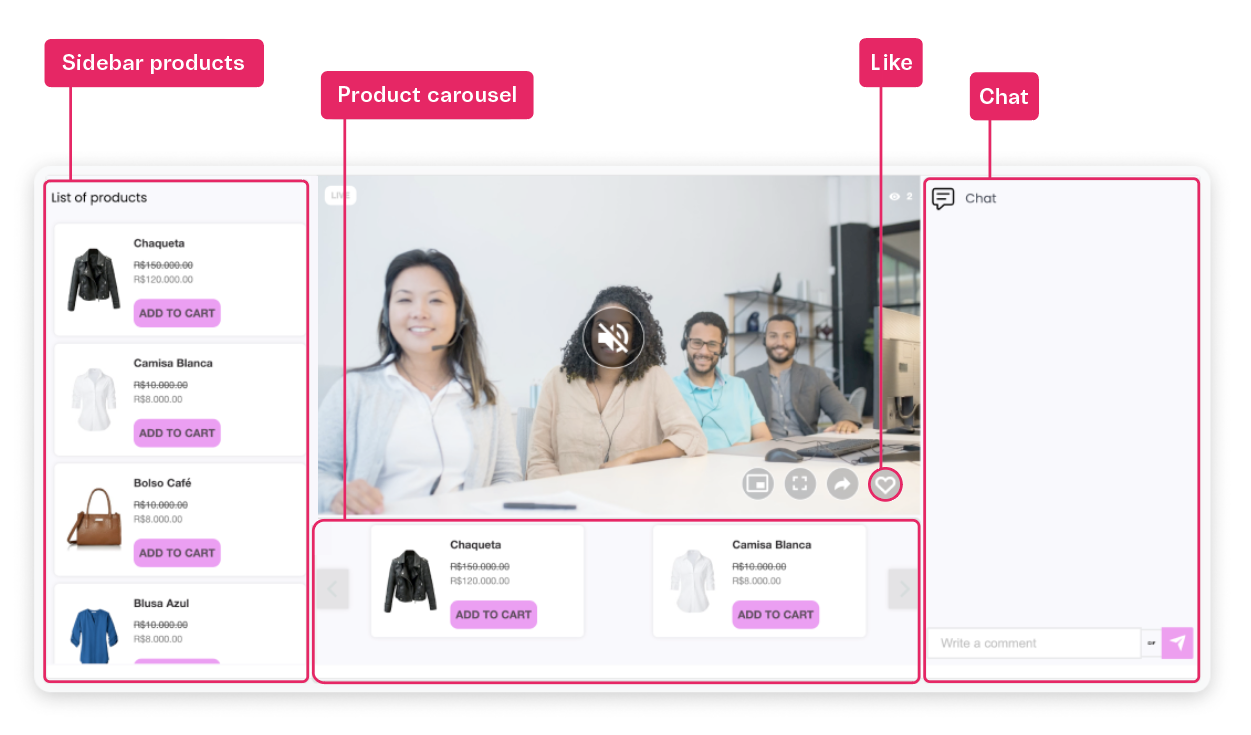\n\n* **Checkout cart:** Provides an `Add to cart` button that, when clicked by your audience, opens the checkout with the product added to the customer shopping cart in a new tab. The picture-in-picture (PiP) mode will also be activated, allowing the customer to continue watching the live stream while completing the purchase.\n* **Quick view:** Allows your audience to view the live event while seeing product variations. When the customer clicks the `Add to cart` button, a quick product view opens up without hiding the event transmission. This allows the customer to choose the size and color of a product, for example, while still watching the event.\n * If this option is disabled, when the customer clicks `Add to cart`, a new tab with the Product Details Page (PDP) opens and the PiP mode automatically activates so that the customer keeps watching the live stream.\n* **Infinite scroll:** Implements an infinite scroll for the sidebar products option that automatically scrolls every N seconds, so that your audience can view all the products without any additional action.\n * The automatic scroll speed is set to 10 seconds by default, but you can change it by entering the desired number in the field. We recommend configuring within 3 to 100 seconds.\n\n> ℹ️ All the functionalities above are enabled by default, except **Product carousel** and **Checkout cart**.\n\n### Script for template\n\nTo embed the live-streaming app in your storefront with your preferences, you can use the HTML tag found under the **Script for template** field. You must choose one of the following options:\n\n* **CMS template:** For stores using CMS Portal (Legacy).\n* **External template:** For external stores.\n\n### Preview\n\nTo have a preview of the event, in **Event Information > CMS Configuration**, click the `Preview` button. A new tab will open and play the event as your audience will view it. This simulation helps validate everything is working properly by displaying elements such as:\n\n* Chat\n* Player\n* Product sidebar\n* Product highlights\n\n> ❗ We highly recommend doing additional checks on the entire website to ensure everything is working properly. The **Preview** checks only certain **Live Shopping** components."}