{"section":"tutorials","requestedLocale":"en","requestedSlug":"managing-url-redirects","locale":"en","slug":"managing-url-redirects","path":"docs/en/tutorials/storefront/pages/managing-url-redirects.md","branch":"main","content":"**Redirects** is a feature that redirects the customer to any other internal or external page. It is done in the search area using selected terms or filters.\n\n> ⚠️ **Stores using Store Framework**: This functionality is available natively. **Stores using FastStore**: - Refer to the guide [Managing URLs with redirects and rewrite paths](https://developers.vtex.com/docs/guides/faststore/routing-managing-urls-with-redirects-and-rewrite-paths) to manage redirects.
- For projects with more than 1,024 redirects, enable the beta flow by activating the `enableRedirects` flag to use the Redirects feature in the Admin. Learn more at [(Beta) Enabling redirects using the enableRedirects flag](https://developers.vtex.com/docs/guides/faststore/routing-managing-urls-with-redirects-and-rewrite-paths#beta-enabling-redirects-using-the-enableredirects-flag).
\n\n## Before you begin\n\nTo create, edit, or remove redirects, the Admin user must have a role that has the [License Manager](/en/docs/tutorials/license-manager-resources) **CMS Settings** resource. \n\nYou can grant the user a role with the resource by following the instructions in the [How to manage users](/en/docs/tutorials/managing-admin-users#editing-users) article or create a new role including the resource by following the instructions in the [Roles](/en/docs/tutorials/roles#creating-a-role) article.\n\n## Creating redirects\n\nMultiple redirects are possible in a single URL. To create a redirect, follow the instructions below. \n\n1. In the VTEX Admin, click **Storefront** > **Redirects**.\n2. Click `New Redirect`.\n3. Fill in the following fields: \n- **From**: Enter the page URL from which you want to redirect visitors. The URL should not contain the domain name, for example: `/mask-regenerator-marine-algae/p`.\n- **To**: Enter the page URL to which you want visitors to be redirected. The URL must not contain the domain name, for example: `/conditioner-ultra-hydrating-milk conditioner/p`. \n\n> ⚠️ QueryString parameters (e.g., `?key=value`) are not forwarded in redirects by default.\n\n4. In the checkbox, indicate whether this redirect is temporary or permanent. If it is temporary, you need to set an end date.\n5. Click `Save`.\n\n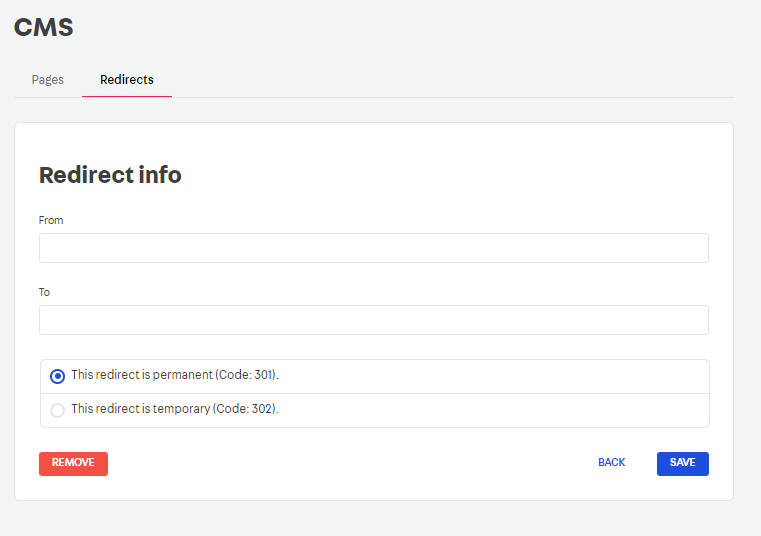\n\n## Importing redirects\n\nFollow the steps below to import a redirect.\n\n1. Click `Import`.\n2. Choose a CSV file from your computer, making sure that the separator is a semicolon (`;`).\n3. Click `Import File`.\n4. Click `Save`.\n\n> ⚠️ Please note that some editors can automatically change the separator. Therefore, before importing a file, make sure that it is correctly formatted as CSV and that it uses a semicolon (`;`) as the value separator. Files containing other separators, such as comma (`,`) or tab (` `), are not supported.
Some editors, such as Google Sheets, export CSV files using a comma (`,`) as the default separator and may not accept semicolons (`;`). In these cases, we recommend using other editors that allow you to replace separators or save the file using semicolons (`;`) as separators.\n\n## Exporting redirects \n\nIf you want to export your redirects, click `Export`, and they will be downloaded to your computer. \n\n> ℹ️ You cannot create redirects via predefined routes like \"home\", \"/\", \"login\", \"account\", etc. We recommend creating them manually by following the instructions mentioned above."}