{"section":"tutorials","requestedLocale":"en","requestedSlug":"how-to-create-a-product","locale":"en","slug":"how-to-create-a-product","path":"docs/en/tutorials/sellers/seller-portal/how-to-create-a-product.md","branch":"main","content":"On the **New product** page, you can create products and their SKUs quickly and simply in Seller Portal. To access it on VTEX Admin, go to **Catalog** > **Products** and click on the `Create product` button.\n\nTo create an active product, you need to keep the **Active** option selected in the upper right corner of the page. If you want to create an inactive product, click the button and note that the option will change to **Inactive**. You can activate it later via the product edit page or the product list.\n\nThe form to add a new product contains the following sections:\n\n* [Basic information](#basic-information)\n* [Operations and Logistics](#operations-and-logistics)\n* [Description](#description)\n* [Images](#images)\n* [Attributes](#attributes)\n* [SKU information](#sku-information)\n* [Specifications](#specifications)\n* [Variations](#variations)\n* [SEO](#seo)\n* [Storefront](#storefront)\n\n> ℹ️ Before creating a product, you must create the corresponding [Category](/en/docs/tutorials/registering-a-category) for the product, if it has not been previously registered in your store.\n\n## Basic information\n\nFill in some basic information to start selling your product.\n\n* **Product name:** write the name of the product. Use simple words, write in the language of your end customer and avoid complex sentences. This field is important for SEO and must not exceed the 150-character limit.This is a required field.\n* **Brand:** select a brand previously added to your store or create a new brand or create a new one by typing the brand name. This is a required field.\n* **Category:** select the category or subcategory related to the product from a tree with the ones already listed in your store. This is a required field.\n* **Reference code:** enter a unique reference code to help with the organization of your store.\n\n## Operations and logistics\n\nIn this section, you need to add at least one trade policy to apply to the product. You can also select a transportation strategy for it.\n\n* **Trade Policies:** select the trade policies you want to link with the product, to define on which marketplaces it will be available. This is a required field.\n* **Modal:** select the product's transportation strategy.\n\n## Description\n\nIn this step, you must write a description with the main information related to the product. The text should contain a clear and simple product description. This is a rich text editor, which means that you can use several formatting features using the toolbar, as illustrated below.\n\n\n\nHere are the features available:\n\n* **Styles:** define the style of the text. The options are **Normal** and **Titles 1** to **6**. \n* **Font size:** change the font size. You can choose a value from 10 to 36.\n* **Bold:** format the text in bold.\n* **Italic:** format the text in italics.\n* **Underline:** underline the selected text.\n* **Left align:** align the selection to the left.\n* **Center align:** center the text.\n* **Right align:** align the text to the right.\n* **Bulleted list:** convert the selection to a bulleted list.\n* **Numbered list:** convert the selection to a numbered list.\n* **Insert link:** insert a link in the selected text. Fill in the information below and click `Save`.\n * **Text:** edit the text that will contain the link.\n * **URL:** the web page the link will point to.\n * **Open in a new tab:** select it if you want the user to open the link in a new browser tab.\n* **Source code:** displays the source code for the description you have written, in HTML. You can edit the description directly in the source code. To switch back to the previous view, click the source code button again.\n\n## Images\n\nTo add images to the product, follow the instructions below:\n\n1. Click on the `Add images` button or drop the images within the dotted line frame.\n2. Insert all product images, including their variations, such as color and size. Images must be in JPEG, PNG, or GIF format, up to 5 MB each.\n\n> ⚠️ We recommend using images of at least 600 x 600 pixels, to ensure that they will be displayed properly in your store.\n\nTo rearrange the images and change their display order on the product page, you can click on an image and then drag and drop it to a certain position, as shown below.\n\n\n\nYou can change information by clicking the button in the row of each image, which opens a menu with the following options:\n\n* **Edit description:** change the description (Alt text) of the image. This information helps the visually impaired to interpret the images and is also relevant for SEO. After editing the description, save the changes.\n* **Delete:** delete the image. It will be removed from the product and all variations it is associated with. This is a permanent action and cannot be undone. You need to confirm the operation by clicking on the `Delete` button.\n\n## Attributes\n\nAttributes are complementary and optional information about your product. For example, a perfume’s attribute might indicate that its application type is spray.\n\nTo add a new attribute, click on `+ Add` and fill in the following fields:\n\n* **Attribute name:** enter the name of the attribute. For example, \"application type\".\n* **Content:** enter the value of the attribute. For example, \"spray\".\n\nTo add more attributes, click on `Add Attribute` and fill in the required fields.\n\nIn the Attributes dashboard, you can view the List of Attributes, which is a group of one or more attributes. By default, when you create the first attribute, it is associated with this group. However, if you wish, you can rename this group and add or delete other attribute groups. Here are the possible actions:\n\n* **button:**\n * **Rename:** rename the attribute group.\n * **Delete:** delete the attribute group and all attributes in it.\n* **+ Add group:** add a new attribute group.\n\nFor example, a cosmetic store could configure attribute groups of a perfume as shown below.\n\n* Group 1 - Scent\n 1. Olfactive family: floral, citrus\n 2. Intensity: moderate\n\n* Group 2 - Use\n 1. Fixation time: long\n 2. Application type: spray\n\n\n\nAfter you have made the desired changes in the attribute dashboard, save the information.\n\nTo edit an attribute, select it from the list. To delete an attribute, click the icon. If you delete an attribute from a group that only has one listed attribute, the group will also be removed.\n\n## SKU information\n\nEach product must have at least one [SKU](/en/docs/tutorials/what-is-an-sku) added. If your product has no variations and you want to create **only one SKU** associated with it, fill in the information below:\n\n* **SKU Reference code**: unique reference code created to improve the store's organization. This is not a required field.\n* **EAN/UPC**: unique SKU identification code (barcode), composed of up to 13 numeric characters.\n* **Package dimensions:**\n * **Weight:** the field to enter the weight of the package, in kilograms. This is a required field.\n * **Width:** the field to enter the width of the package, in centimeters. This is a required field.\n * **Height:** the field to enter the height of the package, in centimeters. This is a required field.\n * **Length:** the field to enter the length of the package, in centimeters. This is a required field.\n\n If you want to create **more than one SKU** according to your product's variations, click on the `+ Add variations` button.\n\n> ⚠️ Clicking on `+ Add variations` will delete the data you have entered in the **SKU information fields**.\n\nWhat differentiates one SKU or product variation from another is the many possible combinations of specifications. For example, you add _a pair of sneakers_ and configure its _color_ specification with the _pink_ and _blue_ options and its _size_ specification with the sizes _7_ and _8_. This product's SKUs will be the combinations of the previous options: _pink sneakers size 7_, _pink sneakers size 8, blue sneakers size 7,_ and _blue sneakers size 8_.\n\nSpecifications are prerequisites for distinguishing SKUs, so clicking on the `+ Add variations` button will open a modal window where you can **[create specifications](#creating-specifications)**.\n\n## Creating specifications\n\nTo create a product specification, you must fill in the following information:\n\n* **Specification name**: write the name of the specification you want to create. For example, color and size.\n* **Options:** define the possible options related to this specification. For example, pink. In this field, you must enter the options you want to include and type the option name, press `enter` or click on **Create “option name” +** to proceed and create other options.\n\nIf you want to create more specifications, click on the `+ Add specification` button and fill in the new fields.\n\nAfter configuring the specifications, click on the `Create` button.\n\nThe specifications you’ve created and their respective options will be listed in the **[Specifications](#specifications)** section and can be edited later.\n\nBy combining these different options, the system automatically generates a list of SKUs and displays it in the **[Variations](#variations)** section.\n\n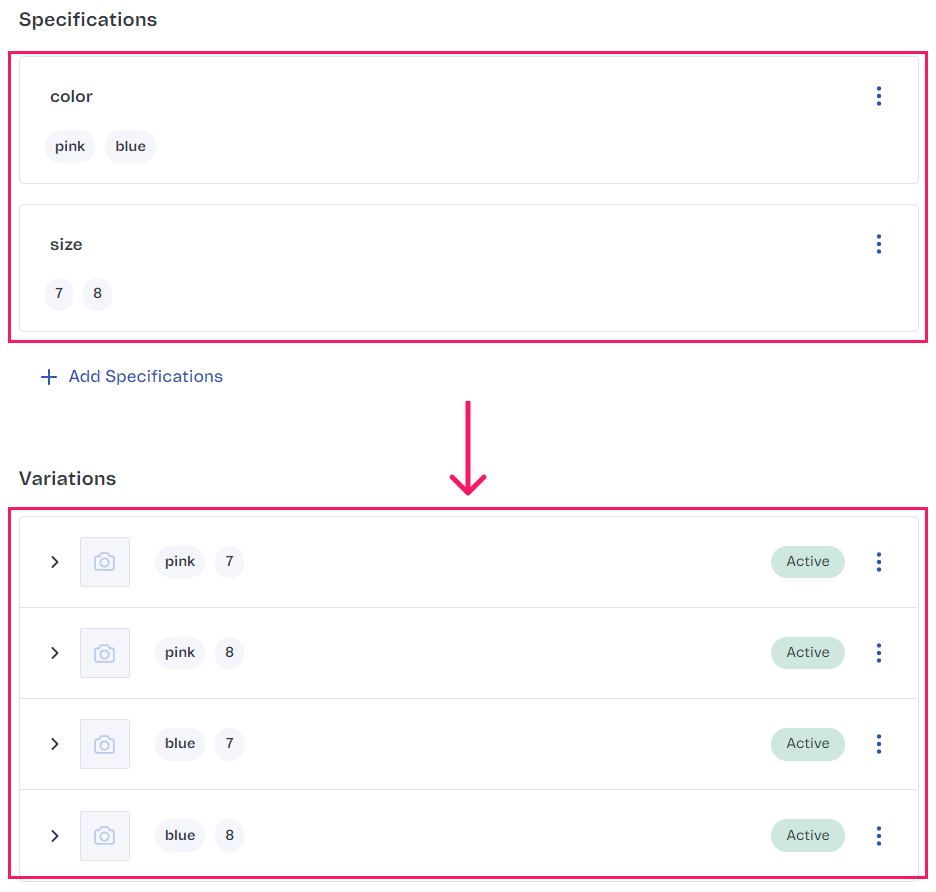\n\n## Specifications\n\nIn this section, you can find the specifications you’ve created and the options associated with them.\n\nYou can edit the specification info by clicking on the button on each row.\n\n> ℹ️ Once you have configured product specifications, you cannot delete a specification or add a new one. While editing, you can only add new values to the existing specification.\n\nYou can also click on the `+ Add specifications` button to include more specifications.\n\nWhen you edit, delete, or add specifications on this page, the system automatically updates product variations according to the new configuration.\n\n## Variations\n\nIn this section, you can see a list of all product variations (SKUs) automatically generated from the specifications and options you have created.\n\nTo fill in the information for each variation, click on the arrow (**>**) or the row of the variation you want to edit. The fields included in the [SKU information](#sku-information) section will be displayed for each variation you have created.\n\nBy clicking the arrow (>), you can view and edit the **Variation Name** and other [information corresponding to the variation](#sku-information). By clicking the `Advanced Editing` button, you can access the product variations advanced [editing dashboard](#advanced-editing).\n\nBy clicking on the button, you can perform the following actions:\n\n* **Edit:** change the variation information in the **Advanced editing** window.\n* **Edit images:** access the image editing dashboard, which opens the actions listed below. After you have made the desired changes, click on `Save`.\n * **Select images:** select images corresponding to the variation. To select an image, just click on it. If you want to select all images at once, use the keyboard shortcut `Ctrl` + `A`.\n * **Apply to multiple variations:** you can add the selected images to multiple variations. To do so, click on `Apply to multiple variations +` and select the values of the specifications your image relates to. For example, for an image of beige sneakers, you should select the `beige` option from the `color` specification. The image will then apply to all variations whose `color` specification has the value `beige`, regardless of any other specifications you have set. \n\n\n\n * **Add images:** on this page, you can also upload new images by clicking on the `Add images` button or by dropping image files into the dotted space.\n* **Deactivate:** deactivate the SKU.\n\n> ⚠️ If you add specifications after configuring the variations, the system will recalculate all variations and redefine their fields.\n\n### Advanced Editing\n\nYou can view and edit all information and images related to each product variation in the variations advanced editing dashboard, illustrated below.\n\n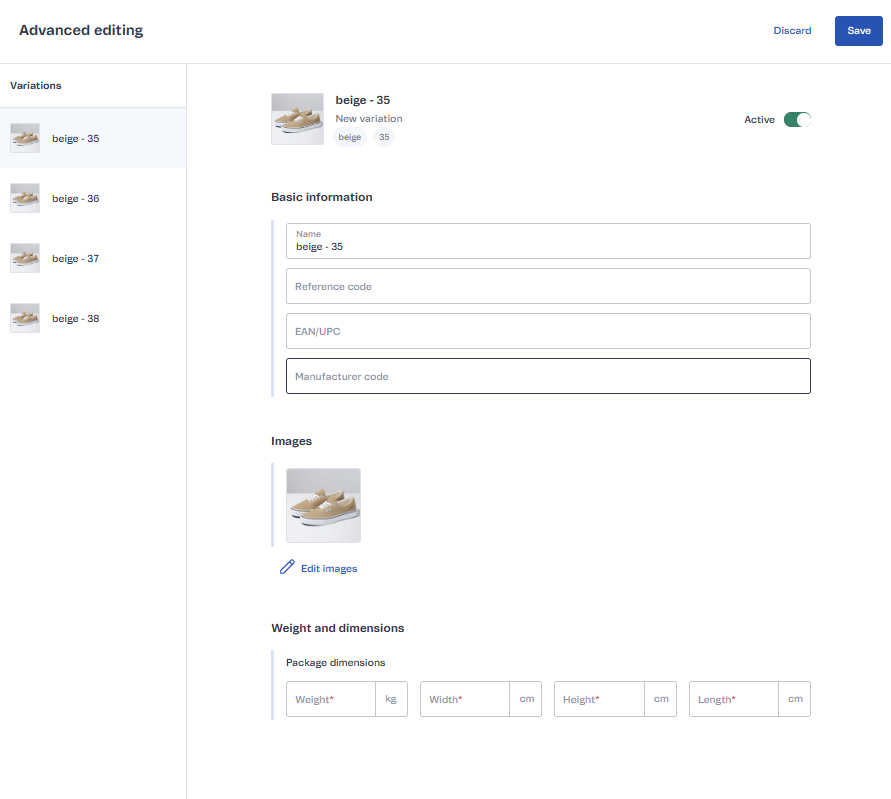\n\nIn the **Variations** section on the left side of the dashboard, you will find the list of variations of your product. To edit a specific variation, click on it.\n\nTo make the selected variation available in your store, keep the **Active** option selected in the upper right corner of the page. If you want to disable the variation, click the button and the option will change to **Inactive**.\n\n### Bulk edit\nTo edit a large number of variations at once, you can use the Bulk edit feature by following the steps below.\n\n1. Click on the `Bulk editing` button to open the variation editing spreadsheet.\n2. To edit information, double-click on the field you want to change.\n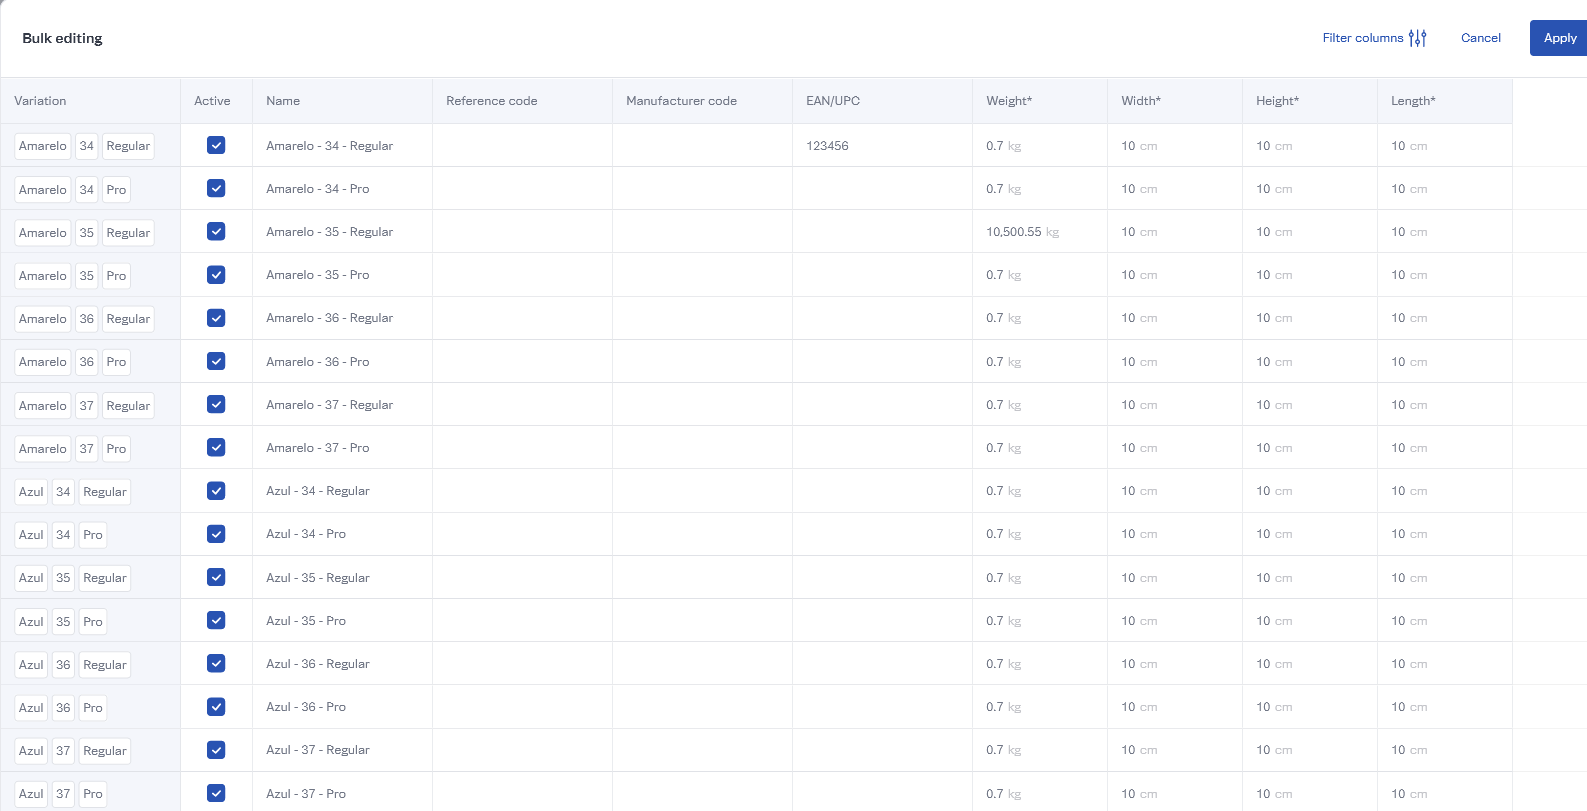\n\nYou can edit the following information:\n- **Active:** whether the variation is active or not.\n- **Name:** name of the variation.\n- **Reference code:** unique reference code created to improve store organization. \n- **Manufacturer code:** manufacturer code for the variation. \n- **EAN/UPC:** unique SKU identification code (barcode). Supports up to 13 numeric characters.\n- **Weight:** the weight of the package, in kilograms.\n- **Width:** the width of the package, in centimeters.\n- **Height:** the height of the package, in centimeters.\n- **Length:** the length of the package, in centimeters.\n\nTo filter the columns displayed in the spreadsheet, click on `Filter columns` and select the columns you want to hide.\n\nYou can replicate information from one cell to other rows and columns. To do this, click on the blue square in the lower right corner of the cell and drag to the cells where you want to automatically replicate the value, as shown in the image below.\n\n3. After editing, click on `Apply` to save the changes.\n\n## SEO\n\nThe way you fill in the fields in this section affects how the product will be ranked in search engines, such as Google.\n\n* **Product URL:** customize the URL by which the product can be accessed in your store. Do not use spaces or special characters in this field. If the URL has more than one word, separate them with a `-`. This is a required field.\n* **Page title:** write the title of the product page. To optimize your product's ranking in search results, it should not exceed 60 characters. This is a required field.\n* **Meta description:** write the product description that will be displayed in search engines. Google only shows the first 160 characters of this description.\n\nBy filling out the SEO fields, a preview of your product in Google's results will be displayed. See an example in the image below.\n\n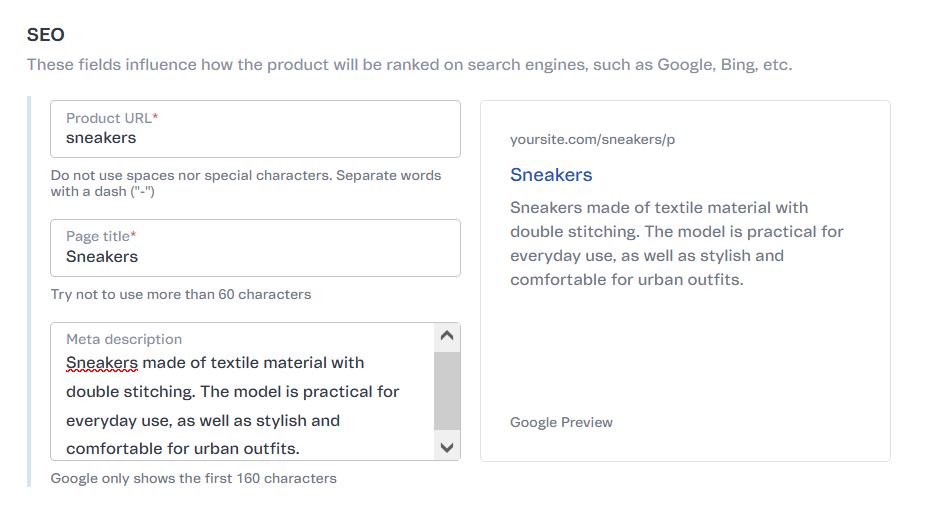\n\n## Storefront\n\nIn this section you can configure whether the product will appear in your store through the following options:\n\n* **Visibility**\n * **Show on site:** toggle button to enable or disable the product display on the store. If the product is a giveaway that cannot be purchased, you must disable this option.\n * **Show when out of stock:** toggle button to enable this function. If this function is enabled, the out-of-stock product will appear in your store with a Notify Me option, in which customers enter their email to be notified when the product is back in stock. If this function is disabled, the out-of-stock product will not be displayed in the store."}