The Anti-fraud Provider Protocol is the integration protocol between VTEX and companies that provide anti-fraud services.
Through it, VTEX offers a public contract available to all providers that wish to integrate into our platform. As a result, providers become more autonomous regarding such integration.
The protocol has the following features:
- Processing of synchronous and asynchronous risk analysis.
- Webhook for status notification.
Concepts
Provider: system or provider that offers the anti-fraud risk analysis service.
Anti-fraud Provider Protocol: integration protocol developed by VTEX.
Connector: name of the integration partner provider.
Implementation prerequisites
1. Business partnership agreement
To make your anti-fraud service available at VTEX, you must sign a partnership agreement that is specific to financial services covering the details of this subject and platform regulations. If you do not have a partnership agreement yet but are interested in becoming a payment provider, contact our team through our website.
2. Access to a VTEX environment
After obtaining a business partnership agreement with VTEX, you will receive all information to access the VTEX environment, where you can publish, homologate, update, and have access to our support when developing and maintaining a connector.
If the partner is a SI (Service Implementer) developing integrations for clients or other payment providers, the VTEX account of the main provider must be used and not the account of the contractor agency.
Integration steps
1. Implementing the protocol
Before setting up the VTEX environment, the provider must implement the backend service required to process the anti-fraud services (API). For more information, access the Anti-fraud Provider Protocol API.
You can also access our template on GitHub to help you quickly develop your anti-fraud connector using the Anti-fraud Provider Protocol and VTEX IO.
2. Install the Anti-fraud Provider Tester App
After receiving the access data and deploying the backend, the provider can access the approval tool through VTEX Admin. If you still do not have the Anti-fraud Provider Tester App installed in your store, you need to follow these steps:
- In the VTEX Admin, go to Apps > Apps Store.
- Type Antifraud Provider in the search bar at the bottom of the page and click on
Install. - After that, you will be redirected to the VTEX APP Store. Click the
GET APPbutton at the top right corner of the page. - Then, on the popup screen, type your account's name (with lowercase and no space in between) and click the
CONFIRMbutton. - Click
INSTALLto complete the installation process.
With the app installed, go to Apps > Installed Apps and click on Antifraud Provider, or access https://{{AccountName}}.myvtex.com/admin/test-suite/antifraud-provider, replacing {{AccountName}} with the name of your platform account.
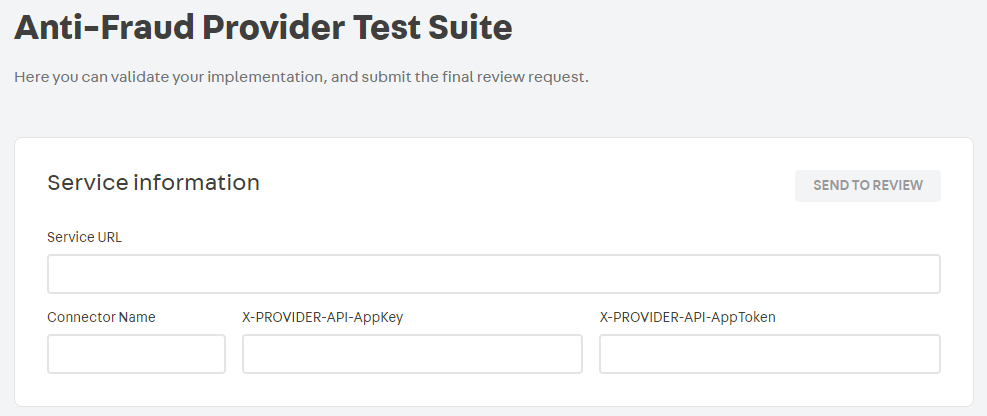
3. Initial settings
In the Anti-fraud Provider Tester app environment, fill in the fields as indicated below:
- Connector Name: name you want to give to your connector within VTEX.
- Service URL: URL of your provider service. This URL will be the base address of the protocol and must follow the format determined by it. For example, if the service URL is
http://10.10.10.10, the full URL for the endpoint transactions will behttp://10.10.10.10/transactions. - Application Key: "X-PROVIDER-API-AppKey" value of your provider's request header for testing purposes.
- Application Token: "X-PROVIDER-API-AppToken" value of your provider's request header for testing purposes.
It is important to remember that all HTTPS communication should run exclusively on TLS 1.2. Your provider must be prepared to receive two headers (X-PROVIDER-API-AppKey and X-PROVIDER-API-AppToken), as this combination is used to identify a merchant. All settings that need to be made by the merchant should persist in your provider. The only configuration that VTEX saves about merchants is the combination of X-PROVIDER-API-AppKey and X-PROVIDER-API-AppToken credentials.
After completing the fields correctly, the system will check the approved transactions through a call to the /transactions endpoint of your provider. See the API reference here.
4. Testing
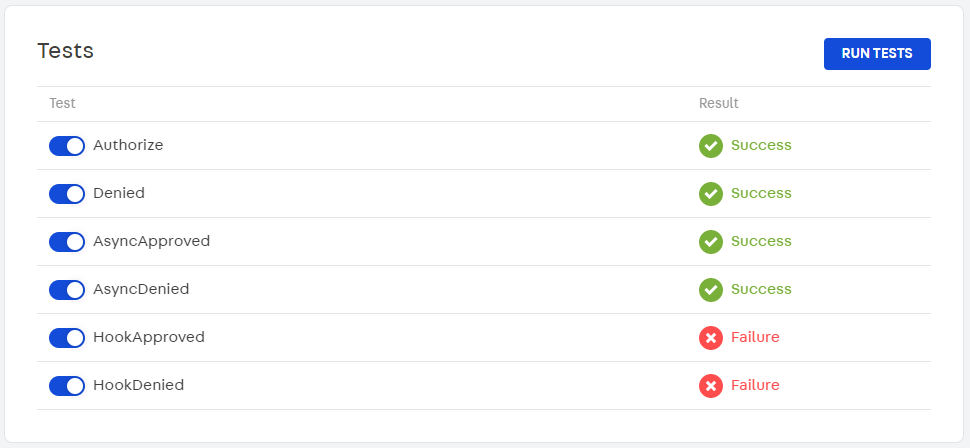
To ensure the correct operation of the anti-fraud, a series of tests are necessary. You can choose how many tests you want to run at a time. However, for your integration to be analyzed by the VTEX team, all tests must have been performed and approved. See below the description of each test:
-
Authorize: test performed in two steps.
- A Send Anti-fraud Data request (
{{ServiceURL}}/transactions) is sent. The expected value forstatusin the response body isreceived. - A Get Anti-fraud Status request (
{{ServiceURL}}/transactions/transactionId), with the Transaction ID generated in the previous step, is sent. The expected value forstatusin the response body isapproved.
- A Send Anti-fraud Data request (
-
Denied: test performed in two steps.
- A Send Anti-fraud Data request (
{{ServiceURL}}/transactions) is sent. The expected value forstatusin the response body isreceived. - A Get Anti-fraud Status request (
{{ServiceURL}}/transactions/transactionId), with the Transaction ID generated in the previous step, is sent. The expected value forstatusin the response body isdenied.
- A Send Anti-fraud Data request (
-
AsyncApproved: test performed in three steps.
- A Send Anti-fraud Data request (
{{ServiceURL}}/transactions) is sent. The expected value forstatusin the response body isreceived. - A Get Anti-fraud Status request (
{{ServiceURL}}/transactions/transactionId), with the Transaction ID generated in the previous step, is sent. The expected value forstatusin the response body isundefined. - After 10 seconds, a Get Anti-fraud Status request (
{{ServiceURL}}/transactions/transactionId), with the Transaction ID generated in the first step, is sent again. The expected value forstatusin the response body isapproved.
- A Send Anti-fraud Data request (
-
AsyncDenied: test performed in three steps.
- A Send Anti-fraud Data request (
{{ServiceURL}}/transactions) is sent. The expected value forstatusin the response body isreceived. - A Get Anti-fraud Status request (
{{ServiceURL}}/transactions/transactionId), with the Transaction ID generated in the previous step, is sent. The expected value forstatusin the response body isundefined. - After 10 seconds, a Get Anti-fraud Status request (
{{ServiceURL}}/transactions/transactionId), with the Transaction ID generated in the first step, is sent again. The expected value forstatusin the response body isdenied.
- A Send Anti-fraud Data request (
-
HookApproved: test performed in four steps.
- A Send Anti-fraud Data request (
{{ServiceURL}}/transactions) is sent. The expected value forstatusin the response body isreceived. - A Get Anti-fraud Status request (
{{ServiceURL}}/transactions/transactionId), with the Transaction ID generated in the previous step, is sent. The expected value forstatusin the response body isundefined. - Afterwards, 10 seconds is waited for the anti-fraud provider to POST the URL sent in the hook field of the first step (the POST content should contain the response obtained in that same step).
- A Get Anti-fraud Status request (
{{ServiceURL}}/transactions/transactionId), with the Transaction ID generated in the first step, is sent again. The expected value forstatusin the response body isapproved.
- A Send Anti-fraud Data request (
-
HookDenied: test performed in four steps.
- A Send Anti-fraud Data request (
{{ServiceURL}}/transactions) is sent. The expected value forstatusin the response body isreceived. - A Get Anti-fraud Status request (
{{ServiceURL}}/transactions/transactionId), with the Transaction ID generated in the previous step, is sent. The expected value forstatusin the response body isundefined. - Afterwards, 10 seconds is waited for the anti-fraud provider to POST the URL sent in the hook field of the first step (the POST content should contain the response obtained in that same step).
- A Get Anti-fraud Status request (
{{ServiceURL}}/transactions/transactionId), with the Transaction ID generated in the first step, is sent again. The expected value forstatusin the response body isdenied.
- A Send Anti-fraud Data request (
When you click the RUN TESTS button, the Anti-fraud Provider Tester App will apply the selected tests in your integration to the different possible scenarios. To run them your service must be in HTTPS.

For each Anti-fraud Provider Protocol test, we send a specific ID end to return the expected response. They are:
- Authorize: ID with end 1.
- Denied: ID with end 2.
- AsyncApproved: ID with end 3.
- AsyncDenied: ID with end 4.
- HookApproved: ID with end 5.
- HookDenied: ID with end 6.
5. Results
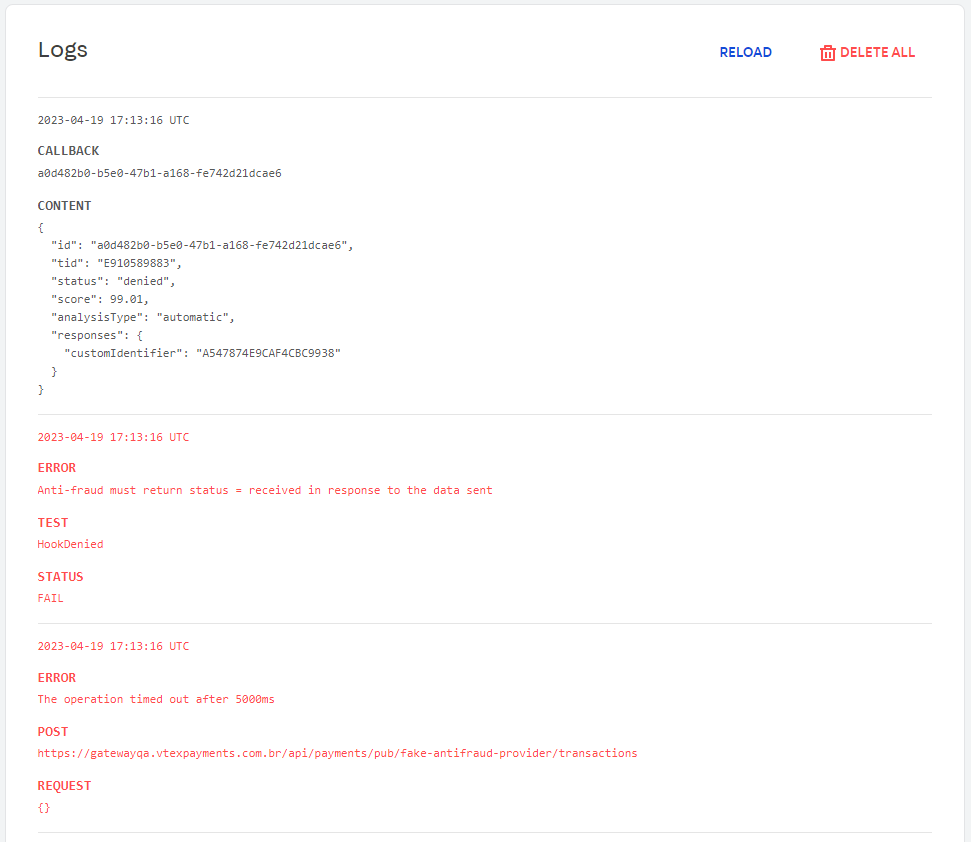
After executing the tests, all results (successes or failures) will be displayed in the app environment.
A list with detailed information about the events that occurred during the tests can be accessed by clicking on Show logs. This will allow identifying and correcting possible errors, in case of test failure.
- Connector Name: a description of the provider. Use max. 16 alphanumeric characters. This name can not be modified after being published.
- Partner contact: partner's email address. We will use this address to communicate changes and new features of our protocol.
- Production Service Provider Endpoint: the base path that will be used for API calls to the provider (e.g.,
https://vtex.pagseguro.com). It has to respond to the route{{serviceUrl}}/manifest. This endpoint must be publicly available. - Sandbox Service Provider Endpoint: the base path that will be used in test mode for API calls to the provider (e.g.,
https://sandboxserviceproviderendpoint.com). - Owner account: the VTEX account name which will be used in callback requests. This account must be available at {account}.myvtex.com.
- Allowed Accounts: describe which VTEX accounts from this provider will be available (all accounts or specific accounts).
- New Payment methods: inform if this connector supports a payment method that is not yet available in the VTEX Admin.
- New Payment method purchase flow: if a “New Payment method” is supported, inform whether it works with Redirect or Payment App. For more information, access Purchase Flows.
The SLA required for the VTEX payments team to carry out the homologation is 30 days.
VTEX Credentials
When calling CallbackURL, you must specify the authentication headers, which in VTEX are X-VTEX-API-AppKey and X-VTEX-API-AppToken. You can find these credentials in VTEX License Manager. These credentials are used by the Anti-fraud Provider only.
Use the https://{{AccountName}}.myvtex.com/admin/license-manager/#/home URL, replacing {{AccountName}} with your account name. Then follow the instructions of this tutorial to learn how to create appKeys and appTokens on our platform.
Settings in VTEX stores
Once the integration with your anti-fraud is approved, a connector will be made available for VTEX merchants to configure it on their respective stores. To do this, in addition to the contract with your company, the store will need two keys in hand: "X-PROVIDER-API-AppKey" and "X-PROVIDER-API-AppToken".
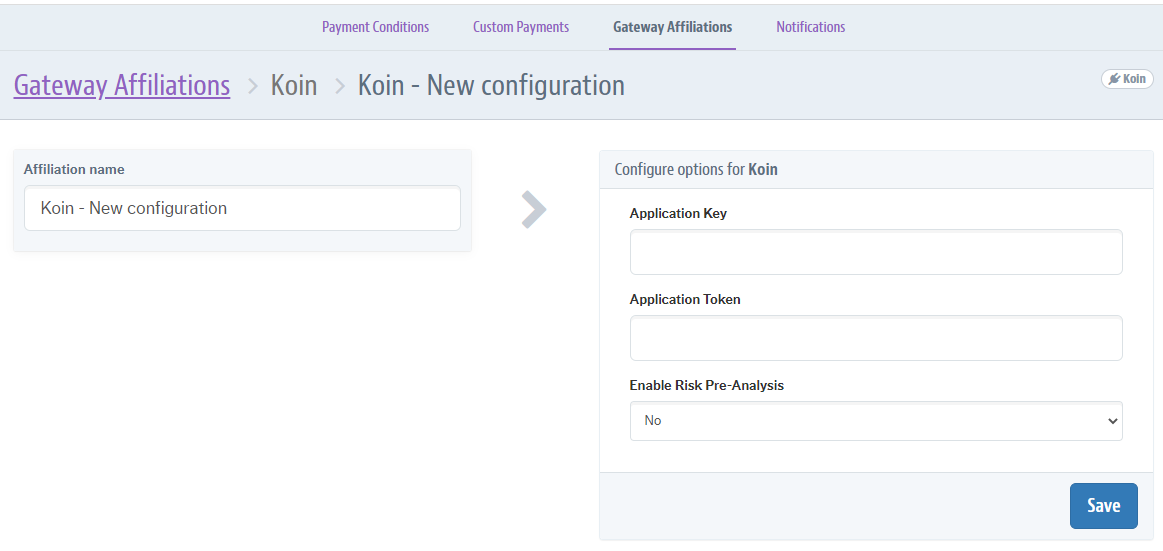
An example of how the anti-fraud settings screen will look for the VTEX store:
Cardholder Document Configuration
During payment transactions analysis, some anti-fraud providers may choose not to use additional information such as the cardholder’s personal identification. In these cases, the merchant has the autonomy to decide whether or not to request this document from his customer during the checkout procedure.
The configuration option Cardholder document field will only be available to the merchant if the anti-fraud provider declares in its manifest, the cardholder document field (
cardholderDocument) asoptional. Learn more at Cardholder Document Configuration.
To set up the cardholder document field, follow the steps below:
-
In the VTEX Admin, go to Store Settings > Payments > Settings, or type Settings in the search bar at the top of the page.
-
In the Gateway affiliations tab, click on the
+button. -
Select the anti-fraud provider you wish to use.
-
On the anti-fraud configuration screen, fill in the requested information.
-
In Cardholder document field, select one of the following options:
- Display as a required field: the field will be displayed at checkout with the information “required”, and the customer must fill in the cardholder information to complete the order.
- Display as an optional field: the field will be displayed at checkout with the information “optional”, and the customer will decide whether or not to fill in it. The order can be completed even if the field is not filled in.
- Hide Field: the field will not be displayed at checkout.
-
Click on Save.
After following the steps indicated, the settings made above may take up to 10 minutes to appear at your store's checkout.